UserForm in Excel revolutionizes how you interact with your spreadsheets, turning complex data input tasks into a streamlined, error-resistant process. This guide has equipped you with the knowledge to harness the full potential of UserForms, ensuring that your data collection is not only user-friendly but also impeccably organized and remarkably efficient. Embrace the sophistication of data entry UserForm in Excel and transform your data management practices into a seamless, intuitive, and highly productive part of your daily workflow.
UserForms in Excel is interactive interfaces that simplify data entry and improve the user experience. In this tutorial, we will guide you on how to create and use data entry UserForms in Excel. We will cover the basics of creating a Excel UserForm, adding different types of controls to it, programming the controls to respond to user input, and deploying the data entry UserForm in Excel workbook. By the end of this tutorial, you should be able to use data entry UserForms to create customized input forms that make data entry easier and more efficient.
This Tutorial Covers:
- What Is a UserForm Excel VBA
- How to create UserForm in Excel
- Insert VBA code to initialize the UserForm
- Insert VBA code for putting UserForm data into WorkSheet
- Add VBA code to clear UserForm
- Add VBA code to close UserForm Window
- Add VBA code to create a command button to open UserForm
- Test the Userform
- Things to Keep in Mind
1. What Is a UserForm Excel VBA?
A UserForm in Excel VBA is a customized graphical user interface (GUI) that allows users to interact with an Excel workbook through a variety of controls such as buttons, text boxes, checkboxes, drop-down lists, and more. The UserForm can be used to collect and display information, perform calculations, and execute other operations within an Excel workbook.
UserForms are created using Visual Basic for Applications (VBA), a programming language integrated with Microsoft Excel. With VBA, you can design and customize your UserForm to fit your specific needs and requirements. You can also program the controls on the UserForm to perform specific actions or calculations based on user input.
Overall, UserForms in Excel VBA provide a powerful and flexible way to create user-friendly interfaces that can enhance the functionality and usability of Excel workbooks.
2. How to create Data Entry UserForm in Excel?
The computer language Visual Basic for Applications (VBA), which is integrated with Microsoft Excel, is used to construct UserForms.
The steps to create a data entry form in Excel:
Step 1: To access the VBA window, press Alt+F11, then select “User Form” from the “Insert” menu.
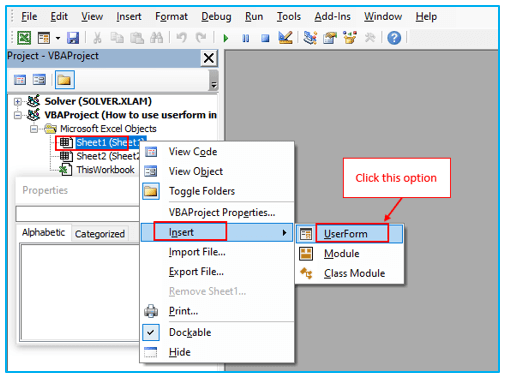
As a result, a blank UserForm with the name “UserForm1” will be created. As needed, we will now create a unique interface. Another pop-up window with the title “Toolbox” can be found there. All the buttons, lists, boxes, and other elements will be created from this point.

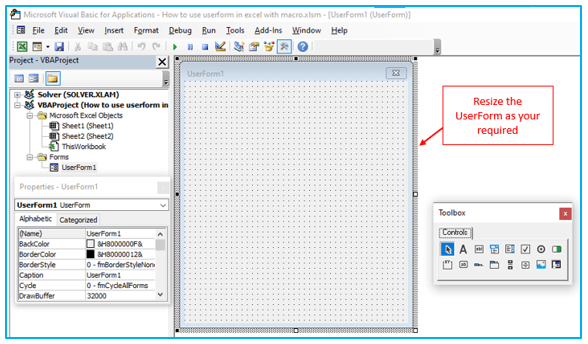
Step 2: You must first adjust the user form’s size to your needs. To resize, use the mouse to click and drag the right-bottom corner.
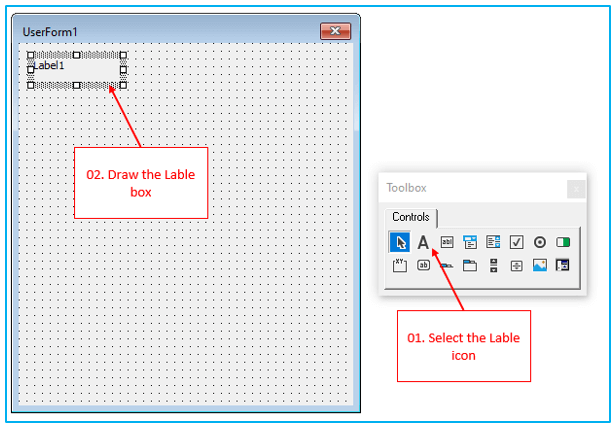
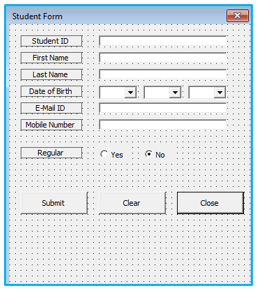
Step 3: We are currently starting to develop the UserForm’s unique user interface. A UserForm consists of two sections. First is the box’s name or label, which is called Label in the UserForm in Excel, and second are the boxes that will receive user input.
Click on the “Label” icon in the “Toolbox” to create a Label. Then, using mouse clicks, draw a box form in the UserForm. So, a Label box will be produced.
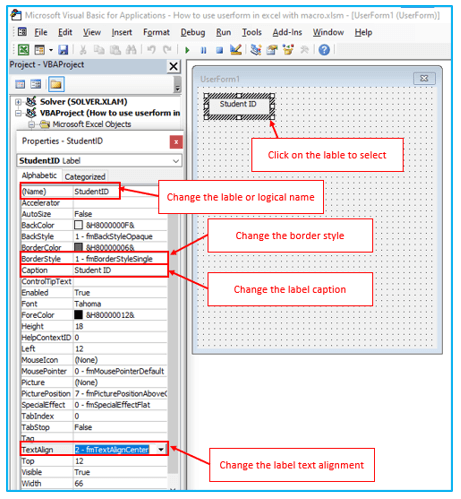
Step 4: Click on the “Label” to make changes. You’ll then see a window labeled “Property” open on the left side. Change the Label name in the “Name” field in the “Property” box. Because you must use this name to call it in the VBA code, it is very significant.
- To enclose the box with a border, choose “BorderStyle” = 1.
- Put “Student ID” in the “Caption” field. What you wish to display as the label is the caption.
- Adjust the centering “TextAlign” value, which is 2 now.
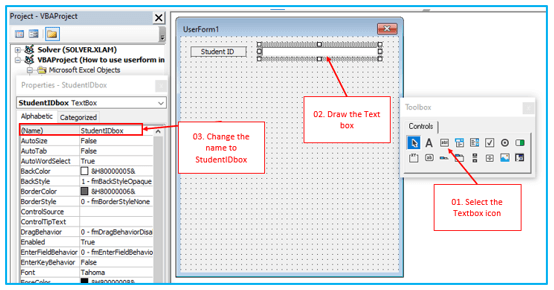
Step 5: You must now create a Text box in order to receive user text input. In relation to this:
- The “Text Box” option must be chosen in a similar manner for the label box.
- Then, in the Userform, draw a rectangle to create a text box in the proper location.
- Go to the “Property” window once the text box has been created. Name the box “StudentIDbox” instead.
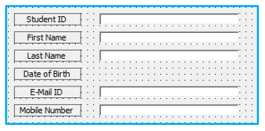
Repeat the same procedure for “First Name”, “Last Name”, “E-Mail ID” and “Mobile Number”.
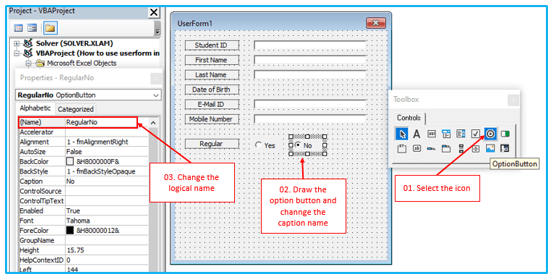
Step 6: Now, you can create a button for yes/no, known as a “Option” button in the “ToolBox” to ask the user for a yes/no response
- Create two Option Form Buttons for Yes and No.
- Go to the properties after generating the option buttons and enter the appropriate Name and Caption.
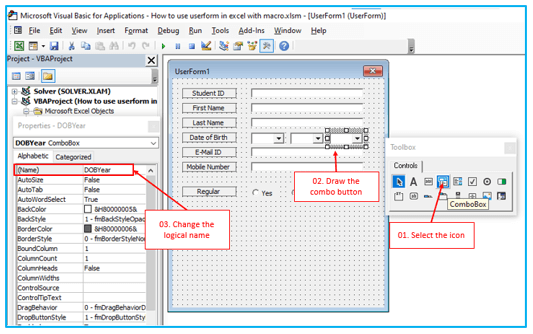
Step 7: You can use a “Combo” Box to make a drop-down list that accepts the Date input. You must construct three combo boxes for the day, month, and year when entering dates.
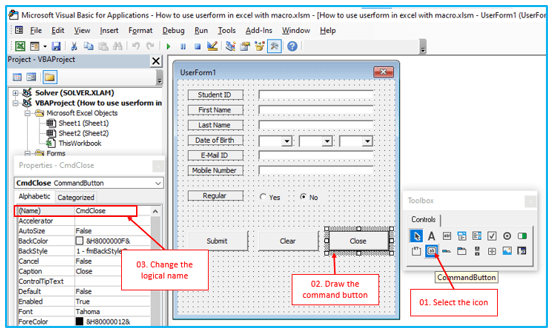
Step 8: You must construct command buttons in order to generate submit, close, or clear buttons. To change the Label name and Caption name, use the same procedures as before.
As a result, you have produced a UserForm. However, it is not yet prepared to accept user data submission. To make it work, you must write VBA code.
You can resize the UserForm as your required without any struggle.
Also Read: How to add developer tab in Excel?
Names and Captions are provided in this UserForm as stated in the table below. These names are used to build the VBA code.
| Control | Logical Name | Caption |
| From | StudentForm | Student Form |
| Label | StudentID | Student ID |
| Label | FirstName | First Name |
| Label | LastName | Last Name |
| Label | DOB | Date of Birth |
| Label | EmailID | E-Mail ID |
| Label | MobileNumber | Mobile Number |
| Label | Regular | Regular |
| TextBox | StudentIDbox | – |
| TextBox | FirstNamebox | – |
| TextBox | LastNamebox | – |
| TextBox | MobileNUmberbox | – |
| TextBox | EmailIDbox | – |
| ComboBox | DOBDate | – |
| ComboBox | DOBMonth | – |
| ComboBox | DOBYear | – |
| OptionButton | RegularYes | Yes |
| OptionButton | RegularNo | No |
| CommandButton | CmdSubmit | Submit |
| CommandButton | CmdClose | Close |
| CommandButton | CmdCancel | Cancel |
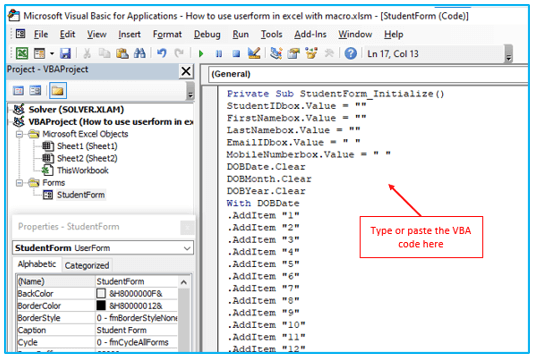
3. Insert VBA code to initialize the User Form:
The code must first be initialized. Initialization entails preparing the UserForm in Excel to accept user input. Therefore, the prior inputs must be removed. Additionally, you must assign the items to combo boxes and list boxes in order to construct drop-down lists. For this:
For the VBA code to be entered, double-click the UserForm. or choose “View Code” from the context menu when you right-click on the UserForm.
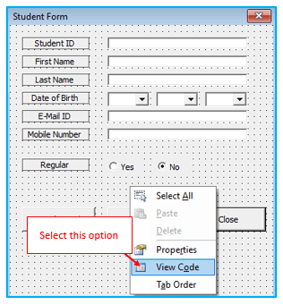
Now, paste the following VBA code into the empty module:
Private Sub StudentForm_Initialize()
StudentIDbox.Value = “”
FirstNamebox.Value = “”
LastNamebox.Value = “”
EmailIDbox.Value = ” “
MobileNumberbox.Value = ” “
DOBDate.Clear
DOBMonth.Clear
DOBYear.Clear
With DOBDate
.AddItem “1”
.AddItem “2”
.AddItem “3”
.AddItem “4”
.AddItem “5”
.AddItem “6”
.AddItem “7”
.AddItem “8”
.AddItem “9”
.AddItem “10”
.AddItem “11”
.AddItem “12”
.AddItem “13”
.AddItem “14”
.AddItem “15”
.AddItem “16”
.AddItem “17”
.AddItem “18”
.AddItem “19”
.AddItem “20”
.AddItem “21”
.AddItem “22”
.AddItem “23”
.AddItem “24”
.AddItem “25”
.AddItem “26”
.AddItem “27”
.AddItem “28”
.AddItem “29”
.AddItem “30”
.AddItem “31”
End With
With DOBMonth
.AddItem “JAN”
.AddItem “FEB”
.AddItem “MAR”
.AddItem “APR”
.AddItem “MAY”
.AddItem “JUN”
.AddItem “JUL”
.AddItem “AUG”
.AddItem “SEP”
.AddItem “OCT”
.AddItem “NOV”
.AddItem “DEC”
End With
With DOBYear
.AddItem “1980”
.AddItem “1981”
.AddItem “1982”
.AddItem “1983”
.AddItem “1984”
.AddItem “1985”
.AddItem “1986”
.AddItem “1987”
.AddItem “1988”
.AddItem “1989”
.AddItem “1990”
.AddItem “1991”
.AddItem “1992”
.AddItem “1993”
.AddItem “1994”
.AddItem “1995”
.AddItem “1996”
.AddItem “1997”
.AddItem “1998”
.AddItem “1999”
.AddItem “2000”
.AddItem “2001”
.AddItem “2002”
.AddItem “2003”
.AddItem “2004”
.AddItem “2005”
.AddItem “2006”
.AddItem “2007”
.AddItem “2008”
.AddItem “2009”
.AddItem “2010”
.AddItem “2011”
.AddItem “2012”
.AddItem “2013”
.AddItem “2014”
End With
RegularYes.Value = False
RegularNo.Value = False
StudentIDbox.SetFocus
End Sub
4. Insert VBA code for putting UserForm data into WorkSheet:
You must enter the data into a worksheet after receiving user input.
Add the code to the Submit button at this time. The user should be allowed to enter the values into the worksheet after pressing the submit button.
Private Sub CmdSubmit_Click()
Dim emptyRow As Long
Sheet1.Activate
emptyRow = WorksheetFunction.CountA(Range(“A:A”)) + 1
Cells(emptyRow, 1).Value = StudentIDbox.Value
Cells(emptyRow, 2).Value = FirstNamebox.Value
Cells(emptyRow, 3).Value = LastNamebox.Value
Cells(emptyRow, 4).Value = DOBDate.Value & “/” & DOBMonth.Value & “/” & DOBYear.Value
Cells(emptyRow, 5).Value = EmailIDbox.Value
Cells(emptyRow, 6).Value = MobileNumberbox.Value
If RegularYes.Value = True Then
Cells(emptyRow, 7).Value = “Yes”
Else
Cells(emptyRow, 7).Value = “No”
End If
End Sub
5. Add VBA code to clear UserForm:
If you want to add another input to the UserForm after taking one, you must first clear the previous input and initialize the UserForm. By clicking the Clear button, the following VBA code will be executed and the UserForm in Excel will be cleared. In the same module, combine this code with the preceding code.
Private Sub CmdClear_Click()
Call StudentForm_Initialize
End Sub
6. Add VBA Code to Close UserForm Window:
You must enter this VBA code into the module to close or cancel the UserForm window. When the user clicks the Cancel button, this code will go into effect.
Private Sub CmdClose_Click()
Unload Me
End Sub
7. Add VBA code to create a command button to open data entry form in Excel
By selecting the Run option, you can quickly run the code and launch the UserForm. You can also just press F5 to run the code without selecting any other options. But this is a cumbersome and sluggish procedure. Therefore, you can add a command button to the Excel spreadsheet to make it more user-friendly.
The steps to create a command button to open UserForm are described below:
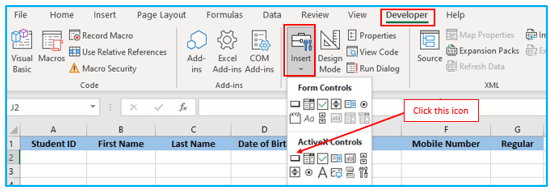
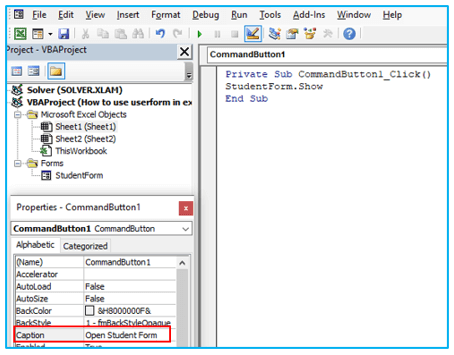
Step 1: Start by selecting the “Developer” tab from the top ribbon. Select the “Command” Button under “ActiveX control” by selecting the “Insert” option.
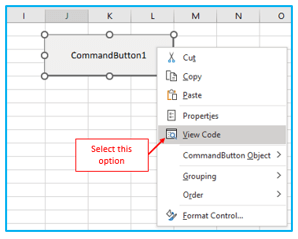
Step 2: The command button will then be created by drawing a rectangular box in an appropriate location. Then, choose “View Code” by performing a right-click on the button.
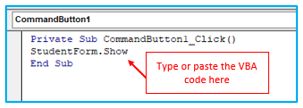
Step 3: Paste the subsequent code into the module.
Private Sub CommandButton1_Click()
StudentForm.Show
End Sub
Step 4: Now that the content in the “Caption” box has been removed, you can rename the code by right clicking the button and selecting “Properties”.
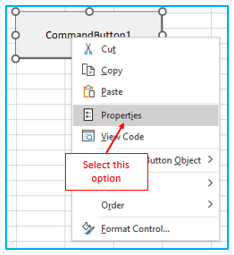
Step 5: Then, give the button an appropriate name.
Your Excel VBA UserForm is now ready for usage.
Also Read: How to Record Macro in Excel?
8. Test the Excel data entry form
It’s time to test UserForm in Excel right now. To do this, select the worksheet’s command button.
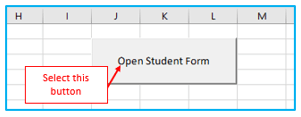
The UserForm window will consequently show up.
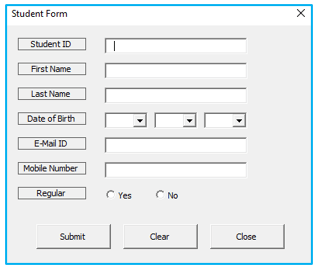
Fill out the UserForm’s blank fields with the necessary information, then click “Submit.”
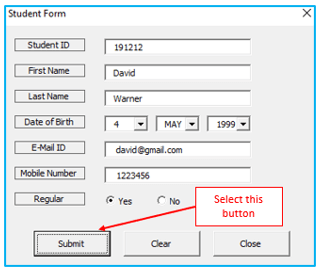
As a result, the UserForm is fully functional as you can see the data entered in the UserForm is stored in the designated columns.

9. Things to keep in mind to create a user form
Please follow these instructions before filling in any information in the user form:
- Ensure that you click on the clear button once before entering any data to avoid any issues and ensure smooth functioning of the user form.
- The Student ID column should be formatted as a number, the Date of Birth column should be formatted as a date, and the Mobile Number column should be formatted as a number.
- If you encounter difficulty while entering data in the user form due to insufficient space, you can resize the form as required using the VB editor.
You may be interested:
