Status Bar in Excel provides users with quick access to essential information and tools for efficient data analysis and manipulation. By default, it displays various indicators, such as average, count, and sum, providing immediate insights into selected data. Additionally, users can customize the Status Bar to show additional information, such as minimum, maximum, or numerical count. Beyond displaying data summaries, the Status Bar also serves as a gateway to useful Excel features, including zoom controls, calculation mode, and recording macros. Leveraging the Status Bar in Excel enhances productivity and facilitates faster decision-making by offering real-time feedback and access to key functionalities. Whether you’re performing basic calculations, analyzing datasets, or managing workbooks, the Status Bar in Excel is an indispensable tool for streamlining your workflow and maximizing efficiency.
This Tutorial Covers:
- Where is the Status Bar in Excel
- Status Bar Not Showing – What to Do
- Default Options in Excel’s Status Bar
- Cell Mode
- Ready
- Edit
- Enter
- Point
- Macro Recording Icon
- Accessibility Check
- Workbook Views
- Zoom-in Zoom-Out Icons and Zoom Slider
- Zoom Slider
- Zoom In and Zoom out icon
- Zoom Level
- Data Stats for the Selected Range
- Cell Mode
- Customizing the Status Bar
- Workbook Statistics
- Sheet Number
- Scroll Lock, Num Lock, and Caps Lock
- Maximum / Minimum Value in the Selected Range
1. Where is the Status Bar in Excel?
In the Excel workbook, the status bar can be found below the worksheet area (behind the sheet tab names).
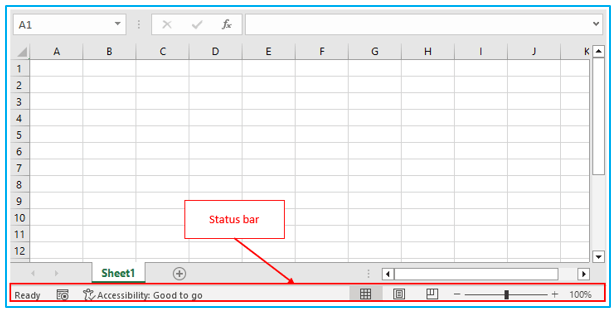
The status bar should always be in the same location because Excel does not let you change its location.
-
Status Bar Not Showing – What to Do?
Although unlikely, there is a chance that your Excel status bar is hidden.
To test if it solves the problem, use the keyboard shortcut provided below:
CONTROL + SHIFT + F1
The full-screen mode can be entered and exited using the aforementioned shortcut.
The status bar won’t be visible if full-screen mode is active on your computer but using the keyboard shortcut above should exit full-screen mode and restore the status bar’s visibility.
A conflict with an add-in is yet another potential cause of the status bar in Excel not appearing. Therefore, if you are using any add-ins, try disabling them to see if that helps.
2. Default Options in Excel’s Status Bar:
In this section will cover the different options available in the Status Bar of Excel and their meanings.
-
Cell Mode:
The left-most section of the Status Bar displays text, such as Ready, Edit, or Enter. This text indicates the current cell mode based on the active cell’s status.
Excel has different cell modes, and the text in the Status Bar changes according to the mode. In the following section, Each cell mode and the corresponding text that appears in the Status Bar will be explained.
-
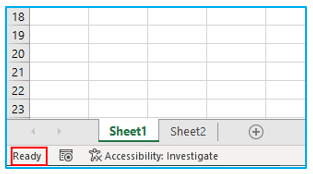
Ready:
The worksheet is now prepared for you to do the job when you notice the Ready mode in the status bar.
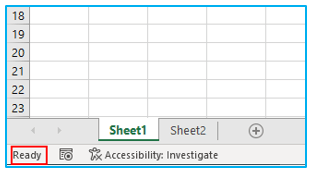
Additionally, it indicates that nothing else is occurring in your worksheet, so you are free to get started.
-
Edit:
When you have your cursor inside a cell and the edit mode icon appears in the status bar, the cell is in the edit mode and you can add data, formulas, or alter the content of the cell there.
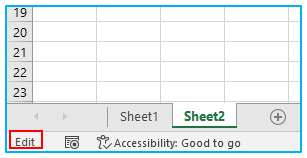
Therefore, the Edit mode indicates that the cell is being edited when you see it.
-
Enter:
With a minor exception, Enter mode is similar to Edit mode.
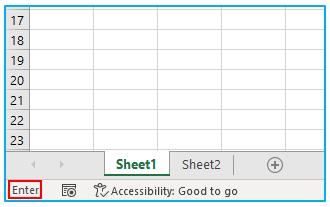
When you use the arrow keys to move the pointer when in Edit mode, the cursor will move within the cell itself. However, if you are in Enter mode and press an arrow key, the cursor will travel to the cells in that direction.
By selecting a cell and pressing the F2 key twice or by double clicking on the cell, you can enter the Enter mode.
-
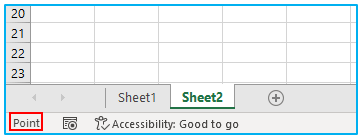
Point:
When you enter a formula in a cell and choose any other cell to serve as a reference in that cell, the Point mode will appear in the status bar.
-
Macro Recording Icon:
The macro recording icon is located right next to the cell mode in the status bar.
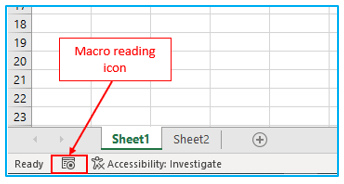
The Record Macro dialog box appears when you click the macro recording button, allowing you to give the macro a name and a brief explanation before beginning to record it.
You can stop recording the macro by clicking on the record macro icon, which appears as a transparent square in the status bar while the macro is being recorded.
-
Accessibility Check:
The accessibility check option, which notifies you of the workbook’s accessibility status, is located next to the record macro icon. Microsoft has taken this step to ensure that everyone, including those with disabilities, can use Excel workbooks.
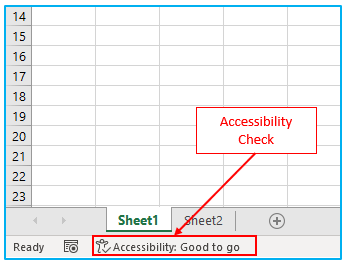
You will notice the text “Accessibility: Investigate” in the status bar if your worksheet has any accessibility problems.
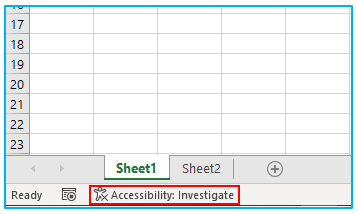
It will open the “Accessibility” pane on the right and provide instructions on how to make your workbook accessible to everyone when you click on it.
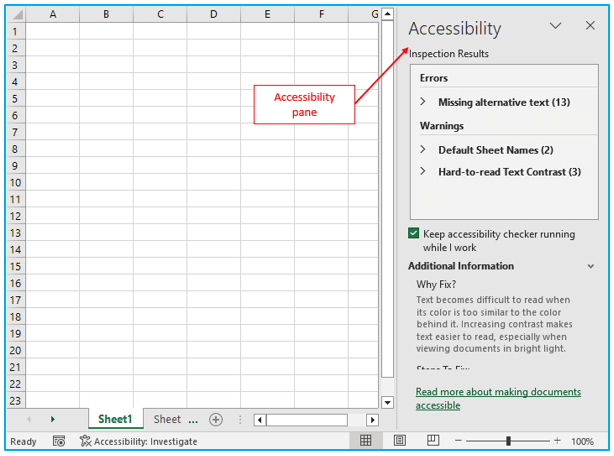
You will see the text “Accessibility: Good to Go” if there are no problems.
-
Workbook Views:
There are three icons for workbook views (Normal, Page Layout, and Page Break Preview) on the right side of the status bar:
Normal View – This view, dubbed “Normal,” is what you typically see when you open an Excel workbook.
Page Layout View – When you want to preview how your work will appear on paper, page layout view is useful. It displays the beginning and ending row and column for each page as well as any additional headers and footers.
Page Break Preview – You can use the Page Break Preview option to check where any extra page breaks will appear when printing your worksheet if you have added any.

You may also find these choices under the ‘View’ tab in the ‘Workbook View’ group, it should be noted.
-
Zoom-in Zoom-Out Icons and Zoom Slider:
You may locate the icons relating to the zoom option to the right of the workbook views icons.
-
Zoom Slider:
You can manually adjust the worksheet’s zoom settings using the zoom slider.

The zoom slider’s default position is in the center, at 100% zoom. You can zoom in or out of the worksheet by dragging the slider to the right or left. If you move the slider to the left, the worksheet will enlarge.
In Excel, you can zoom anywhere from 10% to 400%.
-
Zoom In and Zoom out icon:
The zoom-out and zoom-in icons are likewise located on either side of the zoom slider.

These icons can be clicked to 10% decrease the zoom level and increase 400%.
-
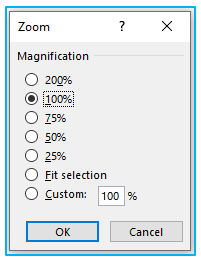
Zoom Level:
The zoom level (which displays the worksheet’s current zoom value) is located at the right end of the status bar Excel.

You can choose from any of the pre-existing options or manually enter the zoom level you desire for the worksheet when you click on the zoom level option. This will open the Zoom dialog box.
-
Data Stats for the Selected Range:
The worksheet will display some statistics about the range of cells you have selected in the status bar when you do so.
It displays the Sum, Count, and Average values by default for the chosen range.

It will only display the number of cells if you choose a range of cells that only contains text data.

3. Customizing the Status Bar:
While the Excel team has tried to display some of the most useful information in the status bar by default, you can also customize the status bar to show as much or as little information as you see fit.
The steps to personalize Excel’s status bar are described below:
Step 1: First, right-click anywhere on the status bar.
You can choose any item in the Customize Status Bar menu that opens to make it visible in the Status bar, even if it doesn’t currently have a green checkmark next to it.
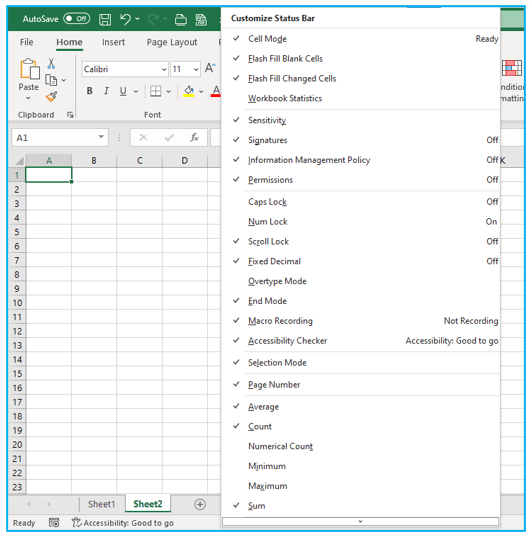
Alternatively, the green tick will be removed and the selected option won’t be visible in the status bar if you click on any of the options that have it already.
You’ll see that the majority of the Customize Status bar options are already selected and have a green check mark to the left of them.
Those that you might think about enabling for the status bar will be covered briefly below:
-
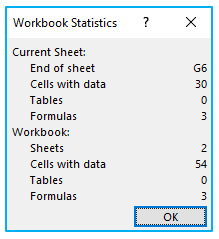
Workbook Statistics:
You’ll see that when the Workbook Statistics option is enabled in the customized status bar menu, it also appears in the status bar (next to Cell Mode).
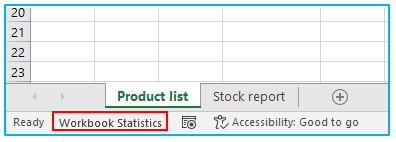
The workbook statistics dialog box will popup when you click on this option in the status bar and will display some statistics about the current sheet and the workbook.
-
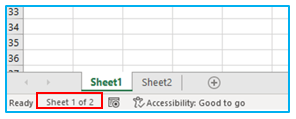
Sheet Number:
It could be a good idea to enable the Sheet Number option in the Customize Status bar menu if you frequently work with Excel spreadsheets that have numerous worksheets.
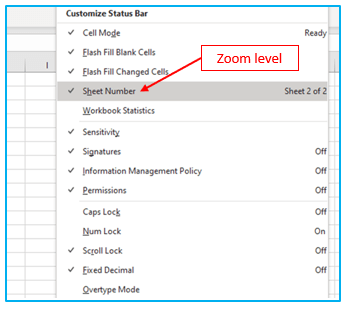
When enabled, the status bar will display the current sheet number (as in the example below).
-
Scroll Lock, Num Lock, and Caps Lock:
Enabling the Caps Lock, Num Lock, and Scroll Lock options in the status bar will display their status in the bar if they are currently activated. By default, the Scroll Lock option is already set to appear in the status bar. As an example, the accompanying screenshot illustrates all three options enabled and currently active in the status bar.

-
Maximum / Minimum Value in the Selected Range:
The status bar in a spreadsheet automatically displays the data, such as sum, count, and average, when a range of cells is selected.
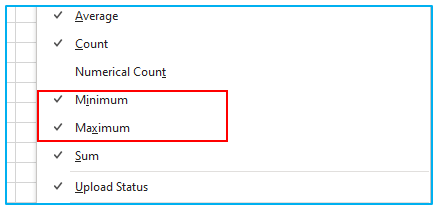
You can further personalize it by including new data, deleting old data, or both.
You can now enter Numeric Count, Maximum, and Minimum values in addition to Sum, Count, and Average.
Note that Microsoft Word and PowerPoint are two additional programs that have a status bar. The options would vary depending on the program, but you can edit the status bar using the same procedures as described in this tutorial.
Application of Status Bar in Excel – Options and Customization
- Quick Data Summaries: Instantly view basic statistics like sum, count, and average of selected cells.
- Customized Information: Customize to display additional data metrics such as minimum, maximum, or numerical count.
- Zoom Control: Adjust zoom level directly from the Status Bar for better visibility of your spreadsheet.
- Calculation Mode Indicator: Easily switch between calculation modes like automatic, manual, or semi-automatic.
- Recording Macros: Toggle macro recording on or off directly from the Status Bar for automation tasks.
- Error Notifications: Instantly see error messages or warnings when encountering formula errors or issues.
For ready-to-use Dashboard Templates:
