VBA loops in Excel provide a powerful way to automate repetitive tasks and process large datasets efficiently. With loops, such as For, Do While, and Do Until, users can iterate through cells, rows, or columns, performing actions or calculations on each item. This capability is particularly useful for tasks like data cleaning, analysis, or formatting, where the same operation needs to be applied across multiple elements. VBA loops can also be combined with conditional statements to create dynamic and flexible scripts that respond to specific criteria or changes in the data. Whether you’re a beginner or an experienced Excel user, mastering VBA loops can significantly enhance your productivity and enable you to accomplish complex tasks with ease. By leveraging the power of VBA loops in Excel, users can streamline their workflows, reduce manual effort, and unlock the full potential of automation in spreadsheet tasks.
This Tutorial Covers:
- What is VBA Loops
- For Next Loop
- Example 1 – Adding the first 20 positive numbers
- Example 2 – Adding the first 10 even positive integers
- Example 3 – Adding a serial number to the cells you’ve chosen
- Example 4 – Protect every worksheet in the open workbook
- Nested ‘For Next’ Loops
- ‘EXIT For’ Statements in For Next Loops
- Do While Loop
- Example 1 – Using VBA, Add the First 20 Positive Integers
- Example 2 – Type Dates for the Current Month
- Exit Do Statement
- Do Until Loop
- Example 1 – Using VBA, Add the First 20 Positive Integers
- Example 2 – Type Dates for the Current Month
- Exit Do Statement
- For Each
- Example 1 – Examine every worksheet in a workbook (and Protect it)
- Example 2 – Examine every open workbook (and Save All)
- Example 3 – Examine Every Cell in a Selection (Highlight negative values)
- ‘Exit For’ Statement
- Where to Put the VBA Code
1. What are VBA Loops?
VBA loops are a fundamental programming construct that allows you to execute a block of code repeatedly. Loops are essential in automating repetitive tasks in Excel, and they are available in several different types, each with its unique characteristics. The primary benefit of using VBA loop in Excel is that it saves time and reduces the amount of manual effort required to perform tasks.
By using VBA loops in Excel, you can automate repetitive tasks, reduce errors, and save time. The loop construct is an essential building block for more complex VBA programs and mastering the different types of loops available in Excel can significantly improve your productivity as a VBA programmer.
2. For Next Loop:
You can cycle over a block of code for the specified number of times using the “For Next” loop.
You would add the first two numbers, then the third number to the result, then the fourth number to the result, and so on, if I asked you to manually add the integers from 1 to 20.
Isn’t that, right?
In VBA, the For Next loop employs the same concept.
You indicate both how frequently you want the loop to run and what action you want the code to take each time.
The For Next loop’s syntax is listed below:
For Counter = Start To End [Step Value]
[Code Block to Execute]
Next [counter]
You can use a Counter (or any other variable) in the For Next loop since it will be utilized to execute the loop. You can repeat this loop as many times as necessary using this counter.
For instance, my Counter value would range from 1 to 20 if I wanted to add the first 20 positive numbers.
For a better understanding of how the For Next loop functions, let’s look at a few instances.
-
Example 1 – Adding the first 20 positive numbers:
The For Next loop is used in the code below to add the first 20 positive numbers.
The sum of these figures will then be shown in a message box.
Sub AddNumbers()
Dim Total As Integer
Dim Count As Integer
Total = 0
For Count = 1 To 20
Total = Total + Count
Next Count
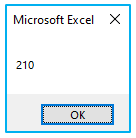
MsgBox Total
End Sub
Before entering the For Next loop in this code, the value of Total is set to 0.
When it enters the loop, it holds the cumulative value at the end of each loop. Therefore, while Counter is at 1, after the first loop, the value of “Total” changes to 1, and after the second loop, it changes to 3 (1+2), and so on.
The ‘Total’ variable then contains the sum of the first 20 positive integers at the conclusion of the loop.
The outcome is then simply shown in a message box by a MsgBox.
-
Example 2 – Adding the first 10 even positive integers:
You need a similar code with a condition to only take into account the even numbers and disregard the odd numbers in order to sum the first ten even positive integers (i.e., 2,4,6,8,10,12,14,16,18 and 20).
Here is the code to do it:
Sub AddEvenNumbers()
Dim Total As Integer
Dim Count As Integer
Total = 0
For Count = 2 To 20 Step 2
Total = Total + Count
Next Count
MsgBox Total
End Sub
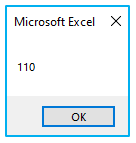
Keep in mind that we used ‘Step 2’ and that the Count value was begun at 2.
The code is instructed to add 2 to the ‘Count’ variable each time the loop is executed when you use the ‘Step 2’ command.
As a result, the count value starts at 2 and increases as the loop is executed to 4, 6, 8, and so on.
Note: A different approach would be to execute a loop from 1 to 20 times, checking each time whether the integer is even or odd. In this instance, however, utilizing Step is a more effective approach because it only calls for 10 iterations of the loop rather than 20.
Negative values for Step are also possible. In this scenario, the Counter starts higher and decrements by the set Step value over time.
-
Example 3 – Adding a serial number to the cells you’ve chosen:
The For Next loop can also be used to cycle through a group of objects (such as cells, worksheets, or workbooks),
The following example swiftly enters serial numbers into each of the chosen cells.
Sub EnterSerialNumber()
Dim Rng As Range
Dim Counter As Integer
Dim RowCount As Integer
Set Rng = Selection
RowCount = Rng.Rows.Count
For Counter = 1 To RowCount
ActiveCell.Offset(Counter – 1, 0).Value = Counter
Next Counter
End Sub
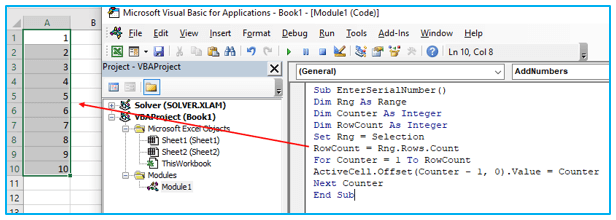
In the code above, the number of selected rows is first counted, and this value is then assigned to the variable RowCount. The loop “from 1 to RowCount” is then executed.
Also take note that we have set the variable Rng to selection (with the line “Set Rng = Selection”) because selection might consist of any number of rows. We can now refer to the selection in our code by using the ‘Rng’ variable.
-
Example 4 – Protect every worksheet in the open workbook:
The ‘For Next’ loop allows you to loop through every worksheet in the open workbook and protect (or unprotect) them one by one.
The code that will accomplish looping in Excel this is shown below:
Sub ProtectWorksheets()
Dim i As Integer
For i = 1 To ActiveWorkbook.Worksheets.Count
Worksheets(i).Protect
Next i
End Sub
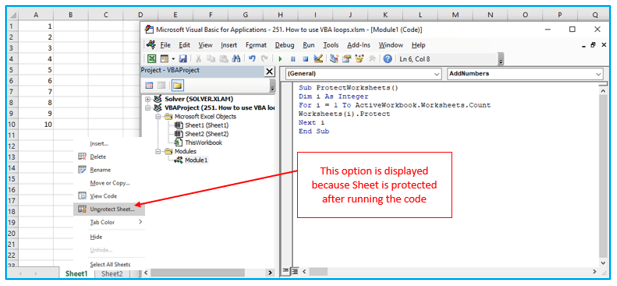
Using ActiveWorkbook, the code above counts the number of sheets.Worksheets.Count. This instructs VBA on how many times the loop should be executed.
Each time, it makes a reference to the Ith workbook and secures it using Worksheets(i).
The same code can also be used to unprotect worksheets. Simply alter the line Worksheets(i).Protect to Worksheets(i).UnProtect.
-
Nested ‘For Next’ Loops:
Nesting ‘For Next’ loops allow you to automate Excel in a more complicated way. A “For Next” loop that is nested means that it is contained within another “For Next” loop.
Consider that you wish to secure every worksheet in the two open workbooks on your computer.
The code that will accomplish this is shown below:
Sub ProtectWorksheets()
Dim i As Integer
Dim j As Integer
For i = 1 To Workbooks.Count
For j = 1 To Workbooks(i).Worksheets.Count
Workbooks(i).Worksheets(j).Protect
Next j
Next i
End Sub
Given that we employed one For Next loop inside another, the example above is a nested For Next loop.
-
‘EXIT For’ Statements in For Next Loops:
You can end the ‘For Next’ loop altogether by using the ‘Exit For’ expression.
When you want the For Next loop to finish when a specific condition is satisfied, you can use it.
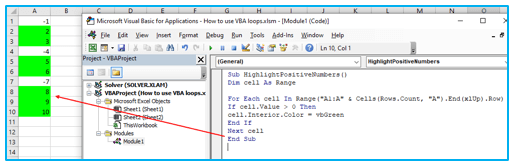
Let’s look at an example where you have a collection of numbers in Column A and you want to make the backdrop of every positive number in that column green. In this instance, we must evaluate each cell’s value and then adjust the cell color.
But in order to make the code more effective, we can first determine whether or not the list has any negative numbers. If there are no negative values, we can simply exit the code by using the Exit For the statement.
The code that will accomplish this is shown below:
Sub HighlightPositiveNumbers()
Dim cell As Range
For Each cell In Range(“A1:A” & Cells(Rows.Count, “A”).End(xlUp).Row)
If cell.Value > 0 Then
cell.Interior.Color = vbGreen
End If
Next cell
End Sub
When the ‘Exit For’ statement is used inside a nested ‘For Next’ loop, it will exit the loop it is currently being used in and continue to the next line of code following the For Next loop.
The ‘Exit For’ statement in the code below, for instance, will exit the inner loop while leaving the outer loop in operation.
Sub SampleCode()
For i = 1 To 10
For j = 1 to 10
Exit For
Next J
Next i
End Sub
3. Do While Loop:
When using a “Do While” loop, you can check whether a condition is true or not and only execute the loop if it is.
In a Do While Loop, there are two types syntax.
Do [While condition]
[Code block to Execute]
Loop
and
Do
[Code block to Execute]
Loop [While condition]
These two vary in that the first example checks the While condition before any code block is executed, whereas the second case executes the code block first and then checks the While condition.
Because the “While” condition is verified after the code has been performed once, even if the While condition is False in both situations, the code will still run at least once in the second case.
Let’s now look at some VBA Do While loop usage samples.
-
Example 1 – Using VBA, Add the First 20 Positive Integers:
Let’s say you wish to use VBA’s Do While loop to add the first twenty positive numbers.
Use the Do While loop until the following value is less than or equal to 20 to accomplish this. Your loop would end if the number was higher than 20.
This VBA code will execute the Do While loop and display the outcome in a message box.
Sub AddFirst20PositiveIntegers()
Dim i As Integer
i = 1
Do While i <= 20
Result = Result + i
i = i + 1
Loop
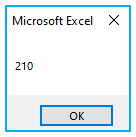
MsgBox Result
End Sub

The aforementioned loop keeps running until the value of ‘i’ reaches 21. The loop comes to an end when it reaches 21 (since the While condition is no longer true).
We’ve used a Result variable inside the loop to save the outcome. The value of the ‘Result’ variable is displayed in a message box once the loop has finished.
-
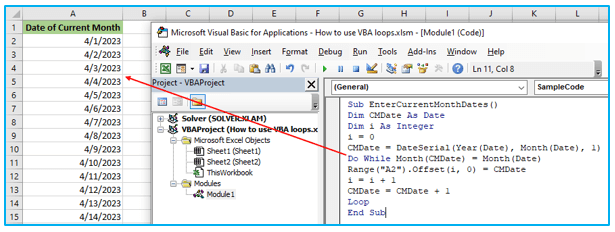
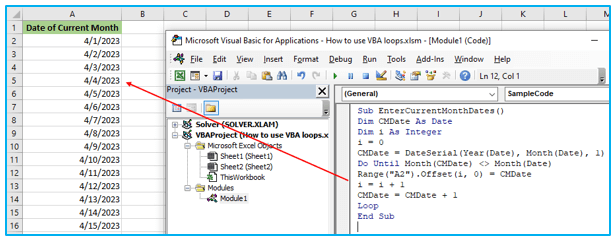
Example 2 – Type Dates for the Current Month:
Say you want to fill out a worksheet column with all the dates for the current month.
Use the code in the following Do While loop to accomplish that:
Sub EnterCurrentMonthDates()
Dim CMDate As Date
Dim i As Integer
i = 0
CMDate = DateSerial(Year(Date), Month(Date), 1)
Do While Month(CMDate) = Month(Date)
Range(“A2”).Offset(i, 0) = CMDate
i = i + 1
CMDate = CMDate + 1
Loop
End Sub
All dates would be entered using the aforementioned code in the worksheet’s second column (beginning with A2). The loops keep going until the current month’s value of the variable “CMDate” is matched.
-
Exit Do Statement:
The Exit Do statement can be used to exit a loop. The code exits the Do While loop as soon as the ‘Exit Do’ line is executed and immediately moves on to the next line after the loop.
For instance, you can end the loop after the first five dates are entered if you just wish to enter the first five dates.
The code that will accomplish this is shown below:
Sub EnterCurrentMonthDates()
Dim CMDate As Date
Dim i As Integer
i = 0
CMDate = DateSerial(Year(Date), Month(Date), 1)
Do While Month(CMDate) = Month(Date)
Range(“A2”).Offset(i, 0) = CMDate
i = i + 1
If i >= 5 Then Exit Do
CMDate = CMDate + 1
Loop
End Sub
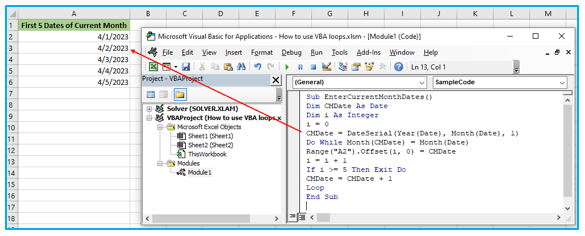
The IF statement is used in the code above to determine whether or not the value of i is larger than 5. The loop is over when the value of ‘i’ reaches 5, at which point the Exit Do statement is executed.
4. Do Until Loop:
‘Do Until’ loops and ‘Do While’ loops have a lot in common.
The loop in ‘Do While’ runs until the given condition is satisfied, whereas ‘Do Until’ loops until the supplied condition is satisfied.
In the Do Until Loop, there are two different syntaxes.
Do [Until condition]
[Code block to Execute]
Loop
and
Do
[Code block to Execute]
Loop [Until condition]
These two vary in that the first example checks the Until condition before any code block is executed, whereas the second case executes the code block first and then checks the Until condition.
The code will still execute at least once in the second example if the Until condition is TRUE in both circumstances (since the ‘Until’ condition is verified after the code has been performed once).
Let’s now look at some VBA Do Until loop samples.
Note: every example for Do Until is also an example for Do While. To demonstrate the Do Until loop’s operation, they have been updated.
-
Example 1 – Using VBA, Add the First 20 Positive Integers:
Let’s say you wish to use VBA’s Do Until loop to add the first twenty positive numbers.
Run the loop until the following value is less than or equal to 20 to do this. Your loop would end if the number was higher than 20.
This VBA code will execute the loop and display the outcome in a message box.
Sub AddFirst20PositiveIntegers()
Dim i As Integer
i = 1
Do Until i > 20
Result = Result + i
i = i + 1
Loop
MsgBox Result
End Sub
The aforementioned loop keeps running until the value of ‘i’ reaches 21. The loop comes to a stop (as the ‘Until’ condition is satisfied) when it reaches 21.
-
Example 2 – Type Dates for the Current Month:
Say you want to fill out a worksheet column with all the dates for the current month.
Use the code in the following Do Until loop to accomplish that:
Sub EnterCurrentMonthDates()
Dim CMDate As Date
Dim i As Integer
i = 0
CMDate = DateSerial(Year(Date), Month(Date), 1)
Do Until Month(CMDate) <> Month(Date)
Range(“A2”).Offset(i, 0) = CMDate
i = i + 1
CMDate = CMDate + 1
Loop
End Sub
All dates would be entered using the aforementioned code in the worksheet’s second column, starting at A2. Up till the CMDate variable’s Month is not the same as the current month, the loop continues.
-
Exit Do Statement:
The ‘Exit Do’ statement can be used to exit the loop.
The code exits the Do Until loop as soon as the ‘Exit Do’ line is executed, and it immediately moves on to the next line after the loop.
For instance, you can end the loop after the first five dates are entered if you just wish to enter the first five dates.
This is what the code below does:
Sub EnterCurrentMonthDates()
Dim CMDate As Date
Dim i As Integer
i = 0
CMDate = DateSerial(Year(Date), Month(Date), 1)
Do Until Month(CMDate) <> Month(Date)
Range(“A2”).Offset(i, 0) = CMDate
i = i + 1
If i >= 5 Then Exit Do
CMDate = CMDate + 1
Loop
End Sub

When the value of ‘i’ in the code above reaches 5, the Exit Do statement is executed, ending the loop.
5. For Each:
The ‘For Each’ loop in VBA allows you to iterate across a number of collections.
Here are a few Excel VBA collection examples:
- A list of all active Workbooks.
- An assortment of every worksheet found in a workbook.
- A collection of all the cells in a set of chosen cells.
- A collection of all the workbook’s charts or shapes.
You can iterate through each object in a collection using the “For Each” loop and take action on each one.
You could, for instance, go through every worksheet in a workbook and protect them, or you could go over every cell in the selection and format each one differently.
You don’t need to be aware of how many objects are in a collection in order to use the “For Each” loop (also known as the “For Each-Next” loop).
Using a “For Each” loop would automatically iterate through each item and carry out the requested operation. For instance, the code would be the same whether you had a workbook with 3 worksheets or 30 worksheets if you wanted to secure every worksheet in it.
The Excel VBA For Each-Next loop’s syntax is seen below.
For Each element In collection
[Code Block to Execute]
Next [element]
Let’s look at a few Excel for Each Loop usage examples now.
-
Example 1 – Examine every worksheet in a workbook (and Protect it):
Imagine you wish to protect every worksheet in a workbook.
For Each-Next loop below can accomplish this quickly:
Sub ProtectSheets()
Dim ws As Worksheet
For Each ws In ActiveWorkbook.Worksheets
ws.Protect
Next ws
End Sub
The ‘ws’ variable has been defined as a Worksheet object in the code above. This instructs VBA to interpret ‘ws’ in the code as a worksheet object.
The ‘For Each’ line is now used to iterate through each ‘ws’ (a worksheet object) in the collection of all the worksheets in the current workbook (provided by ActiveWorkbook.Worksheets).
Note that unlike past loops where we attempted to safeguard every worksheet in a workbook, we are not concerned with the number of worksheets in this loop.
To complete the loop, we don’t need to count these. For Each loop makes sure that every object is examined individually.
-
Example 2 – Examine every open workbook (and Save All):
The ability to save all of your workbooks at once can be helpful if you work with numerous workbooks at once.
The VBA code below can help us with this:
Sub SaveAllWorkbooks()
Dim wb As Workbook
For Each wb In Workbooks
wb.Save
Next wb
End Sub
The workbook is not automatically saved in a specific location when using this code to save it for the first time.
The default folder is where it is saved. When these files are already saved and you need to quickly save all the workbooks while making changes, this method performs well.
-
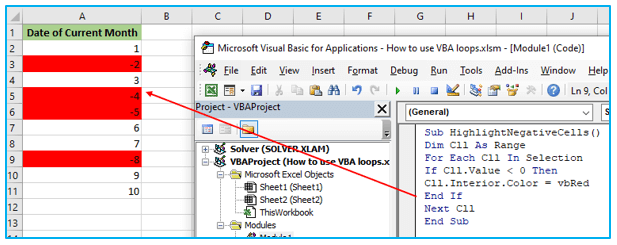
Example 3 – Examine Every Cell in a Selection (Highlight negative values):
You can loop through every cell in a particular range or in the chosen range by using the “For Each” loop.
When you want to examine each cell and act depending on it, this can be useful.
For instance, the code shown below will go through every cell in the selection, changing the color of the cells with negative values to red.
Sub HighlightNegativeCells()
Dim Cll As Range
For Each Cll In Selection
If Cll.Value < 0 Then
Cll.Interior.Color = vbRed
End If
Next Cll
End Sub
(Note that the shorthand variable name for Cell in this code is Cll. It’s best to avoid naming variables after objects like Sheets or Range.
The For Each-Next loop iterates across the group of cells in the selection in the code above. To determine whether a cell value is negative or not, an IF statement is utilized. If so, the cell gets a red interior; otherwise, it moves on to the next cell.
You can use the following code if you don’t have a selection and would like VBA to choose every filled cell in a column starting from a certain cell (much like we use Control + Shift + Down arrow key to select every filled cell):
Sub HighlightNegativeCells()
Dim Cll As Range
Dim Rng As Range
Set Rng = Range(“A1”, Range(“A1”).End(xlDown))
For Each Cll In Rng
If Cll.Value < 0 Then
Cll.Interior.Color = vbRed
End If
Next Cll
End Sub
It makes no difference how many filled cells there are in the example above. Beginning with cell A1, it will examine every adjacent filled cell in the column.
Additionally, selecting cell A1 is not required. Any distant cell can be chosen, and when the code executes, it will still consider all of the cells in column A (beginning with A1) and color the negative cells.
-
‘Exit For’ Statement:
In VBA, the ‘Exit For’ statement can be utilized within a For Each-Next loop to prematurely terminate the loop execution. This is typically applied when a particular condition is met.
For instance, in Example 3 where we are iterating over a range of cells, it may be more efficient to check if there exist any negative values. If there are no negative values present, we can exit the loop early and save processing time in the VBA code.
Here is an example VBA code that demonstrates this approach:
Sub HighlightNegativeCells()
Dim Cll As Range
For Each Cll In Selection
If WorksheetFunction.Min(Selection) >= 0 Then Exit For
If Cll.Value < 0 Then
Cll.Interior.Color = vbRed
End If
Next Cll
End Sub
6. Where to Put the VBA Code?
Have you ever wondered where the VBA code in your Excel document goes?
The Excel VBA editor is the backend for VBA in Excel. The code must be copied and pasted into the VB Editor module code window.
The steps are as follows:
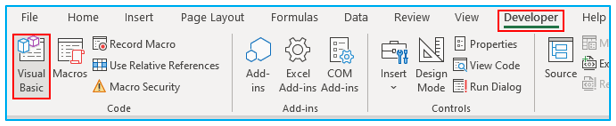
Step 1: Activate the “Developer” tab. Select “Visual Basic” from the menu. This will launch the backend VB editor.
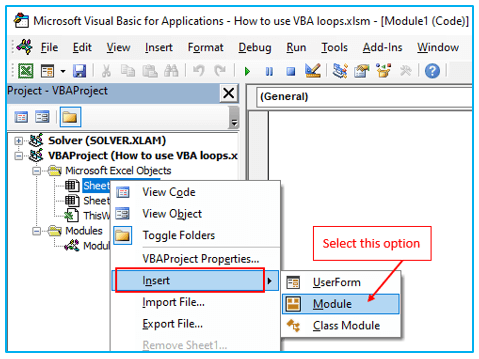
Step 2: Right-click any workbook object in the “Project Explorer” pane of the VB Editor to access the “Project Explorer” window. Go to the “View” tab and select “Project Explorer” if you are unable to view it.
Select “Module” from the “Insert” menu. For your workbook, this will inject a module object.
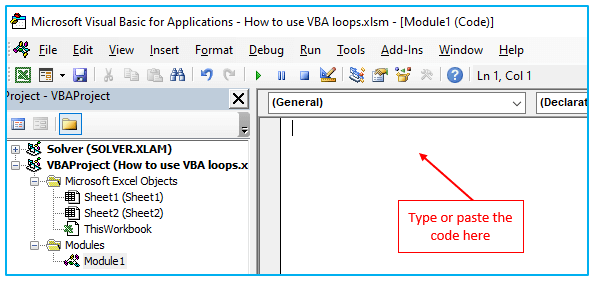
Step 3: In the module window, copy and paste or type the code.
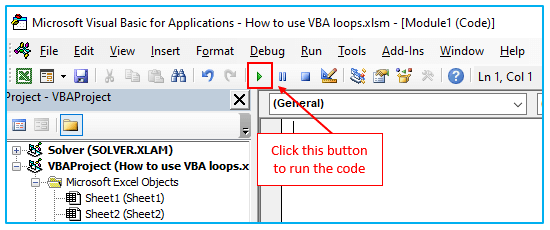
Step 5: To run the code press F5 key on your keyboard or you can click on the green play button.
Application of VBA loops in Excel
- Data Iteration: VBA loops allow iterating through rows, columns, or cells, enabling data processing and manipulation.
- Automation: Loops automate repetitive tasks, such as copying formulas or formatting cells, saving time and effort.
- Conditional Actions: Combining loops with conditional statements like If-Then-Else allows executing specific actions based on predefined criteria.
- Dynamic Range Operations: Loops facilitate working with dynamic ranges by adjusting to varying data sizes or structures.
- Data Validation: Use loops to validate data entries, checking for errors or inconsistencies across a range of cells.
- Advanced Calculations: Employ loops for complex calculations involving multiple variables or intricate formulas, ensuring accuracy and efficiency.
For ready-to-use Dashboard Templates:
