Flash Fill in Excel emerges as the unsung hero of data manipulation, simplifying the most intricate data transformation tasks with ease. This remarkable feature transcends the limitations of traditional data formatting and empowers you to transform your data swiftly and accurately. With ‘Flash Fill in Excel,’ you’re not just making data look better; you’re paving the way for improved data quality, enhanced analysis, and streamlined reporting. Embrace the efficiency and precision of this tool to master the art of data manipulation, ensuring that your Excel workbooks are a testament to data-driven excellence.
This Tutorial Covers:
- What is the flash fill feature in Microsoft Excel
- How to add flash fill in your Excel if it’s not there
- Different uses of flash fill (With Examples)
- Example 1- Using Flash Fill, extract first and last names
- Example 2- Using Flash Fill to combine first and last names
- Example 3- Using Flash Fill to extract zip code from addresses
- Example 4- Using Flash Fill to extract letters from text strings
- The features of flash fill
- How to turn off Flash Fill in Excel
- Limitations of Flash Fill in Excel
- Things to Remember
1.What is the flash fill feature in Microsoft Excel?
Flash Fill in Excel is a feature that automatically fills data based on available cell patterns. It can be found in the Data menu tab under Data Tools. To illustrate its functionality, let’s consider a scenario where we have a column with text lines mixed with numbers. If we want to extract the numbers from each cell and fill them in adjacent cells, we can simply write a number in a parallel cell and use Flash Fill. This can be done by clicking on Flash Fill or pressing Ctrl + E. Once activated, Flash Fill will recognize the pattern and fetch the numbers from the other cells, automatically filling them in the corresponding adjacent cells.
2. How to add flash fill in your Excel if it’s not there?
If Flash Fill is not visible or accessible in your version of Excel, you may need to enable it through the Excel Options menu.
Here’s how you can add Flash Fill to your Excel if it’s not already available:
Step 1: Click on the “File” tab located in the upper-left corner of the Excel window.
In the backstage view, select “Options” from the left-hand menu.
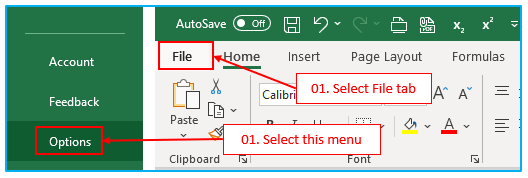
Step 2: The “Excel Options” dialogue window will appear once we click the option.
The “Advanced” option can be found in the “Excel Options” dialogue box. The “Advanced” option dialogue box will appear when you click it, as shown below. Go to the “Editing” option after selecting the “Advanced” option to find the “Automatically Flash Fill” checkbox. Mark that box to make the Flash Fill option active.

Once you have enabled Flash Fill, you can access it from the “Home” menu in Excel. Look for the “Flash Fill” option, which should now be visible and ready for use.

Note: The steps provided are based on the general layout of Excel, but the exact appearance and location of the options may vary slightly depending on your version of Excel.
3. Different uses of flash fill (With Examples)
Different uses of flash fill with examples are covered in next section in this tutorial.
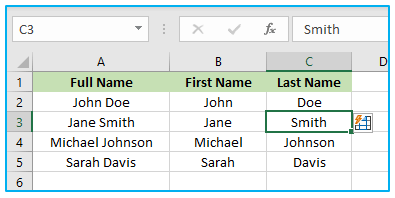
- Example 1- Using Flash Fill, extract first and last names:
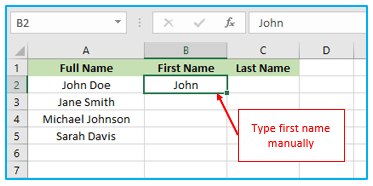
Suppose you have a column in Excel that contains full names in the format “First Name Last Name” (e.g., “John Doe”).
To extract the first and last names into separate columns using Flash Fill, follow these steps:
Step 1: Type the first name manually in cell B2.
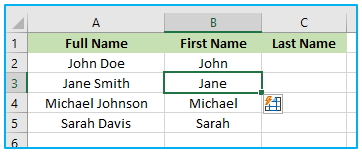
Step 2: Press CTRL+E in cell B3 and the result looks like below:
Step 3: Type the first name manually in cell C2.
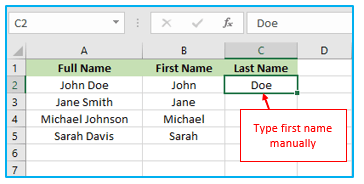
Step 4: Press CTRL+E in cell C3 and the result looks like below:
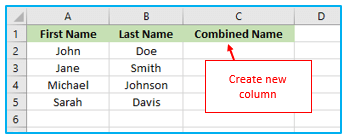
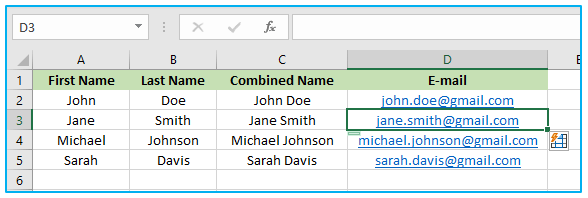
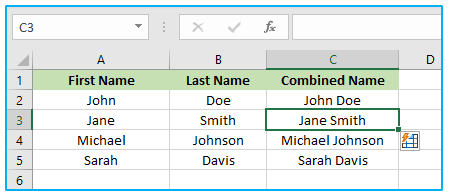
- Example 2- Using Flash Fill to combine first and last names:
Suppose you have two separate columns in Excel, one for first names and another for last names.

To combine the first and last names into a single column using Flash Fill, follow these steps:
Step 1: Create a new column next to the last name column to hold the combined names.
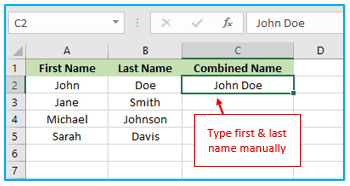
Step 2: In the first cell of the combined name column, enter the desired format for the combined name. For example, you can insert a space or any other symbol after the first name.
Type manually first name and last name in cell C2.
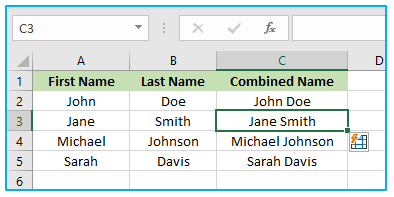
Step 3: Press CTRL+E in cell C3 and the result looks like below:
You can also generate E-mail by using this method as shown below:
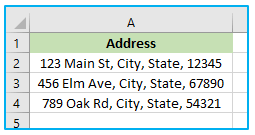
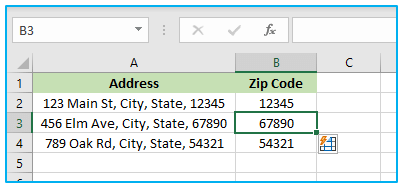
- Example 3- Using Flash Fill to extract zip code from addresses:
Suppose you have a column in Excel that contains addresses, and you want to extract the zip codes from those addresses using Flash Fill.
How to extract zip code from addresses using flash fill is shown below:
Step 1: Create a new column next to the address column to hold the extracted zip codes.
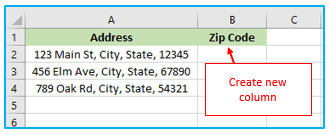
Step 2: In the first cell of the zip code column, manually extract the zip code from the first address and type it in.
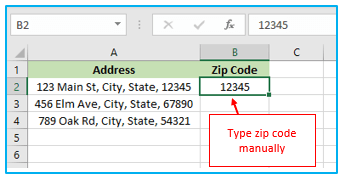
Step 3: Press CTRL+E in cell B3 and the result looks like below:
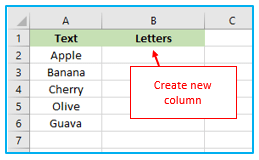
- Example 4- Using Flash Fill to extract letters from text strings:
Suppose you have a column in Excel that contains text strings, and you want to extract only the letters from those strings using Flash Fill.

How to extract zip code from addresses using flash fill is shown below
Step 1: Create a new column next to the original text column to hold the extracted letters.
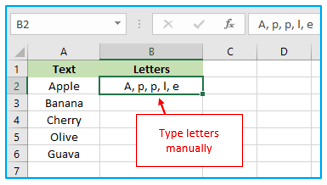
Step 2: In the first cell of the letters column, manually extract the letters from the first text string and type them in.
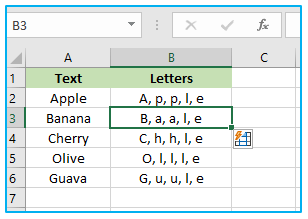
Step 3: Press CTRL+E in cell B3 and the result looks like below:
4. The features of flash fill
To access the Flash Fill features in Excel, you will need a dataset.
Let’s assume we have a dataset in cells A2 to C5.

Here are the steps to see the Flash Fill features:
Step 1: Apply any Flash Fill method to the range C2:C5.
Step 2: After applying Flash Fill in column C, a drop-down menu will appear next to the filled cells.
Click on the drop-down menu to reveal the options in Flash Fill.
By clicking on the options, you can see different suggestions or variations that Excel suggests based on the applied Flash Fill in the column.
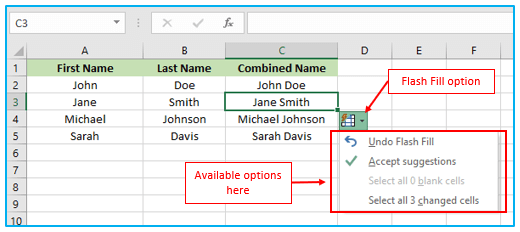
This allows you to choose from the available options and apply them to the rest of the cells or customize the Flash Fill further.
By accessing the Excel Flash Fill feature, you can explore additional suggestions or variations provided to enhance and refine the data filling process.
Flash Fill features in Excel provides pattern recognition and data manipulation capabilities. It can automatically fill in cells based on recognized patterns, extract specific data elements from text strings, transform data formats, and offer dynamic suggestions. Flash Fill saves time, improves productivity, and simplifies data-related tasks in Excel.
5. How to turn off Flash Fill in Excel?
If you want to avoid the Flash Fill suggestions in Excel, you can disable the Flash Fill feature.
Here are the steps to turn off Flash Fill:
Step 1: Click on the “File” tab located in the upper-left corner of the Excel window.
In the backstage view, select “Options” from the left-hand menu.

Step 2: The “Excel Options” dialogue window will appear once we click the option.
The “Advanced” option can be found in the “Excel Options” dialogue box. The “Advanced” option dialogue box will appear when you click it, as shown below. Go to the “Editing” option after selecting the “Advanced” option to find the “Automatically Flash Fill” checkbox. Uncheck that box to make the Flash Fill option deactivate. After that, click OK to close the window.

6. Limitations of Flash Fill in Excel
Flash Fill has several limitations that users should be aware of:
- Lack of Dynamism: One major limitation of Flash Fill is its lack of dynamic functionality. If the data in your spreadsheet changes, the columns created by Flash Fill will not update automatically. Users must rely on formulas to ensure automatic updates.
- Ignoring Non-Printable Data: Flash Fill ignores cells that contain non-printable data, such as leading or trailing spaces, hidden characters, or formatting symbols. This can lead to incomplete or inaccurate results if such data is crucial for the desired transformation.
- Number-to-String Conversion: Sometimes, Flash Fill may convert numeric values into string format unintentionally. This can cause issues if subsequent calculations or operations require numerical data, as string values may not behave as expected.
7. Things to Remember
When using the Flash Fill feature, it is essential to consider the following points:
- Thorough Data Checking: It is crucial to carefully review the data after applying Flash Fill. Merely assuming that it worked correctly based on the first few rows can lead to serious mistakes. A thorough verification of the transfsormed data is necessary to ensure accuracy.
- Consistency of Data: Flash Fill works best when the data is consistent. Inconsistent patterns or variations in the data may result in incorrect or incomplete transformations. Ensuring data consistency improves the reliability of Flash Fill.
- Providing Sufficient Examples: Flash Fill’s accuracy can be enhanced by providing more examples of the desired transformation. The more representative examples you provide, the better the algorithm can understand and generalize the pattern, leading to more accurate results.
Application of Use Flash Fill in Excel
- Name Formatting:
- Quickly split full names into separate first and last name columns or vice versa.
- Date Formatting:
- Convert date formats (e.g., from “MM/DD/YYYY” to “DD-MM-YYYY”) or extract specific date components (e.g., year, month, day) from date strings.
- Concatenation:
- Combine data from multiple columns into a single column, making it easier to create personalized salutations or merge address components.
- Text Extraction:
- Extract specific text patterns from strings, such as extracting email addresses from a list of text.
- Data Cleaning:
- Standardize and clean messy data by removing extra spaces, formatting inconsistencies, or unwanted characters.
- Numeric Operations:
- Perform numeric operations on data, such as adding prefixes or suffixes to numbers, making data consistent and ready for analysis.
Flash Fill in Excel simplifies data manipulation and formatting, reducing manual effort and increasing data accuracy for various data cleaning and transformation tasks.
You may be interested:
