The fill handle in Excel is an incredibly efficient tool for automating data entry, extending formulas, and replicating patterns with just a drag and a click. Whether you’re a financial analyst preparing reports, a marketer managing extensive datasets, or an educator organizing grades and schedules, mastering the fill handle can dramatically streamline your workflow. This guide will introduce you to the power and versatility of the fill handle in Excel, providing you with practical tips and step-by-step instructions to harness this feature for a wide range of tasks. By incorporating the fill handle into your repertoire, you’ll not only save time but also enhance the accuracy and consistency of your data management.
In this tutorial, you will learn what a fill handle is and how to use it. You will also learn how to enable it if it cannot be found.
This Tutorial Covers:
- What’s this Fill Handle in Excel
- How to Use Fill Handle in Excel
- Examples of Using Fill Handle in Excel
- Autofill Numbers that Increment/Decrement by 1
- Autofill Weekday Names
- Autofill Dates
- Auto Fill Options
- Autofill Options for a List with Numbers
- Autofill Options for a List with Dates
- Autofill Options for a List with Day Names
- What if you can’t find the fill handle in Excel
- Creating Custom Criteria for Autofill
1. What’s this Fill Handle in Excel?
Fill Handle is a tool in Excel that automatically fills the rows and columns based on the pattern of values in the chosen cells and generates a list of series.
The fill handle is a tiny, plus-shaped icon that is always present in the bottom right corner of every cell. Users simply need to click on it, move it with their mouse, or double-press it, and it will automatically fill the chosen cells with the values they have entered, creating a series.
If you have a value in the cell(s) in the starting cells from which you want to make a list, you can use Fill Handle to automatically fill the other cells.
2. How to Use Fill Handle in Excel?
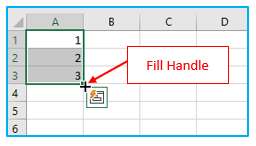
First, let’s clarify where the fill handle is located in Excel.
Assume you possess the information depicted below:
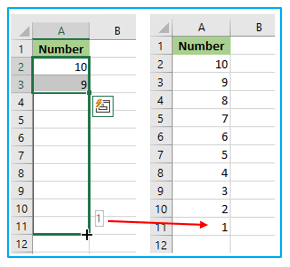
How to use the fill handle to quickly insert numbers? (In this example, I want to add 10 numbers serially):
Step 1: Choosing the data collection.
Step 2: When you move the mouse over the selection’s bottom-right corner, the plus symbol will appear as shown below:
Step 3: Drag the cursor down by clicking the left button. In order to fill the full series, Excel finds a pattern in the first two numbers (a one-step increment).

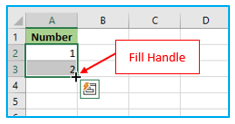
You can also double click while moving the mouse over the selection’s right edge if the neighboring column’s data is present. Based on the information in the adjacent column, it will instantly fill the list up to the last cell.
3. Examples of Using Fill Handle in Excel
The aforementioned examples demonstrated how to finish the list of numbers using Excel’s fill handle (that increment by 1).
A fill handle can instantly identify the pattern and fill the cells in a wide variety of additional circumstances. They are covered in the following part.
- Autofill Numbers that Increment/Decrement by 1
Cells can be rapidly filled when the number increases by 1 as demonstrated above.
When the number decreases by 1, you can also rapidly fill cells.
Keep in mind that the fill handle functions both ways. Either you can fill it up by pulling it upwards or you can fill it down by dragging it down.
- Autofill Weekday Names
To autocomplete workday names in Excel, use the fill handle function. It could either be the complete name (Monday, Tuesday) or the nomenclature using the three alphabets (Mon, Tue…).
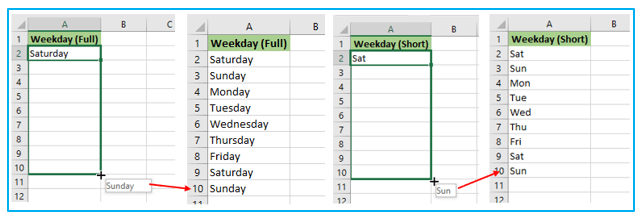
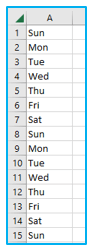
Keep in mind that it first starts over with the same name at the beginning after filling the cells with the names of seven dates. For instance, it begins with Monday in the example above and automatically inserts Monday once more after Sunday.
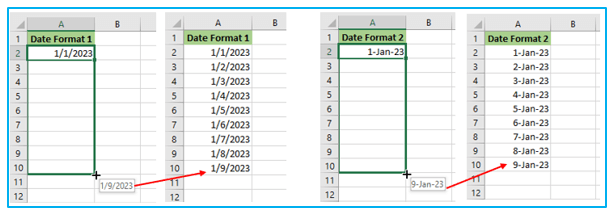
- Autofill Dates
Using Excel’s fill handle, you can quickly autofill times. The fill handle can be used to enter dates in any date style that Excel supports.
4. Auto Fill Options
The fill handle offers some extra options in addition to recognizing patterns and filling the list.
You will see the Autofill option icon at the bottom right of the list as soon as you move the mouse (or double-click) and autocomplete the list.
A menu of choices appears when you click on this symbol. These choices vary depending on the sort of data (numbers, dates, days).
- Autofill Options for a List with Numbers
The Auto Fill Options icon will appear in the bottom right corner when you use the fill handle to automatically finish a list of numbers. For more choices, click on that icon.
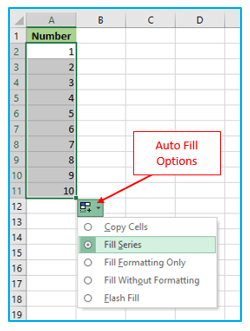
Let’s examine these possibilities:
Copy Cells: If you choose this choice, the cells will simply be copied and pasted.
Fill Series: In this initial setting, the series is filled based on the pattern it detects. The cells in the illustration below are filled with numbers that increase by 1 each time.
Fill Formatting Only: This selection only fits the formatting; the values are left blank.
Fill Without Formatting: This choice does not copy the formatting; instead, it fills the cells according to the recognized pattern. When this choice is chosen in the example below, the border and color are not applied to the filled cells.
Flash Fill: Only Excel 2013 has this novel feature, which is only available. Based on the values in neighboring cells, it determines the pattern to finish the list.
- Autofill Options for a List with Dates
Additional choices become available in the autocomplete options if you are using the fill handle to autocomplete dates.
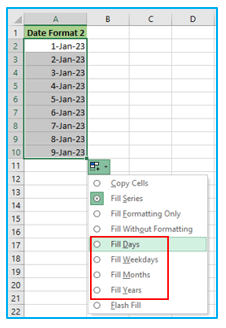
When using dates, the following extra choices become available:
Fill Days: The days will be added to the roster. If you choose this choice in the aforementioned example, the cells will be filled with dates that increase by one (which is also the default fill in this case).
Fill Weekdays: It removes weekends and only inserts weekdays into the compartments.
Fill Months: The cells are filled with months that are increasing. The month numbers in this instance shift, but the day number stays the same.
Fill Years: It inserts years that are increasing into the cells. In this instance, the year shifts but the day number stays the same.
- Autofill Options for a List with Day Names
There are some extra choices that are available when using day names (as compared with autofill with numbers).
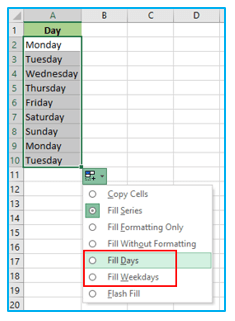
When using days, the following extra choices become available:
Fill Days: The days will be added to the roster. If you choose this choice in the aforementioned example, the cells will be filled with days that increase by one (which is also the default fill in this case).
Fill Weekdays: It removes weekends and only inserts weekdays into the compartments.
5. What if you can’t find the fill handle in Excel?
If the fill handle is not functioning in your Excel workbooks, don’t panic. There is a choice to make it active (although it is enabled by default, it may happen that you disable it by mistake).
How to enable the fill handle in Excel is in below:
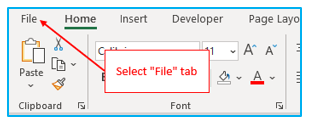
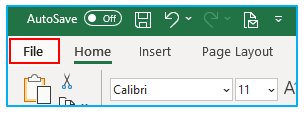
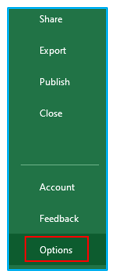
Step 1: Go to the “File” option.
Step 2: Select “Options” by clicking.

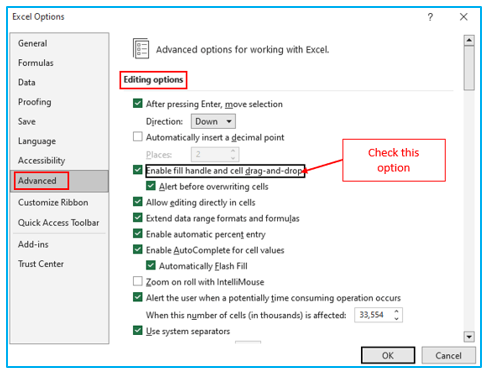
Step 3: From the dialogue box’s left side, choose “Advanced.” Make sure the “Enable fill handle and cell drag-and-drop” option is checked in the “Editing Options” area. Select OK.
6. Creating Custom Criteria for Autofill
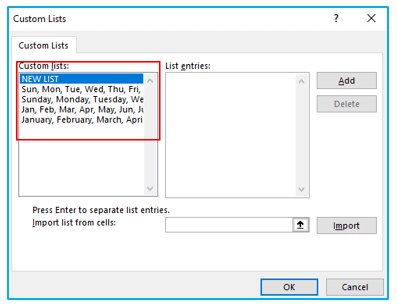
Excel comes with certain pre-fed custom lists by default that you may use to save time.
Use Excel fill handle to fill in the remaining days, for instance, if you type “Sun” in one cell and “Mon” in the one next to it. If you drag to extend the choices, it will repeat and give you the day’s name once more.
The pre-built custom lists for Excel are listed below. As you can see, the names of the days and months are mostly used since they are constant and will not change.
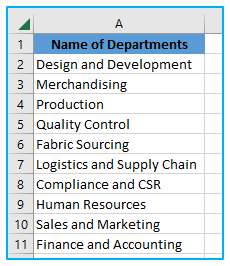
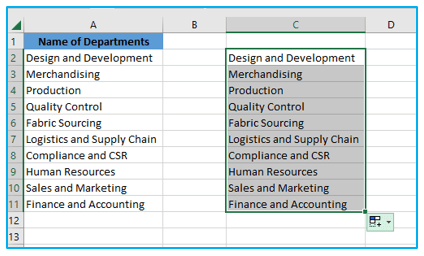
Now, let’s say you want to make a custom list in Excel for a list of departments you frequently use. In this way, you won’t have to dig through old papers the next time you need the names of all the departments in one spot. Simply type the first two in the list and drag them into place.
The steps to make your own Custom List in Excel are in below:
Step 1: On the File tab, click.
Step 2: Select “Options”. This will bring up the dialog box for “Excel Options.”
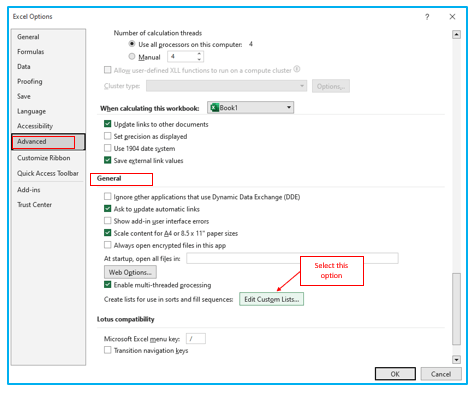
Step 3: In the left-hand menu, select Advanced. Click the “Edit Custom Lists” button under the General section (you may have to scroll down to get to this option).
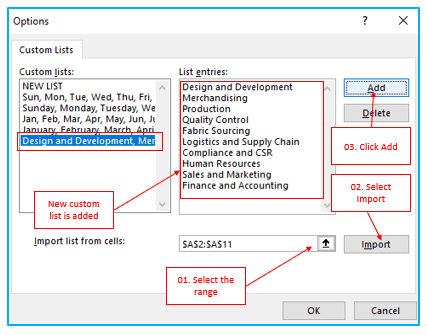
Step 4: Import the list by choosing the range of cells that contain it in the Custom Lists dialog box. As an alternative, you can type the name by hand into the List Entries field (separated by comma or each name in a new line). Select Add. You will see that your list has been added to the Custom Lists as soon as you click Add.
As soon as you have the list in Excel’s backend, you may utilize it with Autofill in the same way that you would use numbers or months (as shown below).
While it’s amazing that you can easily drag and drop these custom lists names into Excel, there is something even more awesome that you can do with custom lists (that is what the next part is about).
Pro tip: You can also make a named range and utilize it to make the custom list. To do this, click OK after entering the named range’s name in the “Import list from cells” area. The advantage of this is that if you modify or broaden the named range, the custom list will also be instantly modified.
For ready-to-use Dashboard Templates:
