DATEVALUE Function in Excel is a powerful tool for converting text representations of dates into proper date values, enabling efficient date-based calculations and analysis. By leveraging the DATEVALUE Function, you can transform date data stored as text into a format that Excel recognizes, ensuring accuracy and consistency in your spreadsheets. Say goodbye to manual date conversion processes and hello to streamlined data manipulation with this essential function. Whether you’re working with imported data, generating reports, or performing date-based calculations, the DATEVALUE Function in Excel provides the flexibility and precision you need. Embrace the convenience of this feature to enhance your data management tasks and unlock new insights from your date-related data. With just a simple formula, you can convert text dates into usable date values, making your Excel experience more efficient and reliable.
This Content Covers:
- Definition of DATEVALUE Function.
- Syntax, Arguments and Purpose of DATEVALUE Function.
- How to use DATEVALUE Function in Excel?
- By Inserting a Date in the Function
- By using Cell References in the Function
- Cell Formatting for DATEVALUE Function with Format Cells Dialogue Box.
1. Definition of DATEVALUE Function.
The DATEVALUE function in Excel is an in-built function which converts a date that is represented as a text string into a genuine Excel date. Dates imported from external sources that are in text format can be properly formatted and recognized by Excel using the DATEVALUE function for further analysis. The DATEVALUE Function is listed under Excel Date/Time functions.
2. Syntax, Arguments and Purpose of DATEVALUE Function.
Syntax:
=DATEVALUE(date_text)
Purpose:
Transform a textual date into a real date
Arguments:
date_text- A valid date in text format.
3. How to use DATEVALUE Function in Excel?
3.1 By Inserting a Date in the Function
Numerous date formats can be used when directly entering dates into the DATEVALUE function.
Step 1: Select a cell, enter a date with your preferred date format inside the DATEVALUE function, and hit Enter key.
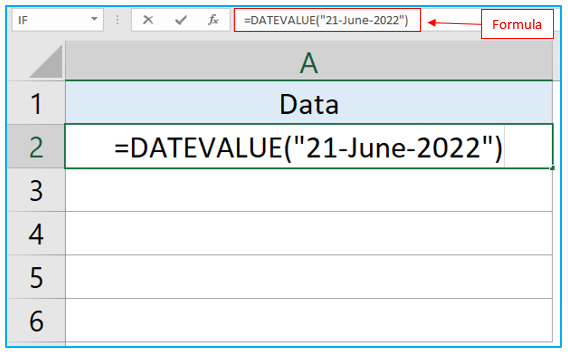
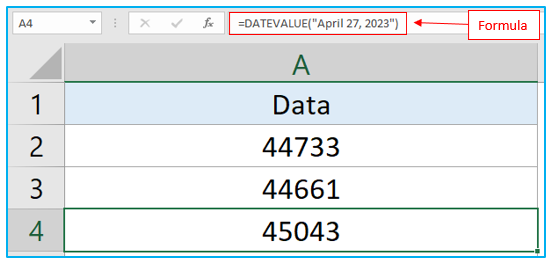
Step 2: Each time you enter a different date into a cell with a different date format, that cell will receive serial number for the dates.
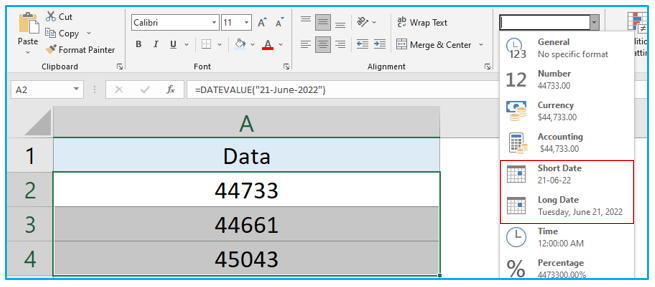
Step 3: To give all the numerical dates an appropriate date format appearance, select them all and then select Long Date or Short Date.
3.2 By using Cell References in the Function
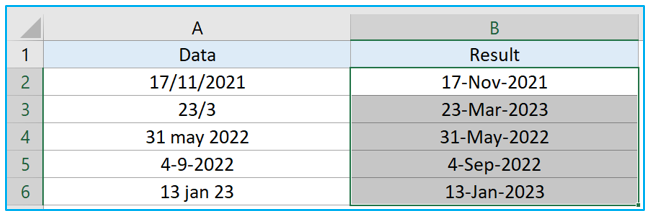
We will be converting these dates from Data column into legitimate dates using the DATEVALUE function.
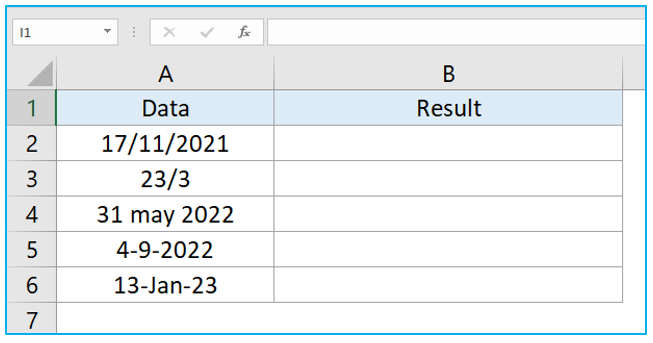
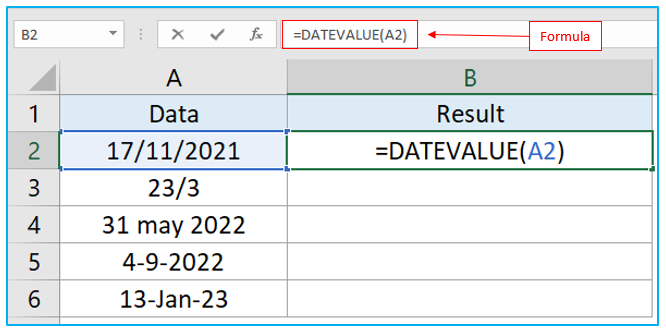
Step 1: Select cell B2 and insert the formula given below inside it and click Enter key.
=DATEVALUE(A2)
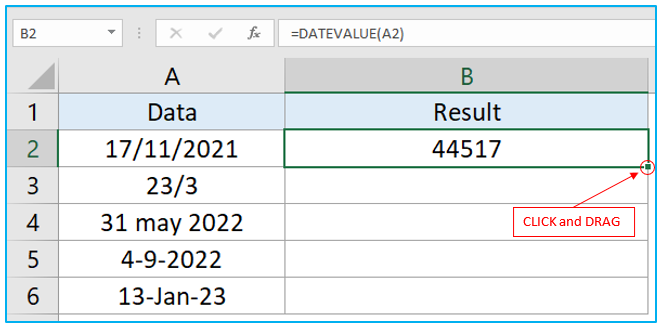
Step 2: When you hit Enter key, the formula will return a numeric value inside the cell which is the date’s serial number. Now right click on the lower right corner of cell B2 and drag it down to B6.
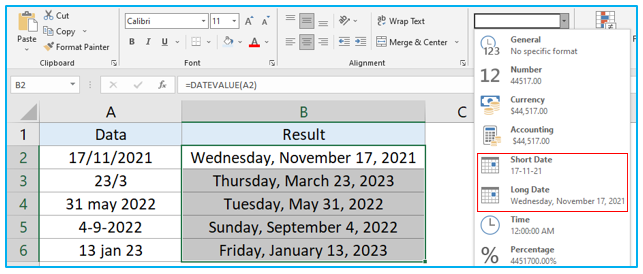
Step 3: Here you can see cell B6 resulted in #VALUE error. This happened because the date in A6 was not formatted as text. If you format it as text then the formula will return a number value just like the rest of them.

Step 4: Select the number values and choose Short Date or Long Date from this drop-down list.
4. Cell Formatting for DATEVALUE Function with Format Cells Dialogue Box.
Suppose you have created some numeric date values using any of the above-shown methods and you don’t want to use the Long Date and Short Date to format them. Instead, you want to choose a custom date format. You can do that with the help of Format Cells dialogue box.
Step 1: Select the cells and right click on them. Choose Format Cells. Or select the cells and use CTRL+1 shortcut to open Format Cells dialogue box.
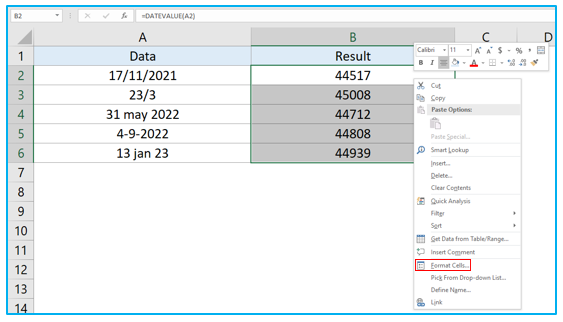
Step 2: Go to Number Tab>>Date and choose your preferred date format. Click OK.

Step 3: All the cells containing DATEVALUE formula have been formatted into the selected date format.
Application of DATEVALUE Function in Excel
- Date Conversion: Utilize DATEVALUE Function in Excel to convert text representations of dates into proper date values, ensuring consistency and accuracy in data analysis.
- Imported Data: Convert dates imported as text into Excel into a format that can be used for calculations or analysis, improving data integrity and usability.
- Data Cleaning: Standardize date formats by converting text dates using DATEVALUE Function, enhancing data cleanliness and consistency in spreadsheets.
- Date Comparison: Facilitate date-based comparisons by converting text dates to date values, enabling accurate chronological sorting and analysis.
- Conditional Formatting: Apply conditional formatting based on date values derived from text using DATEVALUE Function, enhancing data visualization and analysis.
- Chart Creation: Convert text dates to date values for use in creating charts or graphs, allowing for accurate representation and analysis of time-series data.
For ready-to-use Dashboard Templates:
