Set Print Title in Excel to bring consistency and clarity to your printed documents, ensuring that essential headers and labels are visible on every page of your spreadsheet. This feature is indispensable for professionals dealing with extensive reports, data tables, or financial statements where continuity and readability are key. Whether you’re an accountant finalizing year-end reports, a project manager documenting phases and milestones, or a teacher organizing student grades, this guide will provide you with a clear, step-by-step approach to set print titles in Excel. By mastering this function, you’ll ensure that your printed spreadsheets are not only informative but also professionally presented, with important titles and headers neatly displayed on each page.
In this Excel tutorial, you will learn how to set print titles. This feature allows you to keep specific rows and columns visible on every printed page, ensuring clarity and organization in your printouts. Let’s get started!
This Tutorial Covers:
- Why it is important to set print titles in excel
- How to Print Titles in Excel (Step by Step)
- Print Excel Titles Row Numbers and Column Alphabets
- Things to Remember
1. Why it is important to set print title in excel?
Setting print title in Excel is important for several reasons:
Clarity and Readability: When dealing with large spreadsheets that span multiple pages, it can be challenging for readers to understand the context of the data without proper headings. By setting print titles, you ensure that column headers and important row labels remain visible on every page, making it easier for readers to follow the information.
Avoiding Data Misinterpretation: Without print titles, readers may lose track of which data belongs to which category or column. This could lead to misinterpretation of the information, potentially causing errors in decision-making or analysis.
Professional Appearance: When sharing Excel data with others, professional-looking printouts are essential. Print titles add structure to your printed documents, enhancing their visual appeal and making a positive impression on stakeholders or colleagues.
Quick Reference: Print titles allow users to refer back to the column headers or row labels without needing to flip back and forth between pages. This saves time and improves efficiency, especially when analyzing data in printed form.
Presenting Data Effectively: Whether it’s a financial report, sales data, or any other type of information, setting print titles helps present data in a clear and organized manner. This is particularly crucial when sharing reports with clients, managers, or team members.
By taking advantage of the print titles feature in Excel, you can create more professional, easy-to-read printouts, ensuring that your data is accurately understood and interpreted by others.
2. How to Set Print Title in Excel? (Step by Step):
Let’s say we have a massive sheet. This must be printed with headers on each printed sheet.
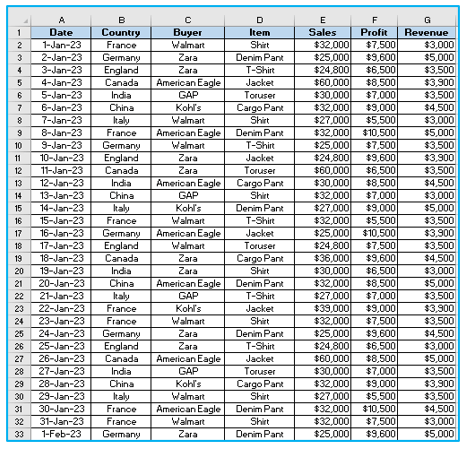
To print a large Excel sheet with headers on all printed sheets, follow these steps:
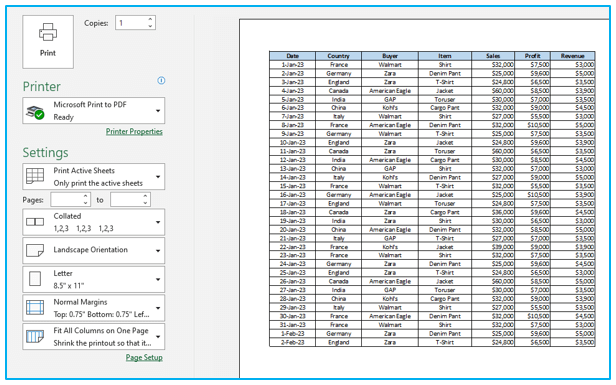
Step 1: Begin by pressing the “Ctrl + P” shortcut key to open the print dialog in Excel.
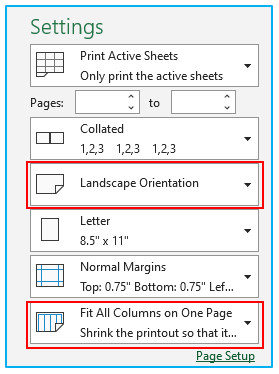
In the print settings, choose “Landscape Orientation” to ensure a wider layout that accommodates more columns on a single page.
To fit the entire dataset onto one page horizontally, select the option “Fit All Columns on One Page.” This will ensure that all columns are scaled down to fit the width of the page.
All of the columns are now arranged on a single sheet.
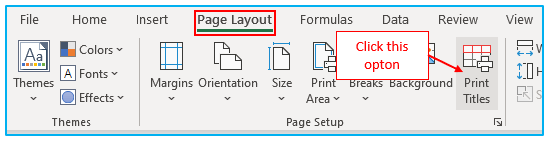
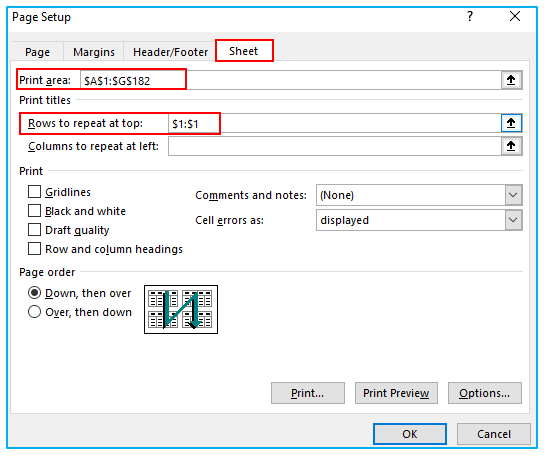
Step 2: We must now print the heading again on each sheet. Go to the “Page Layout” tab and under the “Page Setup” Section, locate the “Print Titles” button and click it. This will open the “Page Setup” dialog box
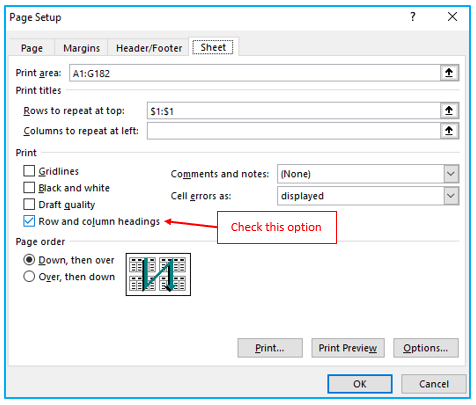
Step 3: In the “Page Setup” dialog box, switch to the “Sheet” tab. In the “Print area” field, click the small icon and select the entire dataset. For this example, we need to print from A1 to G182.
In the “Rows to repeat at top” field, click the small icon and select the row(s) containing the headers that you want to repeat on all printed sheets. Here, we need to choose our headers, or the first row.
Step 4: To proceed, press “OK.” The top row can be adjusted to repeat across all sheets. Click “Print” to get the print preview now. The first sheet is seen in the preview below.
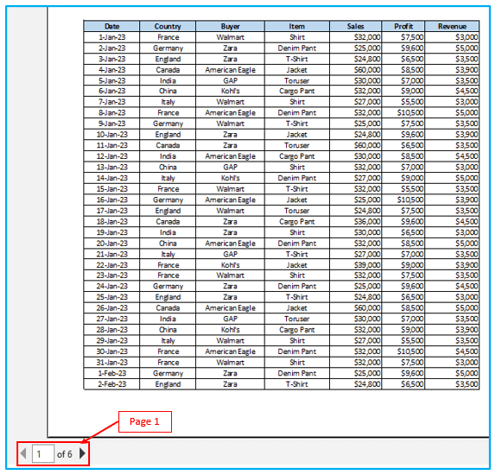
Step 5: Check out the preview of the second sheet now. Headings are also included.

We can have a header on every printing page in this method.
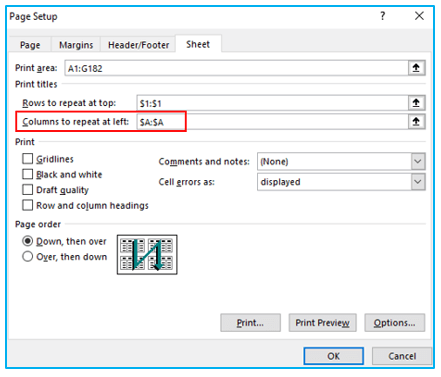
It is equivalent to having row headers across pages to have column headers on every printing page. We must decide which column to repeat.
- Print Excel Titles Row Numbers and Column Alphabets:
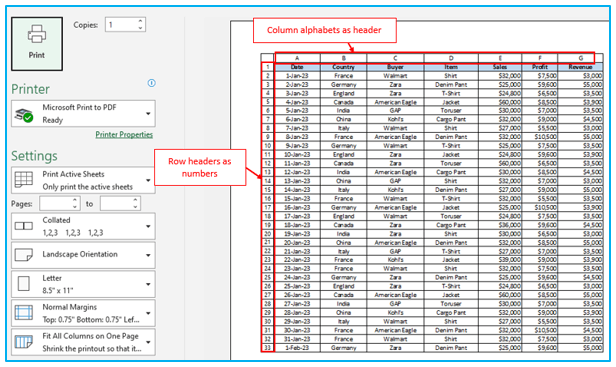
When printing an Excel sheet, you have the option to include row numbers and column alphabets to help users easily identify the cell references.
How to print Excel row numbers and column alphabets is shown below:
Step 1: Go to “Headings” in the “Sheet Options” section of the “Page Layout” tab.
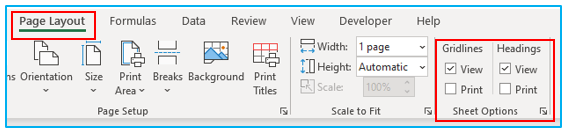
Step 2: As of right now, we can just “View” the headings. The “Print” checkbox under the “Sheet Options” section must be selected in order to print.
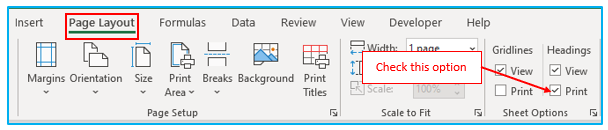
This parameter is also available in the Excel “Print Setup” panel. We must check the option labeled “Row & Column headings.”
Step 3: Press Ctrl + P to open the Print Preview window. The row numbers and column alphabets will be displayed in the top left corner of the window.
3. Things to Remember to set print title
Remembering these key points when printing in Microsoft Excel will help ensure that your printed sheets are well-organized and easy to read:
- Fit All Columns on One Sheet: Before printing, set the print sheet to fit all columns on one page. This will prevent data from being cut off and ensure that everything fits neatly.
- Repeat Row and Column Headers Only for Data Range: When specifying rows or columns to repeat on all sheets, select only the data range, not the entire row or column. This will prevent unnecessary repetition and save space.
- Set Row and Column Headers for Printing: By default, Excel displays row and column headers on the screen, but these headers may not automatically show when printing. Check the appropriate box to include row and column headers in your printout for better context.
- Print Titles for Multiple Sheets: If you have multiple sheets to print, setting the print titles will save time and ensure consistent headers on each printed page. This is especially useful when printing several sheets together.
Following these guidelines will help you create well-formatted and informative printouts from your Excel sheets.
You may be interested:
