Setting Data Validation in Excel is a crucial skill that empowers you to maintain data accuracy and streamline information entry. By mastering how to set data validation in Excel, you gain control over the quality and integrity of your data. Whether it’s restricting entries to predefined options, ensuring dates fall within a specific range, or enforcing numeric limits, this feature enhances your ability to manage data effectively. Embrace the power of setting data validation in Excel to create error-free spreadsheets, improve user interaction, and make your Excel workbooks a hub of reliable information.
This Content Covers:
- What is Data Validation?
- How to set Data Validation in Excel? (Step-By-Step Guide)
- Different Validation Types in Excel.
- Date Validation
- Time Validation
- Validation Based on Text Length
- Data Validation to Create Drop-Down List
- How to Edit Excel Validation Rules?
- How to Locate Cells with Data Validation in Excel?
- How to Duplicate the Settings for Excel Validation to Other Cells?
- Data Validation Removal Method.
1. What is Data Validation?
A feature in Excel called Data Validation limits (validates) user input to a worksheet. Technically, the type of data that can be inserted into a particular cell is controlled by a validation rule that you design. In other words, allowing users to only input pre-defined values in the spreadsheet stops users from entering other sorts of data.
2. How to set Data Validation in Excel? (Step-By-Step Guide)
Follow the steps below to learn how to set data validation rules in your Excel worksheet.
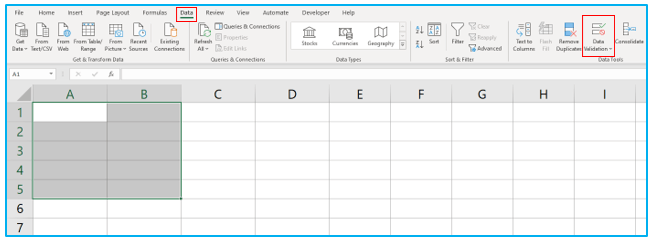
Step 1: Select the cells that you wish to use as validated cells and go to Data>>Data Validation.
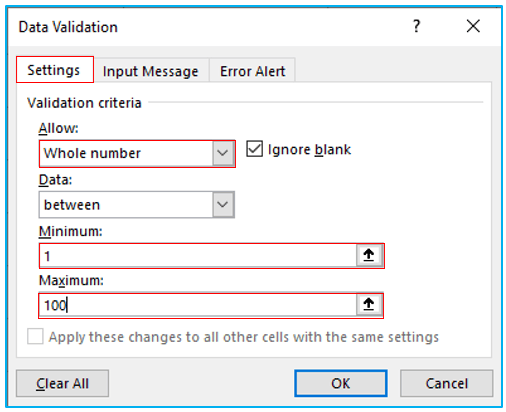
Step 2: The Data Validation dialogue box will open. Go to the Settings tab and set a validation rule as per your preferences. In this instance, I have chosen Whole Number from the Allow box and set a Minimum and Maximum number. If you click OK now, the data validation rules will be applied for those selected cells. The next steps are optional if you want to make the validation a bit more interesting.
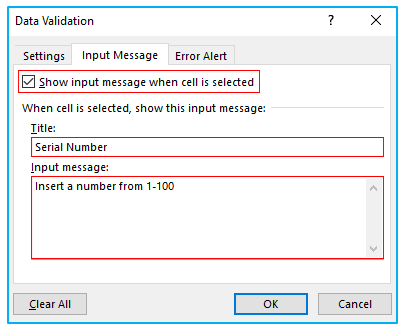
Step 3: You can set an Input Message from this tab in the picture below. Just click on it and check the Show input message when the cell is selected box. Then insert a Title and an Input Message inside these boxes.
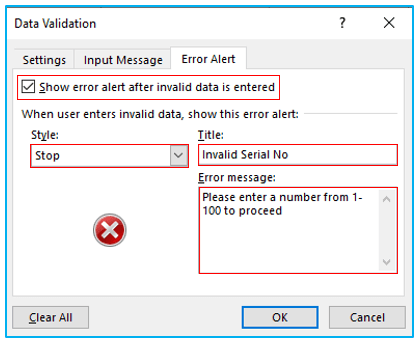
Step 4: You can also set an error alert for your validation rule and set a custom error text from this tab. Go to the Error Alert tab and check the Show error alert after invalid data is entered the box. Choose a style from the Style option and then insert a Title and an Error Message inside these boxes. Click OK, and your data validation rule is set.
Step 5: Now when you click on any of the cells that are validated, this input message that you have set will pop-up.
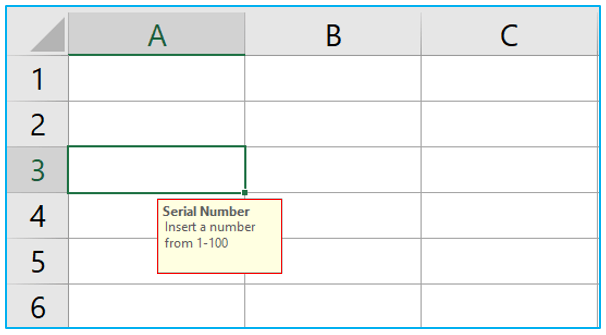
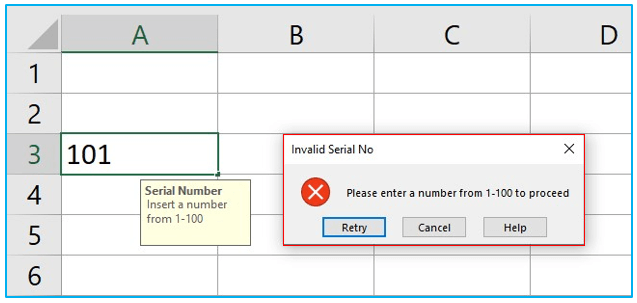
Step 6: If you insert anything that is not a number or outside the range of 1-100, this error text prompt will show in your worksheet because we have set the validation rule as a whole number and from 1-100.
3. Different Validation Types in Excel.
Previously we have seen how to set data validation rule in our excel worksheet, now we will see some of the validation types and how to set them.
3.1 Date Validation
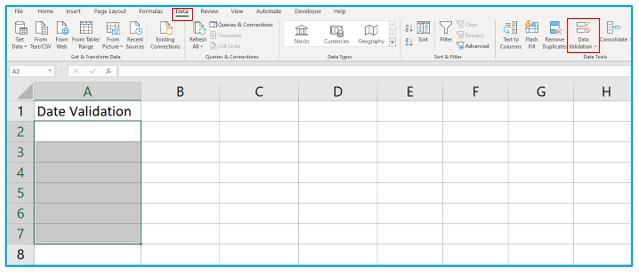
Step 1: Select the cells that you want to set validation rules into and go to Data>>Data Validation.
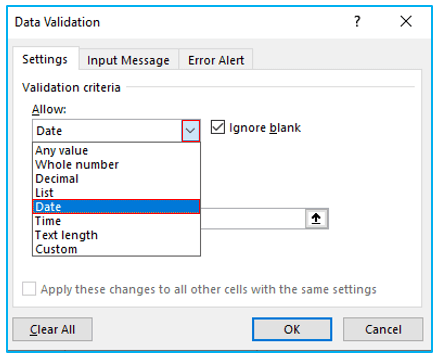
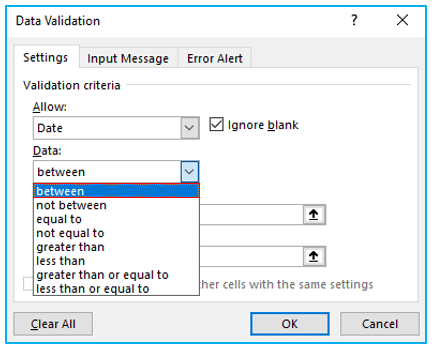
Step 2: Click on the drop-down button of Allow box and select Date.
Step 3: Similarly choose Between from Data category. There are plenty of other options too for your selection based on what sort of validation you want to do. Play with all of them to learn more about them.
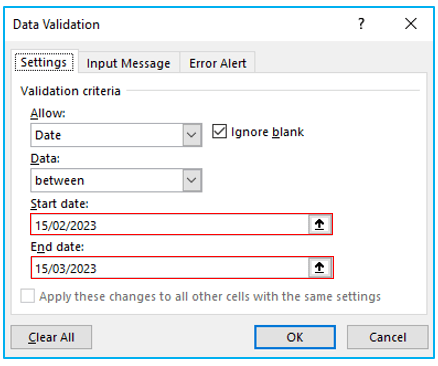
Step 4: Set a Start date and End date and click OK. You can also set Input Message and Error Alert as you have already seen how to do that.
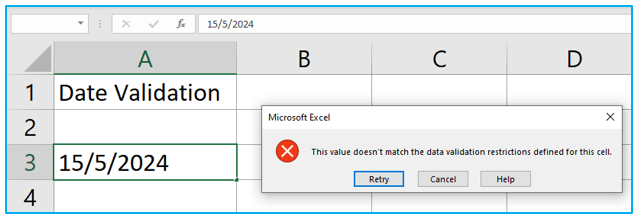
Step 5: The validation rule is set, now if you type anything outside the rule will result in an error text.
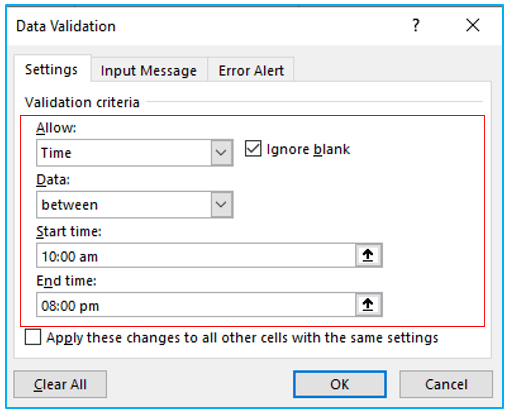
3.2 Time Validation
Step 1: Time validation is the same as date validation. Select the cells, open the Data Validation dialogue box, set the validation rule, and click OK.
3.3 Validation Based on Text Length
Step 1: This time select Text Length and set the other validation rules, then click OK.
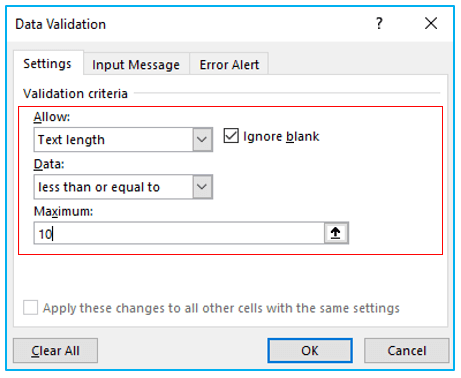
Step 2: If you exceed the limit given by the validation rule, error messages will appear.

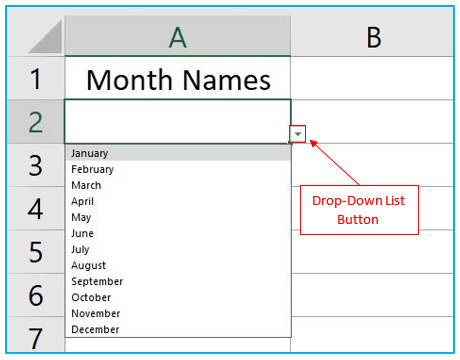
3.4 Data Validation to create Drop-Down List
Suppose now we want to create a drop-down list in our excel worksheet, how do we do that? There are many ways you can create a list in excel but using the List option from Data Validation dialogue box is one of the quickest and easiest ones. Let’s learn how to do that.
Step 1: Select a cell which you want to use as a drop-down list search box and open the Data Validation dialogue box like before. Select List and type the month names inside Source box. Click OK.

Step 2: Now when you select that cell you will notice a drop-down button. Click on it to see the complete drop-down list.
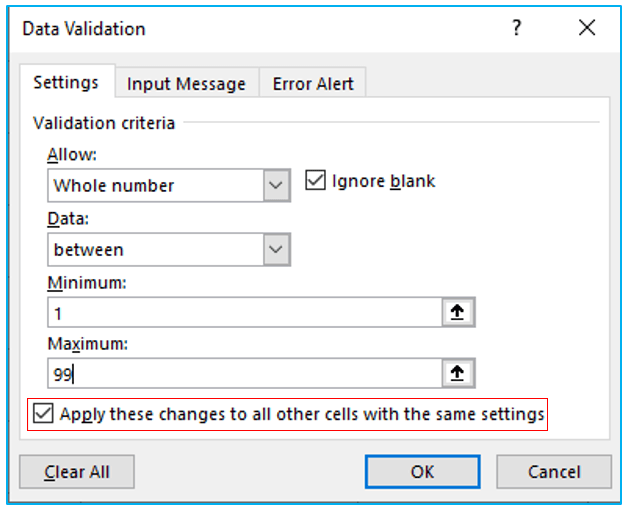
4. How to Edit Excel Validation Rules?
Step 1: To edit or make changes to the previously made data validation rule, simply click on any of the cells that are validated and open the Data Validation dialogue box. Then make the necessary changes and before you click OK, make sure to check Apply these changes to all other cells with the same settings box.
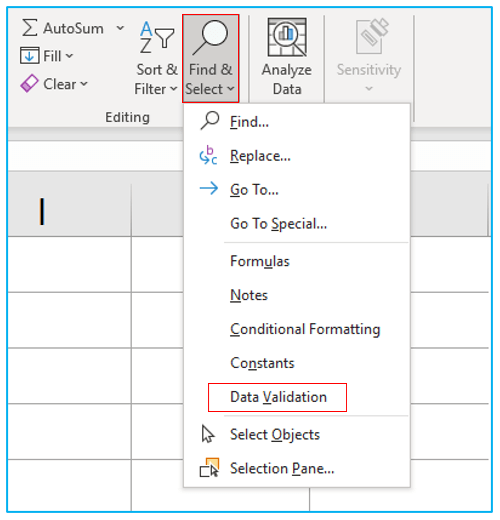
5. How to Locate Cells with Data Validation in Excel?
Step 1: Go to Home>>Find & Select and select Data Validation from the drop-down list. This will select and highlight all the cells with data validation applied to them.
6. How to Duplicate the Settings for Excel Validation to Other Cells?
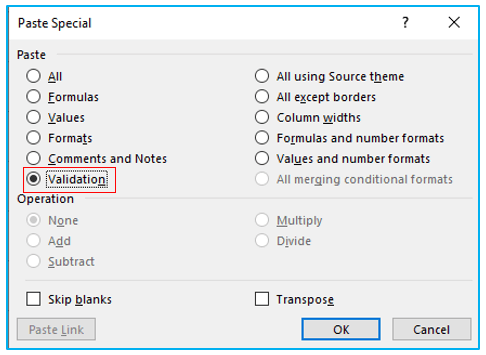
Step 1: Select a cell that has a data validation rule applied to it and copy it using CTRL+C shortcut. Then select the cell/cells in which you want to paste the validation rule and press CTRL+ALT+V shortcut to open the Paste Special dialogue box. Select the Validation option and click OK. The data validation rule will be pasted in those selected cells.
7. Data Validation Removal Method.
Step 1: Select the cells with data validation and open the Data Validation dialogue box. Then click on Clear All option and press OK.

Application of Set Data Validation in Excel
- Data Accuracy:
- Ensure data accuracy by limiting input to specific values or ranges, preventing errors.
- Drop-Down Menus:
- Create user-friendly forms with drop-down menus, allowing users to select from predefined options.
- Date Validation:
- Validate dates to ensure they fall within a certain range or adhere to a specific format.
- Numeric Limits:
- Control numeric data entry by setting minimum and maximum values or step increments.
- Text Length:
- Restrict the length of text entries to meet specific criteria, such as character limits.
- Custom Messages:
- Provide custom error messages to guide users when invalid data is entered.
Setting data validation rules in Excel not only improves data quality but also enhances user experience and simplifies data entry tasks.
For ready-to-use Dashboard Templates:
