Reference Another Workbook in Excel stands as the gateway to a world of data integration and collaborative potential. This invaluable feature empowers you to seamlessly bridge the gap between multiple workbooks, ensuring that your data remains interconnected and your insights are always current. With ‘Reference Another Workbook in Excel,’ you’re not just linking data; you’re forging pathways to efficient collaboration, streamlined reporting, and enhanced data accuracy. Embrace the simplicity and precision of this function to unlock the full potential of your Excel workbooks, where data flows seamlessly across organizational boundaries. Whether you’re consolidating information, validating data, or creating dynamic dashboards, ‘Reference Another Workbook in Excel’ is your trusty companion in the journey towards data-driven excellence.
This Tutorial Covers:
- Using the Same Sheet’s Cell as a Reference
- Using a Cell from Another Sheet as a Reference
- Creating Reference to Another Sheet Automatically in the Same Workbook
- How to Use Another Workbook as a Reference in Excel
- Reference to an Open Workbook from the Outside
- Creating a Reference to a Different Workbook (Automatically)
- Reference from Outside to a Closed Workbook
- Effects of File Location Changes on References
- Using a Defined Name as a Reference (in the same or external workbook)
- Using the defined name as a reference within the same worksheet or workbook
- Using the defined name from another worksheet as a reference (Open or Closed)
- Instructions for Making a Reference to a Named Range
1. Using the Same Sheet’s Cell as a Reference
This is the most fundamental level of referencing, where a cell on the same page is mentioned.
For instance, the syntax would be as follows if I wanted to refer to cell A2 from cell C2:
=A2
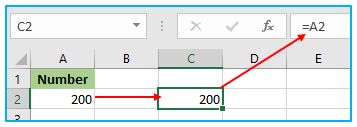
When you do this, cell A2’s value will be replicated in the cell where you use this reference. The cell where you have used this reference will update if you make any modifications to cell A2 at all.
2. Using a Cell from Another Sheet as a Reference
Use the format shown below if you need to link to another sheet in the same workbook:
Sheet_name!Cell_address
The sheet name comes first, followed by an exclamation point, then the cell number.
Therefore, you must use the following citation if you need to refer to cell A2 on Sheet 1:
=Sheet1!A2
Additionally, you must use the following format to refer to a set of columns in another sheet:
Sheet_name!First_cell:Last_cell
Therefore, you must use the reference listed below if you want to refer to the range A1:A5 in another page in the same workbook:
=Sheet1!A1:A5
Please take note that I have only provided a reference to the cell or range. Actually, you would incorporate these into formulas. However, the format of the aforementioned mentions will not change.
The worksheet you’re referring to probably has more than one term in its name. Sales Data, for instance, could be included.
Use single quotes around the name if it contains any spaces or non-alphabetical characters (such as @, !, #, -, etc.).
For instance, you would use the following reference to refer to column A1 on the Sales Data sheet:
=’Sales Data’!A1
If the sheet’s name is Sales-Data, you must use the following reference to refer to column A1 in this sheet:
=’Sales-Data’!A1
You don’t have to be concerned about the reference breaking down if you refer to a worksheet in the same workbook but subsequently change the worksheet’s name. These citations will be updated for you by Excel immediately.
While it’s wonderful to be familiar with the format of these references, it’s not always a good idea to manually type them. It would take a lot of effort and be very error-prone.
I’ll demonstrate a more effective method for you to make cell references in Excel.
- Creating Reference to Another Sheet Automatically in the Same Workbook
Simply pointing Excel to the cell or range to which you want to create the reference and letting it create it on its own is a much better method to create a cell reference to another sheet.
You won’t have to be concerned about the exclamation mark, missing quotes, or any other formatting issues thanks to this. Excel will do the necessary reference creation for you immediately.
The procedure of referencing to another sheet is shown below:
First, Choose the cell in the active workbook that contains the citation you require.
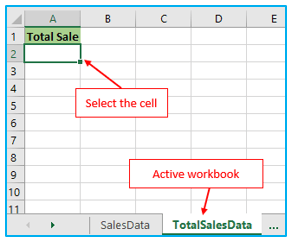
Second, Until you require the reference, type the formula (or an equal-to sign if you just want the reference).
Third, Choose the sheet that needs to be referenced. Choose the cell or region to which you want to refer.
Fourth, Press the enter key on your keyboard to display the formula’s outcome (or continue working on the formula).
By following the steps above, a reference to the cell or range in another sheet would be immediately created.
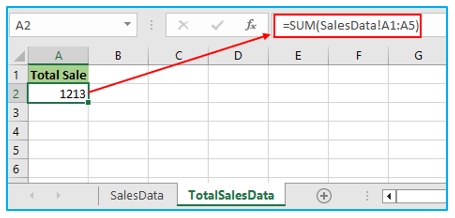
The following formula must be used if I want this reference to always relate to cell A1 in the SalesData sheet:
=SalesData!$A$1
Row and column numbers are locked so that they cannot be changed by the dollar symbol before them.
After discussing how to refer to a different page within the same workbook, let’s examine how to refer to a different workbook.
3. How to Use Another Workbook as a Reference in Excel?
The format of a reference to a cell or range in another Excel document depends on whether that workbook is open or closed.
Unsurprisingly, the title of the workbook and the exercises also affect the format (depending on whether you have spaced or non-alphabetical characters in the name or not).
Let’s explore the various external reference other workbook formats in various situations.
4. Reference to an Open Workbook from the Outside
You need to give the workbook name, worksheet name, and cell/range address when referring to an external open workbook.
You must link to an external open workbook in the manner described below.
='[FileName]SheetName!CellAddress
Let’s say you want to refer to column A1 in Sheet1 of the workbook “ReportData.xlsx” that you have.
The citation for this is given below:
=[ReportData.xlsx]SalesData!A1
You must append the file name (in square brackets) and the sheet name (in single quotes) if the external workbook name, the sheet name, or both contain spaces.
Here are some instances where it would be necessary to put names in single quotes:
='[Report Data.xlsx]SalesData’!A1
='[ReportData.xlsx]Sales Data’!A1
='[Report Data.xlsx]Sales Data’!A1
- Creating a Reference to a Different Workbook (Automatically)
Again, while knowing the format is helpful, it’s best to avoid directly typing it.
Instead, Excel will create these references for you if you just point it in the correct direction. This is much quicker and has much lower mistake rates.
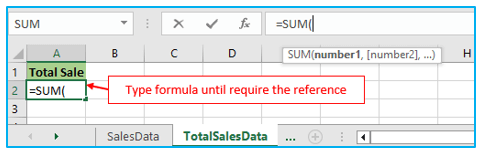
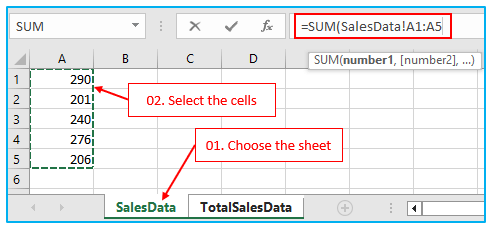
For instance, if you have data in cells A1 through A5 of a sheet called “Sales Data” in a workbook called “Report Data,” and you want to calculate the sum of these values in the present sheet.
The steps to reference another excel sheet are described below:
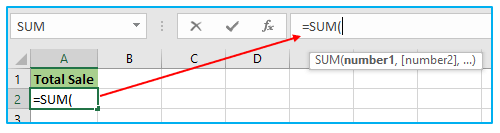
Step 1: In the current sheet (where you need the outcome), enter the following formula:
=SUM(

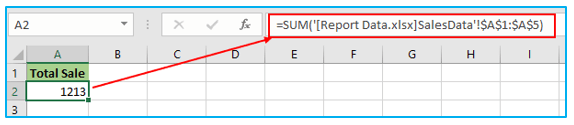
Step 2: Open the document titled “Report Data.” Pick the sheet labeled “Sales Data.” Choose the number you want to include (A1:A5). Excel will instantly generate a reference to this range as soon as you do this (you can see that in the formula bar).
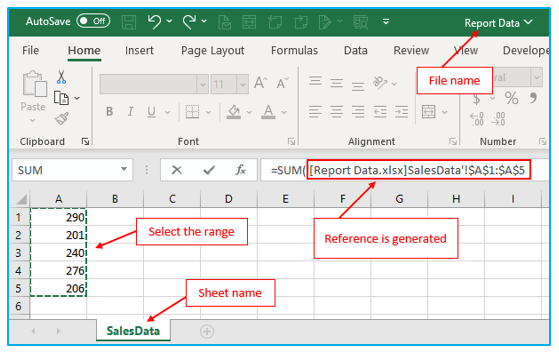
Step 3: Press the enter key on your keyboard. The formula would be instantly created with the proper references.
When adding a reference to an external workbook, you’ll observe that absolute references are always created. This indicates that the row and column values are preceded by a $ sign. Due to absolute reference, this means that if you duplicate and paste this formula into other cells, it will continue to refer to the same range.
You must explicitly change the references if you want this to change.
5. Reference from Outside to a Closed Workbook
The file name, sheet name, and cell/range location are all that are required when referencing an open external workbook.
Excel, however, has no idea where to search for the cells or range you mentioned once this is closed.
This is the reason why you must also give the file path when creating a reference to a closed workbook.
A reference to cell A1 in the “SalesData” worksheet of the “Report Data” workbook can be found below. It also alludes to the file’s storage location because this file is not open.
=SUM(‘C:\Users\Hashim\Desktop\[Report Data.xlsx]SalesData’!$A$1:$A$5)

The following sections are included in the aforementioned reference:
- File Path – the location of the external file on your computer or network
- File Name – the external workbook’s identity. This would also apply to the file extension.
- Sheet Name – the sheet’s name where the cells or ranges are located.
- Cell/Range Address –what specific cell/range location you’re referencing
When a workbook is open when an external reference is created, the reference will immediately change when the workbook is closed. Excel inserts a reference to the file path immediately after the external workbook is closed.
6. Effects of File Location Changes on References
When you open an external Excel file and create a reference to a cell or range within it, the reference now also utilizes the file path.
However, nothing in your workbook will alter if you change the file location (in which you create the reference). However, since you modified the URL, the link is no longer active.
As a result, if you exit and reopen this workbook, it will inform you that the link needs to be updated or broken entirely. You will see the statement as shown in below:

When you select Update, a new prompt will appear where you can select the choices to edit the links (which will show you the below dialog box)
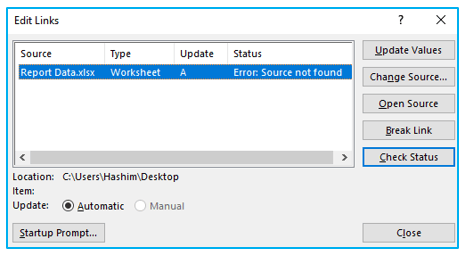
By selecting Update Values, you can designate the new location of the file if you need to maintain these files linked. By navigating to the new file location and selecting it, Excel will open a dialog window where you can enter the new file location information.
7. Using a Defined Name as a Reference (in the same or external workbook)
It is preferable to give the ranges defined titles when you need to refer to cells and ranges.
This is advantageous because it makes it simple for you to refer to these groups by their names rather than their lengthy and intricate reference addresses.
Additionally, you only need to update the reference once you’ve used this defined name in multiple formulas.
The following instructions will show you how to name a group of cells:
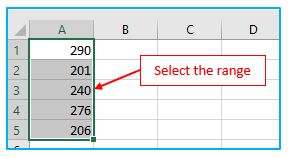
Step 1: Choose every cell that you want to be a part of the specified range.
Step 2: On the “Formulas” menu, click. In the “Defined Names” group, select the “Define Name” choice.
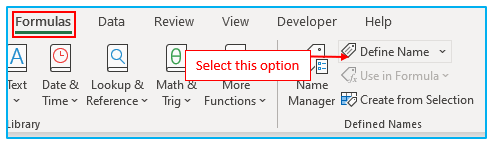
Step 3: Give this range a name in the “New Name” dialog window. Keep in mind that names cannot contain space.
Maintain “Workbook” as the “Scope” (unless you have a strong reason to make it sheet-level). Verify that the area that the refers to is accurate. Select OK.

The named range you just made can now be used in place of cell references and cell addresses.
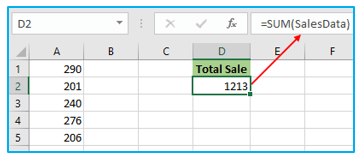
You can use the following formula, for instance, to get the total of all the cells in the “SalesData” range:
=SUM(SalesData)
What would happen if you wanted to use this named range in different exercises or even different workbooks?
You may! You simply need to adhere to the structure that was covered in the part above.
Workbook vs. Worksheet Level Named Ranges:
There can only be one range with the name range when you make a workbook level with that name. As a result, you don’t need to specify the worksheet name when referencing it from worksheets in the same workbook or worksheets in other workbooks because it can be used throughout the complete workbook. If you use the worksheet level called range, you can only use it within the worksheet, and you must also include the worksheet name when referencing it.
- Using the defined name as a reference within the same worksheet or workbook
If you have specified a name at the workbook level, you can use it wherever you want in the workbook by simply using the defined name.
For instance, I could use the algorithm below to find the total of all the cells in the named range we made (SalesData):
=SUM(SalesData)
If you’ve made a named range at the worksheet level, you can only use this formula if the named range was created on the same sheet as the formula.
Use the following formula if you want to use it on a different sheet, like Sheet 2.
=SUM(Sheet1!$A$1:$A$10)
You must enclose the sheet name in single quotation marks if it contains any spaces or alphanumeric symbols.
=SUM(‘Sheet 1’!$A$1:$A$10)
- Using the defined name from another worksheet as a reference (Open or Closed)
You must first give the name of the workbook before you can reference a named range in a different workbook.
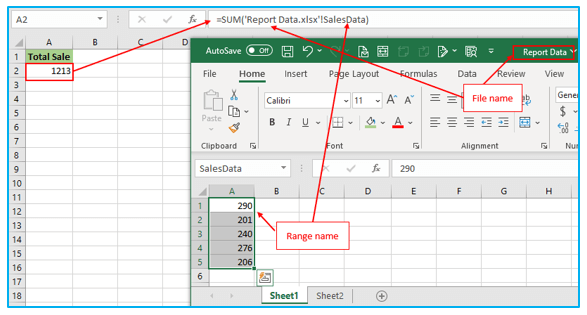
You can use the formula below to get the sum of this range from another workbook, for instance, if you have an Excel workbook called “Report Data.xlsx” and a named range named “SalesData”:
=SUM(‘Report Data.xlsx’!SalesData)
You don’t need to use single quotations if the file name contains no spaces. The following is the formula:
=SUM(ReportData.xlsx!SalesData)
If your workbook contains sheet-level named ranges, you must give both the worksheet’s name and the workbook’s name when referencing it from another workbook.
An example of referring a sheet-level named range is provided below:
=SUM(‘[Report Data.xlsx]Sheet1’!SalesData)
As I also stated above, unless you have a compelling reason to create worksheet level one named ranges, it is always preferable to create workbook level named ranges.
You must also indicate the file path if you’re referencing a named range in a closed workbook. Here is an illustration of this:
=SUM(‘C:\Users\Hashim\Desktop\Report Data.xlsx’!SalesData)

When you open a workbook and add a reference to a named range, Excel immediately updates the reference and includes the file path.
8. Instructions for Making a Reference to a Named Range
How to create a reference to a named range is shown below:
Step 1: Decide which cell you want to put the formula in. To insert the specified range, enter the formula up to that point.
Step 2: F3 should be pressed on your keypad. By doing this, the list of all the names you’ve made will appear in the “Paste Name” dialog box. On the name you want to enter, double-click in your mouse’s left button.
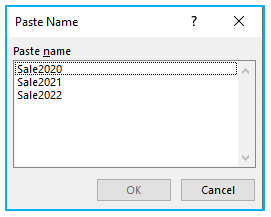
You can proceed to work on the formula after completing the aforementioned steps to insert the name.
In this example, I end this formula here to press enter key on keyboard and see the result which is shown below:
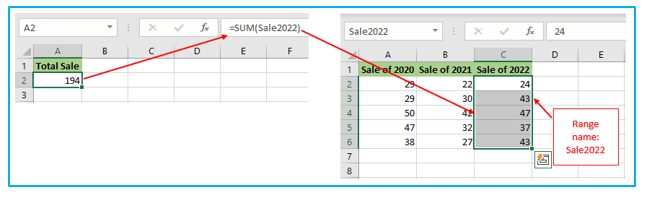
Note: Remember that this method only functions for name groups contained within the same workbook. You must go there, verify the name using the Paste Name dialog box, then return and use it in your formula if you want to get the names in an external workbook (in the correct format using the file name).
Application of Reference another workbook in excel
- Data Consolidation:
- Combine data from multiple workbooks into a single workbook to create comprehensive reports or summaries.
- Data Validation:
- Validate data in your current workbook by referencing external data sources to ensure accuracy and consistency.
- Master Data Management:
- Maintain a central workbook with master data, which can be referenced by other workbooks to ensure data consistency.
- Automated Reporting:
- Automate reporting processes by referencing external data sources, ensuring that your reports are always up-to-date.
- Collaborative Work:
- Collaborate with colleagues by referencing shared workbooks, allowing multiple users to work on different parts of a project simultaneously.
- Dashboard Creation:
- Build interactive dashboards by referencing data from various workbooks, providing a comprehensive view of your organization’s metrics and performance.
Referencing another workbook in Excel streamlines data integration, validation, and reporting, making it a powerful tool for data management and analysis.
For ready-to-use Dashboard Templates:
