This Tutorial Covers:
- What is file protection in excel
- Why use file protection in excel
- Protect Excel file with password
- How to protect worksheet in Excel
- Additional security options
- Points to Remember
1. What is file protection in Excel?
File protection in Excel refers to the process of securing your Excel file from unauthorized access or changes. This can include setting a password to restrict access to the file, restricting permissions to certain users or groups, and encrypting data within the file to prevent it from being read by anyone without proper authorization.
File protection is essential for maintaining the security and confidentiality of sensitive information that may be contained within an Excel file. This can include financial data, personal information, and any other confidential data that needs to be kept secure. By implementing file protection measures, you can ensure that only authorized users have access to the data, and that any changes made to the file are tracked and audited.
Excel provides several built-in security features that can be used to protect your files, and in the following sections, we will explore these features in more detail.
2. Why use file protection in excel?
File protection in Excel is crucial for several reasons:
- Protecting sensitive data: Excel files often contain sensitive and confidential information, such as financial data, personal information, and trade secrets. Protecting this data is critical to prevent unauthorized access or modification.
- Compliance with regulations: Many industries and organizations are required to comply with data protection regulations, such as GDPR or HIPAA. These regulations carry serious legal and financial repercussions for noncompliance.
- Maintaining data integrity: File protection helps ensure the integrity of the data within the Excel file by preventing accidental or intentional changes by unauthorized users.
- Preventing data loss: In the event of a security breach or accidental data loss, file protection measures such as encryption can prevent unauthorized users from accessing the data.
By implementing file protection in Excel, you can minimize the risk of data breaches and protect your sensitive information from unauthorized access or modification.
3. Protect Excel file with password:
One of the most common ways to protect an Excel file is by setting a password. This ensures that only users who know the password can open or modify the file.
Here are the steps to protect an Excel file with a password:
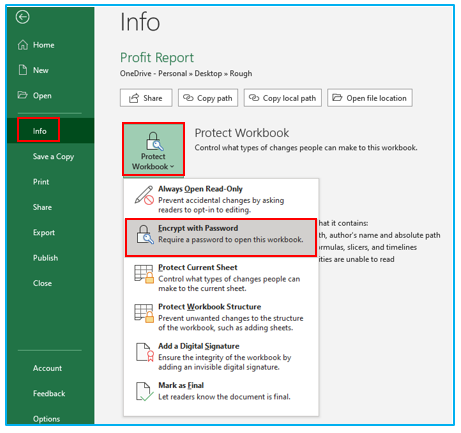
Step 1: Top-left corner of the screen, select the “File” tab. Then, click on “Info” in the left-hand menu to access the file information. From there, select “Protect Workbook” and choose the option to “Encrypt with Password.” This will prompt you to enter a strong password to protect the file.
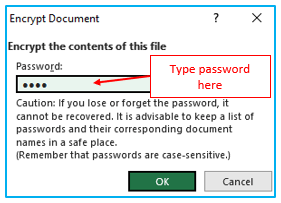
Step 2: Enter a strong password in the “Password” field and click “OK.”
Step 3: In the “Reenter password to proceed” box, type the password again and then click “OK.”
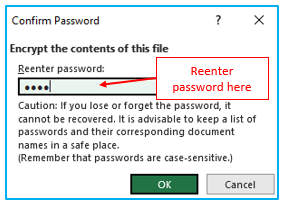
Now, anyone who tries to open the file will be prompted to enter the password you created. Note that passwords should be strong and complex to prevent unauthorized access. It is also important to remember the password or keep a record of it in a secure location, as losing the password will result in permanent loss of access to the file.
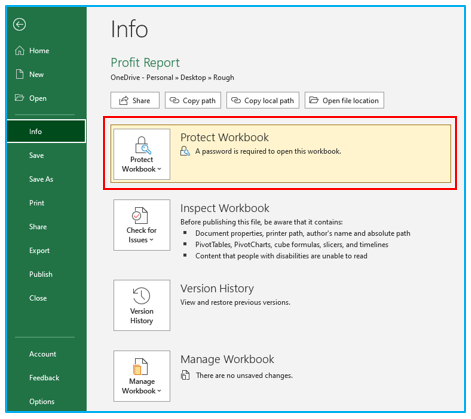
Check the “Protect Workbook” section under the “Info” tab for the document to see if an Excel file is password-protected or not. If a password is necessary to open it, it will let you know.
4. How to protect worksheet in Excel?
Users of Microsoft Excel may quickly track, store, and manage data using this program. By securing worksheets, lock cells prevent unwanted data alterations. To assist prevent it from being altered, you might want to safeguard a worksheet when you share an Excel file with other users.
Procedure of protecting worksheet as follows:
Step 1: Right click a worksheet tab (For example, Sheet1) and click “Protect Sheet”.
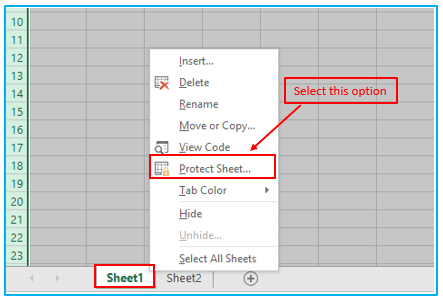
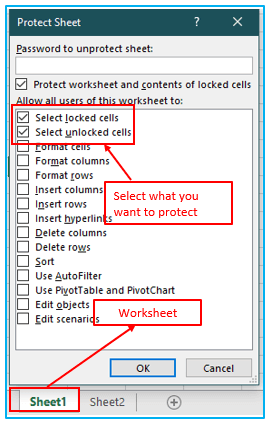
Step 2: Select what you want to protect, type password, and click ok.
5. Additional security options:
If necessary, Excel also enables you to add more specific security settings to your file. In order to achieve the proper security for your project, it is crucial to understand what these additional options do. There are various extra features listed under “Protect Workbook” that can be helpful:
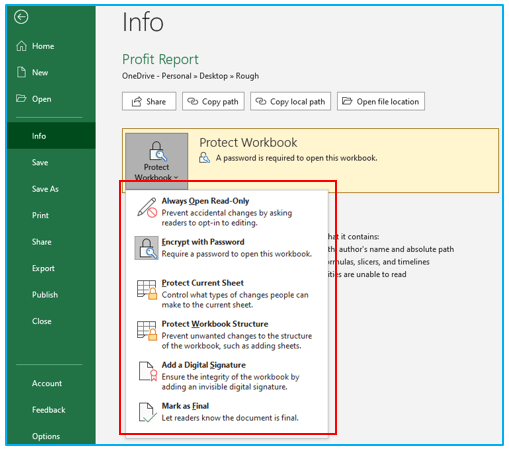
Always Open Read-Only: This option allows you to restrict users from making changes to the workbook by opening it in read-only mode every time. Once this option is enabled, the workbook will open in read-only mode every time someone attempts to access it. This means that users will not be able to make any changes to the file unless they save it with a new name or make a copy of it. This option is useful when you want to ensure that the original file is not accidentally or intentionally modified by other users.
Encrypt with Password: This option allows you to protect the file with a password while allowing users to edit the file. This is useful when you want to restrict access to the file but still allow certain users to make changes.
Protect Current Sheet: This option protects the currently selected sheet within the workbook. You can specify which elements of the sheet are protected, such as cells or charts, and set permissions for users.
Protect Workbook Structure: Once this option is enabled, the workbook structure will be protected, and users will not be able to add, delete, move, or rename sheets without entering the password you created. This option is useful when you want to ensure that the workbook structure remains intact and prevent users from accidentally or intentionally modifying it.
Add a Digital Signature: This option adds a digital signature to the workbook, which verifies the authenticity and integrity of the file. This ensures that the file has not been tampered with or modified since it was signed.
Mark as Final: This option marks the workbook as final, which means it is read-only and cannot be edited. A message is displayed to inform users that the file is final and should not be changed.
By utilizing these additional security options, you can ensure that your Excel-protected file is protected from various forms of unauthorized access or modification. It is recommended to use a combination of these options to provide comprehensive protection for your Excel file.
6. Points to Remember:
- Make sure that your password is particularly memorable because Microsoft cannot recover lost passwords.
- Your passwords can be any length, combination of characters, or number; however, case sensitivity applies.
- Password-protected files containing sensitive data, such as credit card details, shouldn’t always be distributed.
- Sharing passwords or files with other users should be done with caution. You still face the danger of undesired users getting access to your credentials. Keep in mind that simply locking a file with a password won’t guarantee that it’s safe from bad intent.
Application of Protect Excel files
- Confidentiality: Safeguard sensitive data such as financial records, employee information, or proprietary formulas from unauthorized access or disclosure.
- Data Integrity: Prevent accidental or intentional modifications to critical information by restricting editing permissions and enforcing read-only access.
- Compliance: Ensure compliance with industry regulations or internal policies by implementing security measures to protect confidential or personally identifiable information.
- Collaboration: Securely share Excel files with collaborators while controlling access permissions to maintain data confidentiality and integrity.
- Version Control: Protect Excel files from unintended changes or deletions by setting permissions to restrict editing and track changes made by authorized users.
- Protection Against Malware: Mitigate the risk of malware or cyberattacks by password-protecting Excel files and encrypting sensitive data to prevent unauthorized access or tampering.
For ready-to-use Dashboard Templates:
