Print in Excel with confidence and precision by mastering the nuances of setting up your spreadsheets for optimal printing. Whether you’re preparing a financial report, a statistical analysis, or a project plan, knowing how to correctly configure your pages can make all the difference in how your hard work is presented on paper. This step-by-step guide will take you through the process of preparing your Excel documents for printing, from adjusting margins and layout to ensuring that your data is displayed cleanly and comprehensively. By honing your skills to print in Excel, you’ll ensure that your printed spreadsheets are as clear, impactful, and professional as the data they contain.
This Tutorial Covers:
- How to print in Excel
- Print selection, Whole sheet, or the entire workbook
- Print the spreadsheet on one page
- Print to file to save the output for later use
- Print Preview in Excel
- Excel Print Options
- Setting Print Area and how to remove the existing print area
- Insert Page break and remove page break
- Insert Page Numbers and print page numbers in Excel
- Print Formulas
- How to print Excel Chart
- Print with gridlines in Excel
- Print the header on each page
- Print multiple sheets in Excel
- Print all sheets in Excel
1. How to print in Excel?
The procedure for printing Excel spreadsheet:
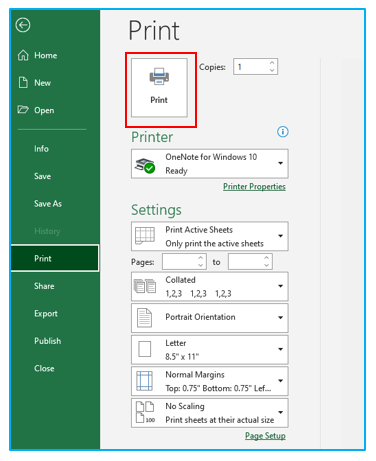
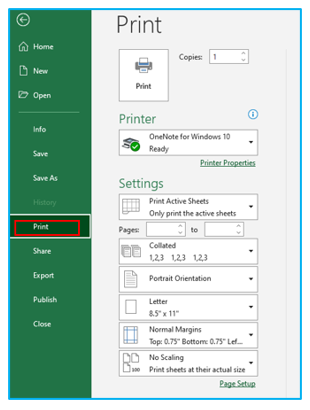
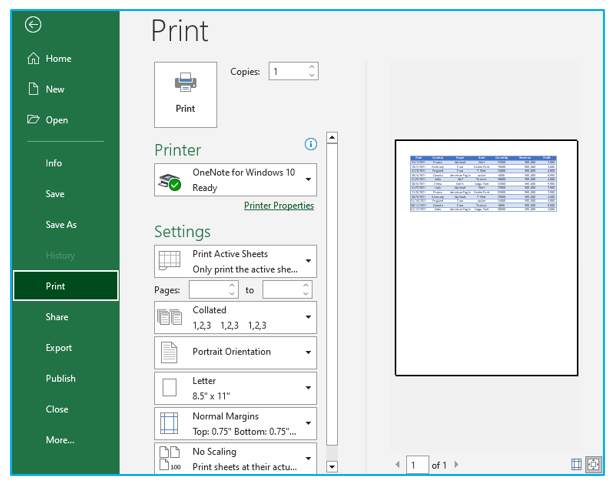
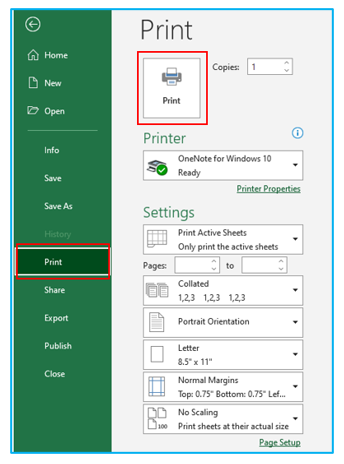
Step 1: Navigate to the Excel Sheet that the user wants to print. Open the File menu bar, then select Print or press Ctrl + P on the keyboard, outlined in Red below.
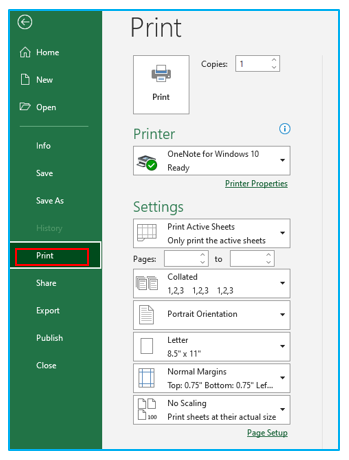
Step 2: Click “Next Page” or “Previous Page” at the bottom of the window to see a preview of the other pages that will be printed, outlined in Red below.

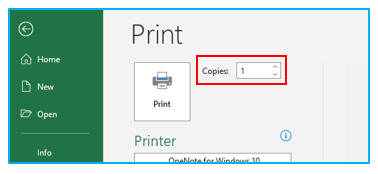
Step 3: Enter the number of copies you want in the “Copies” box, outlined in Red below.
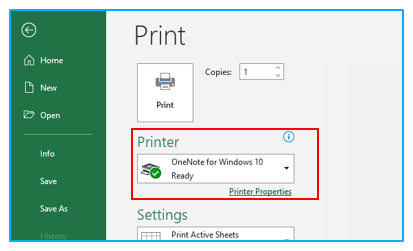
Step 4: Choose the printer you want to use under the “Printer” section, outlined in Red below.
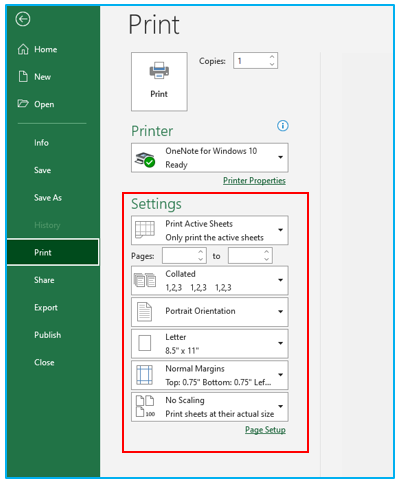
Step 5: Set the page margins, orientation, paper size, and other printing options under the “Settings” section, outlined in Red below.
Step 6: Simply click the large “Print” button to print the worksheet, outlined in Red below.
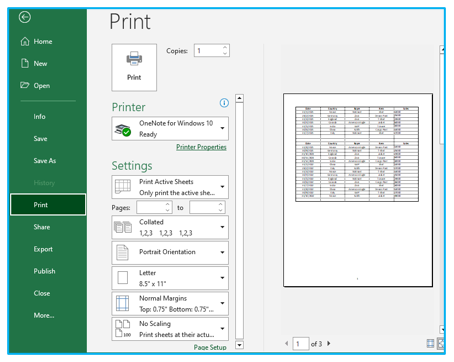
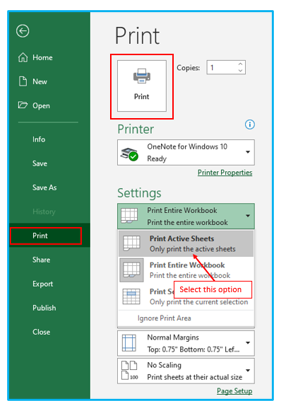
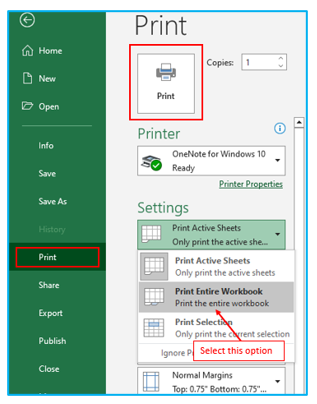
2. Print selection, Whole sheet, or entire workbook
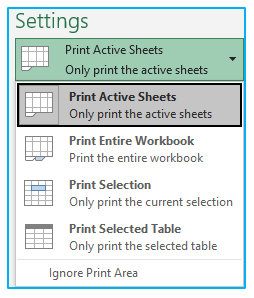
Click the arrow next to “Print Active Sheets” in the Settings section of Excel and select one of the following options to instruct the program which data and objects should be printed:
The settings in the screenshot above are individually briefly described below, along with instructions on how to utilize them.
Print the entire page (s):
Select Print Active Sheets to print the whole sheet that is open at the moment.
Print the entire workbook:
Select Print Entire Workbook to print every sheet in the active workbook.
Print selection:
Highlight a specific cell range on the sheet, then select Print Selection to print only that range of cells. Hold down the Ctrl key when selecting to choose cells or ranges that are not adjacent.
Hold down the Ctrl key as you click on the sheet tabs to print several sheets, and then select Print Active Sheets.
Print Excel table:
Click any cell in your Excel table, then select Print Selected Table from the menu that appears. Only when the table or a portion of it is selected does this option show.
3. Print the spreadsheet on one page
Excel prints sheets at their true size by default. Therefore, your worksheet will require more pages the larger it is.
Step 1: Navigate to the Excel Sheet that the user wants to print. Open the File menu bar, then select Print or press Ctrl + P on the keyboard, outlined in Red below.
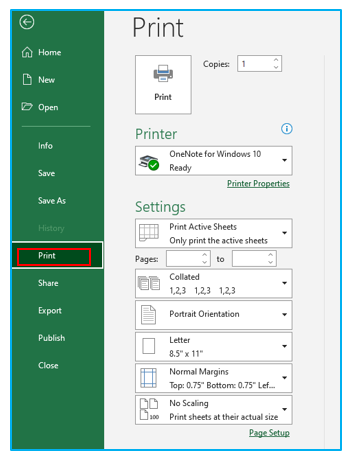
Step 2: Select the appropriate Scaling options listed below, which are located at the bottom of the “Settings” tab in the Print Preview window, to print an Excel sheet on one page.
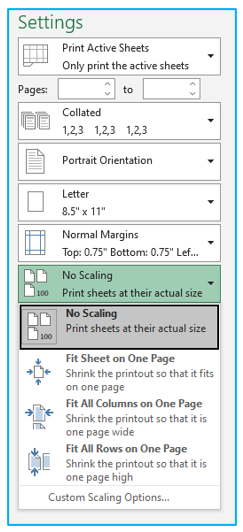
Fit Sheet on One Page: This will shrink the Sheet to fit on a single page.
Fit All Columns on One Page: This will print all the columns on a single page, but the rows may be spread out across multiple pages.
Fit All Rows on One Page: This will print all of the rows on a single page, although the columns may take up multiple pages.
No Scaling: Select “No Scaling” from the list of choices to get rid of scaling.
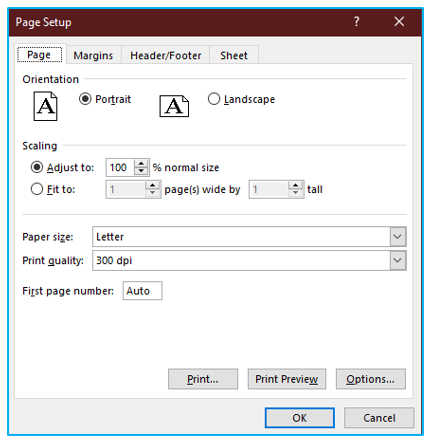
Please use extreme caution while printing on one page because your printout can become unreadable on a large sheet. Click Custom Scaling Options… to see how much actual scaling will be applied. When the Page Setup dialog box appears, you can check the number in the Adjust to box by clicking on it:
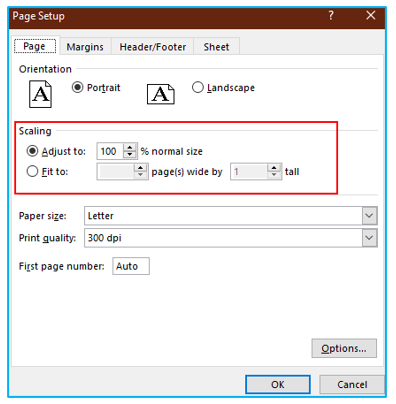
It will be challenging to read a printed copy if the Adjust To number is low. The modifications listed below in this situation might be helpful:
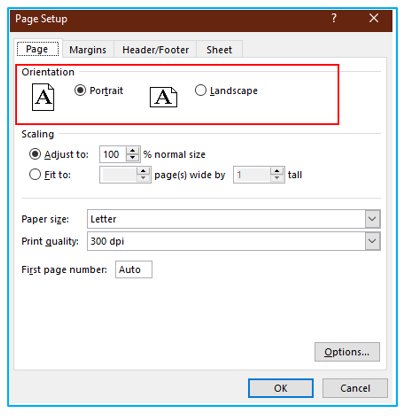
- Change page orientation. When there are more rows than columns in a worksheet, the default Portrait orientation works nicely. Change the page orientation to Landscape if your document has more columns than rows.
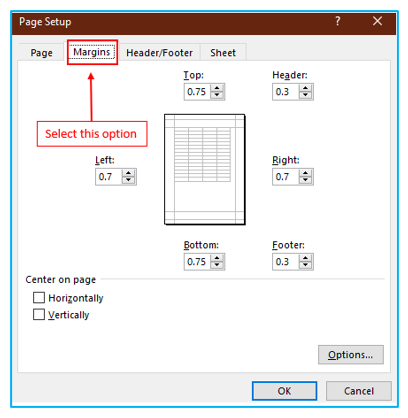
2. Adjust the margins. Your dataset will have more room if somehow the margins are narrower.
3. Indicate how many pages there are. Enter the desired number of pages in both Fit to boxes under Scaling on the Page tab of the Page Setup dialog in order to print an Excel spreadsheet on a certain number of pages (wide and tall). Please be aware that any manual page breaks will be ignored if you choose this option.
4. Print to file to save the output for later use
One of the least often utilized Excel print functions is Print to File, which many people underrate. In a nutshell, this option saves the output to a file rather than printing it.
Why would you want to print a document to keep? when numerous printed copies of the same document are required in order to save time. The concept is to just set the print preferences once—margins, orientation, page breaks, etc.—and then save the result as a a.pdf file. The following time you require a printed copy, just open that.pdf file, and select Print.
These are the steps to do “Print to file” to save the output for later use:
Step 1: Navigate to the Excel Sheet that the user wants to print. Open the File menu bar, then select Print or press Ctrl + P on the keyboard, outlined in Red below.
Step 2: Select “Print to File” from the Printer drop-down list in the Print Preview box, outlined in Red below.
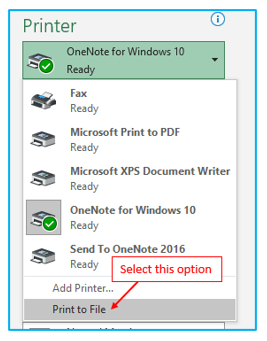
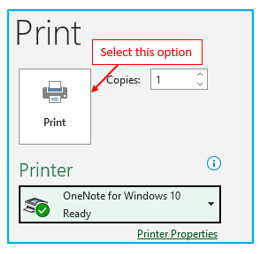
Step 3: Simply click the large “Print” button and save the file as the desired format in your desired location
5. Print Preview in Excel
To prevent unexpected outcomes, it is always a good idea to preview outputs before printing. There are two ways to use Excel’s print preview feature:
- Select “File” > “Print.”
- Press the print preview shortcut Ctrl + P or Ctrl + F2 on the keyboard.
Excel Print Preview is a very useful tool for conserving paper, ink, and your sanity. In addition to displaying exactly how your worksheets will appear on paper, it also enables you to make some changes right there in the preview window:
- Use the right and left arrows at the bottom of the window or type the page number in the box and press Enter to preview the following and previous pages. Only when a selected sheet or range has multiple printed pages of data do the arrows display.
- Click the Show Margins button in the bottom-right corner to reveal the page margins. Simply drag the edges with the mouse to make them wider or narrower. By dragging the handles at the top or bottom of the print preview window, you may easily change the column width.
- Excel Print Preview does not have a zoom slider, but you can zoom a little bit by pressing Ctrl and the scroll wheel. Click the Zoom to Page button in the bottom-right corner to restore the image to its original size.
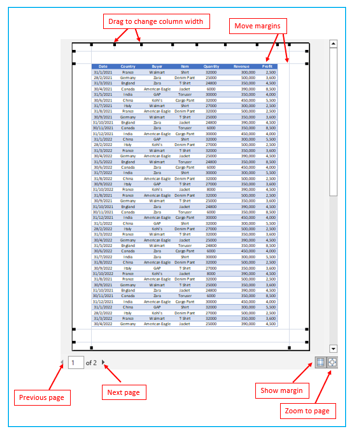
Click the arrow in the top-left of the Print Preview window to close it and go back to your worksheet.
6. Excel Print Options
The Print Preview box mentioned above contains the most common print options. The “Page Layout” tab of the Excel ribbon offers even more options:
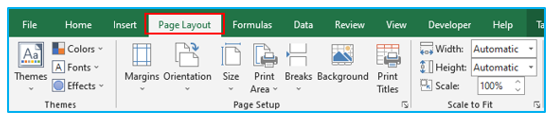
You can insert and delete page breaks, configure the print area, conceal and show gridlines, specify the rows and columns to repeat on each printed page, and more in addition to setting the page margins and paper size.
The Page Setup dialog box contains advanced options that the ribbon does not have room for. Click the Dialog Launcher Dialog launcher icon in the Page Setup group on the Page Layout tab to bring up the dialog box.
Note: The Print Preview window can also be used to launch the Page Setup dialog box. Some of the settings, such as Print area and Rows to repeat at the top, might be disabled in this situation. Open the Page Setup dialog by selecting it from the Page Layout tab to enable these features.
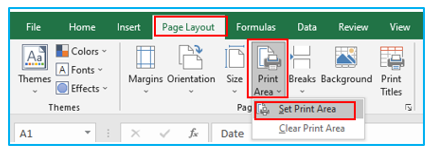
7. Setting Print Area and how to remove the existing print area
Only the area you specify for printing in Excel will be printed. After saving the worksheet, the print area is also preserved.
Step 1: Pick a set of cells.
Step 2: The “Print Area” button is located in the “Page Setup” group on the “Page Layout” tab. Next, select “Set Print Area.”
Step 3: Save, exit, then reopen the Excel workbook. Select “Print” from the File tab.
Note: To edit and delete print areas, use the Name Manager. Click Name Manager under the Defined Names group on the Formulas tab.
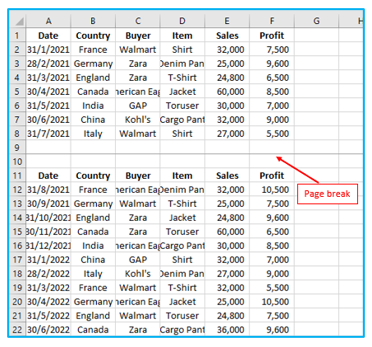
8. Insert Page break and remove page break
You can check where page breaks will display when your spreadsheet is printed by using Excel page break option.
Procedure of inserting page break in excel:
Step 1: Choose the new page’s top row.
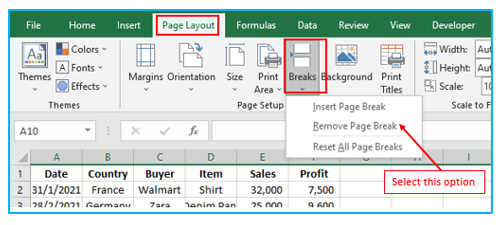
Step 2: Click Breaks under the Page Setup category on the Page Layout tab. Insert Page Break by clicking, outlined in Red below.

Step 3: Excel indicates the start of the new page with a solid line (manual page break). Page breaks are automatically added by Excel as dashed lines, outlined in Red below.
You can also decide where a vertical page break will go by selecting a column.
How to remove page breaks in excel?
Step 1: The worksheet where you want to remove the page break mark should be selected.
Step 2: Click Breaks under the Page Setup category on the Page Layout tab. Remove Page Break by clicking.
After that, the page break will be removed.

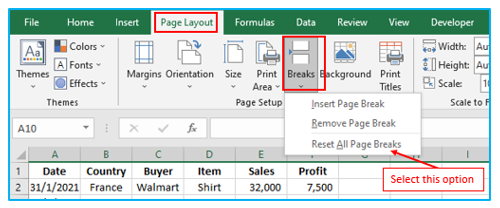
Reset all page breaks you’ve added, and click Breaks under the Page Setup category on the Page Layout tab. Clicking “Reset All Page Breaks” option, to reset all page breaks.
9. Insert Page Numbers and print page numbers in Excel
The procedure for inserting page numbers in Excel:
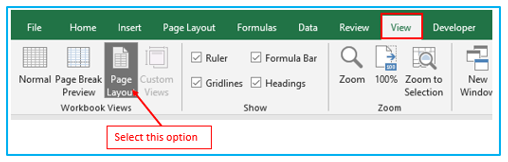
Step 1: To switch to Page Layout view, click Page Layout in the Workbook Views group of the View tab, outlined in Red below.
Step 2: Hit “Add footer”.

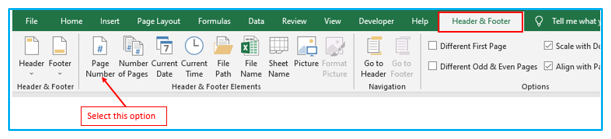
Step 3: To add the page number, click Page Number in the Header & Footer Elements group on the Header & Footer tab.
Step 4: The footer can be seen by clicking another place on the sheet.
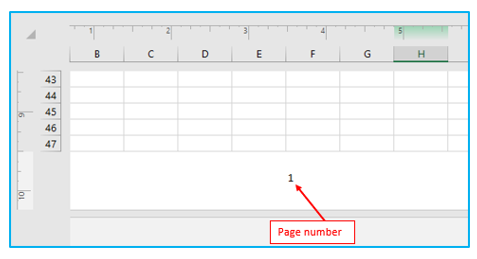
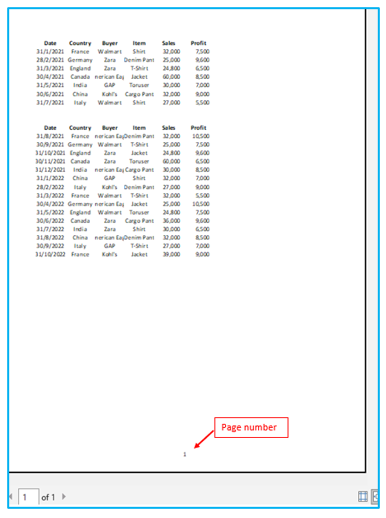
The procedure for printing page numbers in Excel:
Step 1: After inserting the page number, open the File menu bar, then select Print or press Ctrl + P on the keyboard. Then simply click the large “Print” button to print the worksheet, outlined in Red below.
You can see the page number in the footer in the preview, outlined in Red below.
10. Print Formulas : How to print formulas in Excel
Step 1: Click the Show Formulas button in the Formula Auditing group on the Formulas tab to complete the task. After that, print it as usual.

After that, print it as usual.
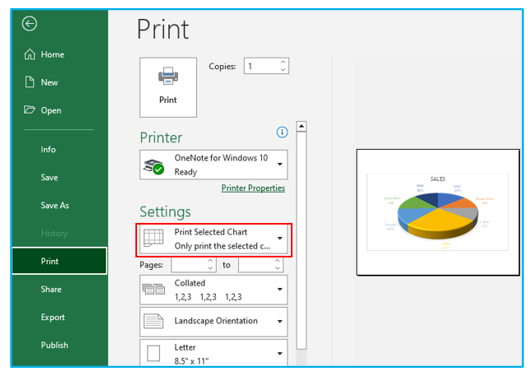
11. How to print Excel Chart
Step 1: Select the desired chart and press Ctrl + P to print just the chart and not the worksheet data.
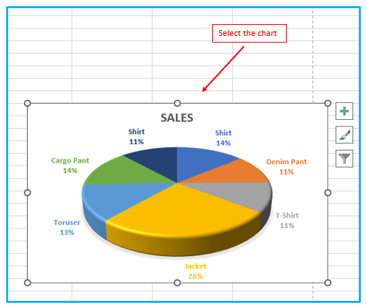
Step 2: The “Print Selected Chart” option is selected under Settings in the Print Preview box, which has a chart preview on the right. Click Print if the preview matches your expectations; otherwise, alter the settings:
Advice and remark:
- Press Ctrl + P without choosing anything on the sheet, and make sure the “Print Active Sheets” option is selected under “Settings” if you want to print a sheet’s whole contents, including the chart.
A chart’s scaling cannot be changed in the Print Preview box. Make your graph larger if you want the printed chart to fill the entire page.
12. Print with gridlines in Excel
By default, no worksheets have gridlines printed on them. It is simple to print an Excel spreadsheet with lines between the cells.
The procedure of printing worksheet with grid lines in Excel
Step 1: Go to the “Page Layout” tab, select the “Sheet Options” group, and then check the “Print” box next to “Gridlines”,

Step 2: After that, print it as usual.
13. Print header on each page
To make your printed copy simpler to read, print row/column headers (1, 2, 3, etc.) and A, B, C, etc. as gridlines.
Procedure of printing header in each page in Excel:
Step 1: Go to the Page Layout tab, select the Sheet Options group, and then check the Print box next to Headings.

Step 2: After that, print it as usual.
14. Print multiple sheets in Excel
You have the option of printing the worksheet as its whole, only a part of it, different sheets, or even all sheets at once.
The procedure for printing multiple sheets in Excel:
Step 1: Choose every sheet you want to print. Holding down the Control key will allow you to choose sheets one at a time.
![]()
Step 2: Open the File menu bar and choose “Print”, or use the keyboard shortcut Ctrl + P. Click “Print Active Sheets” (that should be the default setting by now, but you may change it from the drop-down if necessary). To print the worksheet, simply click the large “Print” button.
Multiple sheets are selected, and when printing, all of these become active sheets.
Additionally, the Print preview on the right lets you see what will be printed. Changing the page numbers will allow you to see what will be printed on each page.
Perhaps each sheet contains summary data, and you want to print just this information rather than the worksheet as a whole.
Setting a print area on each sheet and printing it will accomplish this automatically.
15. Print all sheets in Excel
You can specify to print all of the sheets at once using a capability that is integrated into Excel.
The procedure of printing all sheets in Excel:
Step 1: Open the File menu bar and choose “Print”, or use the keyboard shortcut Ctrl + P. Click “Print Active Sheets” (that should be the default setting by now, but you may change it from the drop-down if necessary). To print the worksheet, simply click the large “Print” button.
For ready-to-use Dashboard Templates:
