Open and Use Visual Basic Editor in Excel to unlock the full potential of automation and customization in your spreadsheets. By mastering the Visual Basic Editor, you can create powerful macros, automate repetitive tasks, and build complex functions tailored to your specific needs. This tool not only enhances your productivity but also allows you to develop sophisticated data solutions that go beyond standard Excel capabilities. Whether you’re streamlining workflows, improving data accuracy, or building interactive tools, the Visual Basic Editor in Excel provides the flexibility and control you need. Embrace the power of this feature to transform your Excel experience, making your tasks more efficient and your data management more robust.
This Tutorial Covers:
- What is Visual Basic Editor in Excel
- Opening the VB Editor
- Shortcut on the keyboard to launch the Visual Basic Editor
- Using the Developer Tab
- Using the Worksheet Tab
- Excel’s Visual Basic Editor in detail
- Menu Bar
- Tool Bar
- Project Explorer
- Properties Window
- Code Window
- Immediate Window
- Where to Put Code in the VB Editor
- Module Code Window Vs Object Code Window
- Adding VBA Code in Module
- Adding a Module in the VB Editor
- Removing the Module
- Adding Code to the Object Code Window
- Customizing the VB Editor
- Editor Tab
- Auto Syntax Check
- Require Variable Declaration
- Auto List Member
- Auto Quick Info Options
- Auto Data Tips Options
- Auto Indent
- Drag and Drop Text Editing
- Default to Full Module View
- Procedure Separator
- Editor Format Tab
- General Tab
- Docking Tab
- Editor Tab
- Things to Remember
1. What is Visual Basic Editor in Excel?
When you access an Excel workbook, a separate program called Visual Basic Editor which is a component of Excel launches. It is hidden by default, so you must activate it to view it.
The VB Editor is where you store your VB code.
The code can be accessed in the VB Editor in a variety of ways:
- When you record a macro, the VB Editor automatically makes a new module and adds the code to it.
- In the VB editor, you can directly type VB code.
- Copy and paste code from another worksheet or the internet into the VB Editor.
2. Opening the VB Editor:
There are several methods to launch Excel Visual Basic Editor, including:
- Using a Shortcut on the Keyboard (easiest and fastest)
- utilizing the Developer Tab.
- using the tabs on the worksheets.
Let’s briefly go over each of these.
-
Shortcut on the keyboard to launch the Visual Basic Editor:
The keyboard shortcut ALT + F11 is the simplest method to open VB editor in Excel. (F11 while holding down the ALT key).
When you do this, a secondary window for the Visual Basic editor will open.
When you use it again, the toggle function of this tool will return you to the Excel program. (without closing the VB Editor).
The keyboard shortcut for the Mac edition is Opt + F11 or Fn + Opt + F11
-
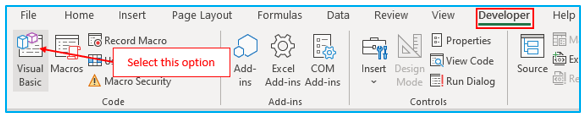
Using the Developer Tab:
The steps to open Visual Basic Editor from the ribbon are described below:
Step 1: On the “Developer” tab, click. Select “Visual Basic” from the “Code” category.
-
Using the Worksheet Tab:
This is a less common way to launch the VB Editor.
Right-click on any worksheet’s tab to access the ‘View Code’ menu.
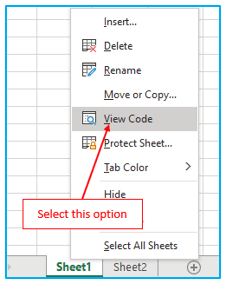
This approach will transport you to the code window for that worksheet object in addition to opening the VB Editor.
This is useful when you want to write code that functions only for a specific worksheet. Events on worksheets typically turn out like this.
3. Excel’s Visual Basic Editor in detail:
The VB Editor may appear a little intimidating when you first launch it.
There are various choices and areas that might initially seem brand-new.
Additionally, it still has the appearance of Excel 97. While the style and usability of Excel have significantly improved over time, the VB Editor’s appearance has not changed.
The various components of the Visual Basic Editor application will be covered in this segment.
With all these new options and windows, I remember being quite overwhelmed when I first started using VBA years back. But as you get used to dealing with VBA, you would get comfortable with most of these. Additionally, you’ll typically only need to use a select few of the choices available to you.
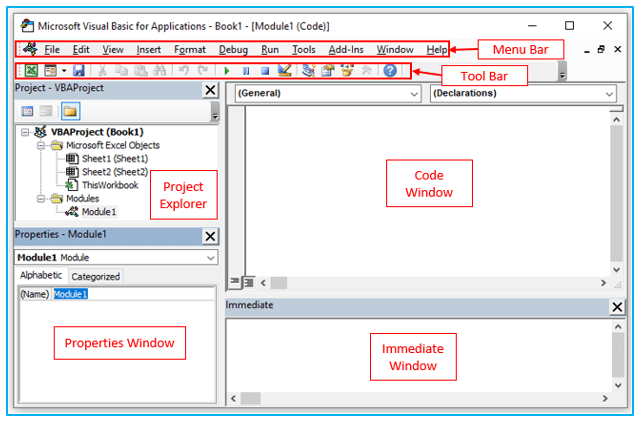
The various parts of the VB Editor are shown in the picture below. In the parts of this tutorial that follow, these are then thoroughly explained.
Let’s briefly review each of these elements to determine what each one does now:
-
Menu Bar:
All of the options available in the VB Editor are located here. It is comparable to the Excel ribbon, where each tab has options.
By selecting each of the menu items, you can examine the options that are offered.
You’ll see that most of the options available in the VB Editor have a list of keyboard shortcuts next to them. Working with the VB Editor becomes incredibly simple once you become accustomed to a few keyboard shortcuts.
-
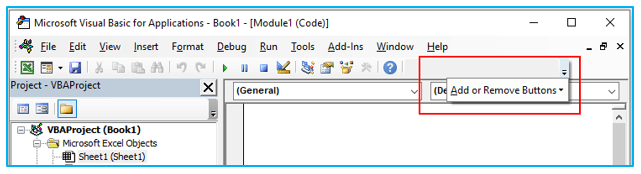
Tool Bar:
The VB Editor comes with a toolbar that contains some helpful options that you’re likely to use most frequently by default. This is identical to Excel’s Quick Access Toolbar. You can quickly access some of the practical choices thanks to it.
It can be slightly altered by removing or including options. (by clicking on the small downward pointing arrow at the end of the toolbar).
When using the VB Editor, the basic toolbar is typically all you need.
By clicking on the three gray dots at the toolbar’s commencement and dragging, you can shift the toolbar above the menu bar.
Note: The VB Editor has four toolbars: Standard, Debug, Edit, and User form. The typical toolbar is what you can see in the picture above (which is also the default). By selecting the View option and then placing your cursor over the Toolbars option, you can reach additional toolbars. The VB Editor allows you to add one or more toolbars.
-
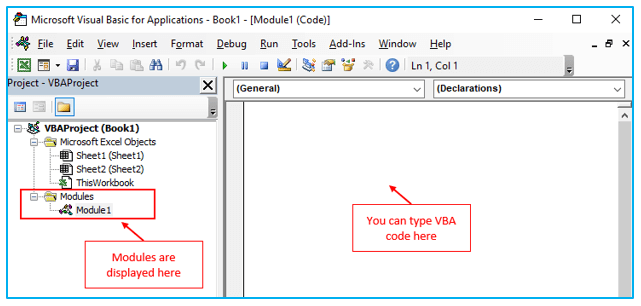
Project Explorer:
The “Project Explorer” window on the left displays each open item in Excel.
Every active workbook or add-in is a project when you’re using Excel. Additionally, each of these projects may contain a set of objects.
For instance, in the picture below, the “Project Explorer” displays the two open workbooks (Book1 and Book2) as well as the objects in each workbook. (worksheets, “ThisWorkbook”, and “Module” in Book1).
You can use the plus sign to the left of the word “objects” to expand or contract the collection of objects so that you can see it all.
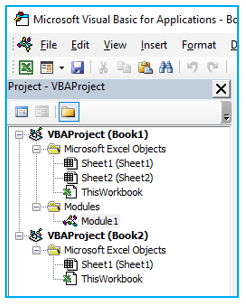
The Project Explorer may include any of the following objects:
- All open Workbooks – Each notebook, also known as a project, can contain the following objects:
- Every worksheet in the workbook has a “Worksheet” object.
- “ThisWorkbook” object which represents the workbook itself.
- Each chart sheet has a “Chartsheet” object. (these are not as common as worksheets)
- The code created by a macro encoder is put into “modules,” which are special types of code. Additionally, you can type or enter VBA code here.
- All open Add-ins.
Think of the Project Explorer as a list of all the Excel files that are currently open.
Control + R is the keyboard command for starting the Project Explorer. (Press R while holding down the control key). Simply select the close icon in the Project Explorer window’s upper right corner to close it.
There is a code window for each item in Project Explorer where you can enter the code. (or copy and paste it from somewhere). When you double select the object, the code window opens.
-
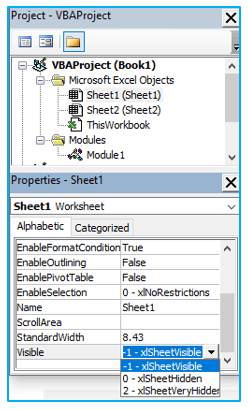
Properties Window:
The selected object’s properties are shown in the Properties window. You can open the Properties window by pressing the F4 key on your keyboard if it isn’t already open. (or go to the View tab and click Properties window).
In the VB Editor, you may dock the floating window known as the Properties window. I docked it just below the Project Explorer in the image below.
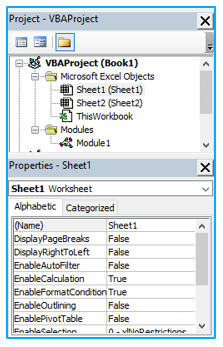
We can modify an object’s attributes using the attributes window. By altering the Visible Property of the selected worksheet object, for instance, I could make a worksheet invisible (or extremely invisible).
-
Code Window:
Each object displayed in the Project Explorer has its own code window. Double-clicking on an item in the Project Explorer area will bring up the code window for that object.
You can type your own code in the code box or copy and paste it from another location.
The code for a macro is entered into a module’s code box when it is recorded. When creating a macro, Excel immediately creates a module and inserts the code into it.
-
Immediate Window:
When debugging code, the Immediate window is frequently utilized. I sometimes use the Immediate window to execute code after inserting a Print.Debug statement.
It assists in code debugging and locating problematic areas. I can tell the code was working at least up until that line if I see the Print.Debug output in the current window.
It might take some practice if you’re new to VBA programming before you can use the immediate area for debugging.
The Immediate panel is hidden by default in the VB Editor. You can access it by pressing Control + G on your computer (or by selecting “Immediate Window” on the View tab).
4. Where to Put Code in the VB Editor?
I believe you now have a basic grasp of what the VB Editor is and all of its components are.
I’ll demonstrate where to add VBA code in the Visual Basic Editor in this part of the tutorial.
In Excel, you can put VBA code in two different places:
- The object’s code area. These items could be a workbook, worksheet, user form, etc.
- The module’s code area.
-
Module Code Window Vs Object Code Window:
First, allow me to briefly explain the distinction between adding code to a module and adding code to an object code window.
Any time you add a code to an object, that code will only run in response to an action taken by that object. For instance, the code would go in the ThisWorkbook object if you wanted to instantly unhide all of the lessons in a workbook when you opened it. (which represents the workbook).
In this situation, reading the workbook serves as the trigger.
The code for that would go in the worksheet code window if you wanted to protect a worksheet as soon as another worksheet was enabled.
You can associate a code to be executed when an event happens and these triggers are referred to as events.
On the other hand, the module’s code must be run either directly or automatically. (or it can be called from other subroutines as well).
Excel immediately creates a module and inserts the recorded macro code into it when you record a macro. Now, you must explicitly run the macro if you need to run this code.
-
Adding VBA Code in Module:
While using a macro recorder has some drawbacks, recording a macro immediately creates a module and inserts the code into it. It cannot, for instance, use If Then Else or sequences.
In these circumstances, it is preferable to manually copy and paste the code or to create the code from scratch.
The following types of VBA codes can be placed in a module:
- Declarations: You can define variables in a module. You can specify the kinds of data that a variable can contain by declaring it. You have the option of declaring a variable for just one subroutine or for every subroutine in the module. (or all modules)
- Subroutines (Procedures): This code contains the actions you want VBA to take.
- Function Procedures: You can write custom functions using this code, which only gives a single value. (additionally known as User Defined Functions (UDFs) in VBA)
It’s a fact that a lot of people don’t know about the internet. Before using it, you must first enter it.
-
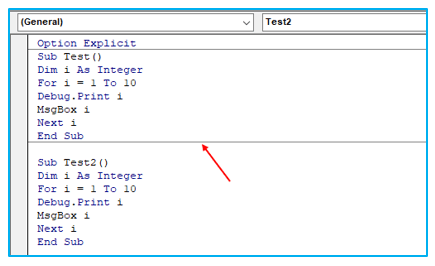
Adding a Module in the VB Editor:
The steps to add a module are described below:
Step 1: Right-click any workbook object. (in which you want the module). Place your mouse over the “Insert” menu item. Click “Module” after that.
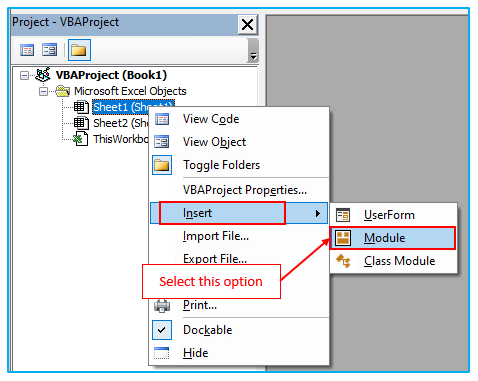
Step 2: By doing this, an entity named Module 1 and a folder called Module would be created right away. The aforementioned procedures will insert another module if you already have one implanted.
When you double click on the module object in the Project Explorer after it has been inserted, the code window for that object will appear.
Now you can either create the code yourself or copy-paste it.
-
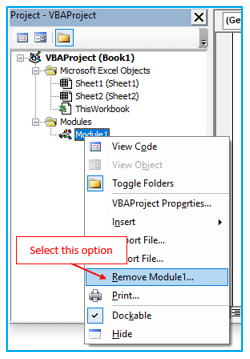
Removing the Module:
The methods to remove a module in Excel VBA are as follows:
Step 1: Select the part you want to delete with the right click. Select “Remove Module” by clicking.
Step 2: Click No in the dialog window that appears.
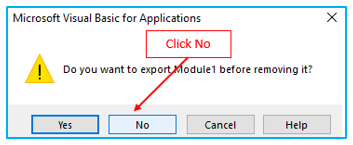
Note: Before deleting a module, you can export it. You can import it into a different project after it is stored as a.bas file. Simply select “Export file” from the context menu when you want to export a module.
-
Adding Code to the Object Code Window:
Simply double-click on an object to bring up the code box for that object.
When it opens, you can directly type in the code or copy and paste it from other modules or the internet.
One thing to keep in mind is that some objects let you select the event for which you want to create the code.
For instance, if you want to create code that will execute when a worksheet’s selection is changed, you must first choose worksheets from the drop-down menu in the code window’s top left before choosing the change event from the drop-down menu in the code window’s top right.
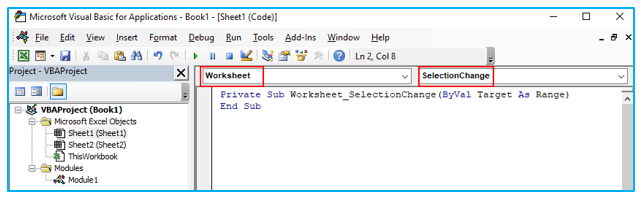
Note: These incidents only occur with this object. The events connected to the workbook object are visible when you start the code window for a workbook. The events connected to the worksheet object are visible when you launch the code window for a worksheet.
5. Customizing the VB Editor:
Although the Visual Basic Editor’s preset settings are adequate for the majority of users, you can still further customize the user interface and a few functionalities.
You will see all the options available to you for modifying the VB Editor in this part of the tutorial.
The steps to customize the VB Editor are described below:
Step 1: Click “Tools” in the menu bar, then select “Options” to personalize the VB Editor environment.
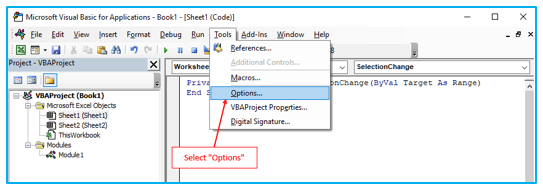
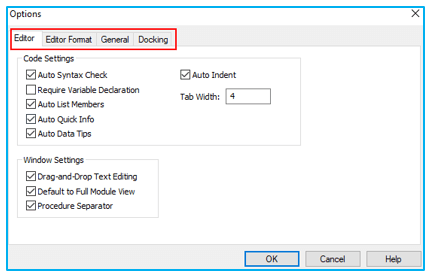
By doing so, the “Options” dialog window would be opened, giving you access to all the VB Editor customization options. The four tabs in the “Options” dialog box (as shown below) contain different customization options for the Visual Basic Editor.
Let’s briefly review each of these tabs and the key settings within each.
-
Editor Tab:
While the default settings are generally adequate, let me still go over the options available in this tab.
You might want to customize some of these settings in the VB Editor as you gain experience using VBA in Excel.
-
Auto Syntax Check:
When using VBA in Excel, a pop-up dialog box will appear whenever you make a syntax mistake. (with some description about the error). As demonstrated below:
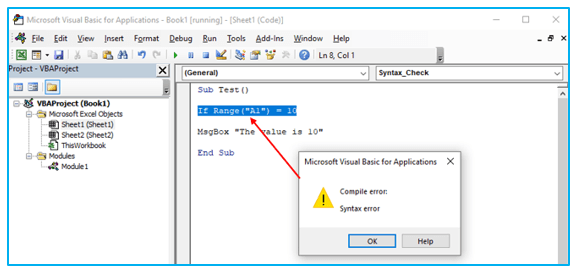
You will get a message box saying “Syntax error” because you forgot to add Then after the If statement. The visual basic editor will also highlight the error in red.
If you correct the code like this:
Sub Test()
If Range(“A1”) = 10 Then
MsgBox “The value is 10”
End If
End Sub
You will not get any message box and the code will run without errors.
This pop-up box won’t show up if you disable this option, even if you make a syntax mistake. To show that there is a mistake, there would be a shift in color in the code text.
I advise keeping this choice enabled if you’re a beginner. You may start to find these pop-up boxes annoying as you gain coding expertise, at which point you can disable this option.
-
Require Variable Declaration:
This is one setting that I advise turning on.
Variables are used when dealing with VBA to store various data types and objects.
The “Option Explicit” statement is immediately added to the top of the code window when this option is enabled. You are compelled to define every variable you use in your code as a result. When you run the code without declaring a variable, an erroneous message will appear. (as shown below).
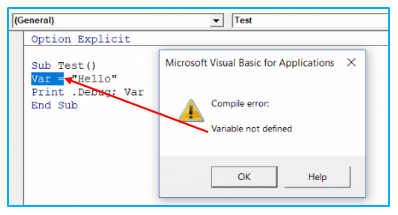
I used the variable Var in the example above but I didn’t define it. I get an error message when I attempt to run the code.
When you have a large number of variables, this choice can be very helpful. It frequently aids in my discovery of misspelled variable names because they are regarded as undeclared and a mistake is displayed.
Note: The current modules are unaffected when you activate this option.
-
Auto List Member:
This choice is very helpful because it enables you to get a list of an object’s properties and methods.
For instance, I must use the line Sheet1.remove if I want to remove the worksheet Sheet1.
When I write the dot as I type the code, all of the Worksheet object’s methods and properties are displayed to me. (as shown below).
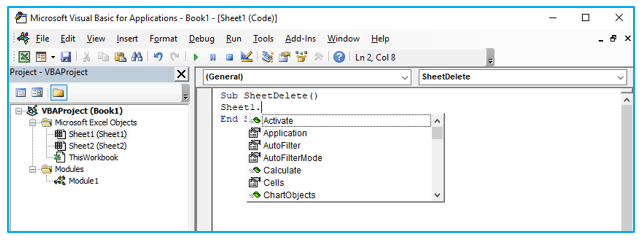
The auto list function is excellent because it lets you:
- Saves time by selecting the property and technique quickly from the list.
- demonstrates all the characteristics and techniques that you might not be aware of
- Avoid misspelling words.
I advise leaving this option’s default setting of “enabled” in place.
-
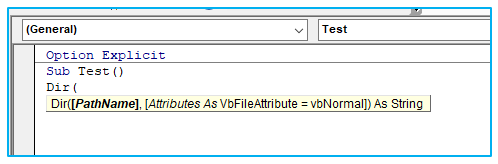
Auto Quick Info Options:
The Excel worksheet displays some function-related information when you enter a function, such as the arguments the function accepts.
Similar to this, VBA displays some details when you type a function. (as shown below). However, you must make sure the Auto Quick Info choice is turned on for that to happen. (which it is by default).
-
Auto Data Tips Options:
The value of a variable will be displayed when your mouse is over its name while you are reading through your code line by line.
When debugging or looking through loop-containing code line by line, I find it to be quite helpful.
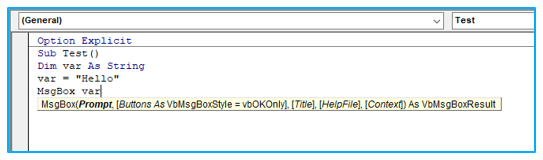
When I hover the cursor over the variable (var) in the aforementioned example, it immediately displays the number it contains.
I advise keeping this option enabled since it is currently activated by default.
-
Auto Indent:
The comprehension of VBA code is improved by using indentation because the codes can grow lengthy and disorganized.
The tab key can be used to indent text when composing code.
By selecting this choice, you can prevent the subsequent line from beginning at the very beginning and keeping the same indentation as the line you just finished writing.
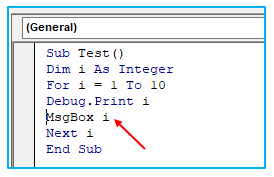
In the aforementioned illustration, it will begin immediately beneath the Debug.Print line once I type it and press Enter. (with the same indentation level).
I like having this option and disabling it would require me to carefully indent each line of a block of code that I want to be indented.
You can change the indentation number if you want. I leave it at its original setting.
-
Drag and Drop Text Editing:
You are able to drag and place a block of code when this option is enabled.
You don’t have to clip and then paste it, which saves time. Simply pick it out and move it.
I advise keeping this option enabled since it is currently activated by default.
-
Default to Full Module View:
You can view every procedure in a module in one scrollable list when this option is activated.
You will only be able to view one module at a time if you disable this choice. You must choose the section you want to view from the drop-down menu in the code window’s upper right corner.
I advise leaving this option’s default setting of “enabled” in place.
When you have many large procedures and scrolling across them takes a lot of time, or when you have a lot of procedures and want to find it right away rather than spending time scrolling, you may want to disable it.
-
Procedure Separator:
You will notice a line (sort of a divider) between two processes when this option is active.
This helps me because it demonstrates visually when one procedure stops and another one begins.
It is currently turned on by default, and I advise leaving it that way.
-
Editor Format Tab:
You have the ability to alter how your code appears in the code window using the options available in the “Editor Format” tab.
Personally, I leave everything set to default because I don’t mind it. You can adjust this if you’d like in accordance with your preferences.
You must first choose a choice in the Code Colors box before you can make a change. You can change the foreground, background, and indicator colors for a choice after you’ve chosen it.
This tab also allows you to adjust the font size and style. It is advised to use a fixed-width font like Courier New because it makes the code easier to comprehend.
Keep in mind that all code types will use the same font style and size setting. (i.e., all the code types shown in the code color box).
I’ve chosen “Execution Point Text” in the image below, and you can modify its formatting.
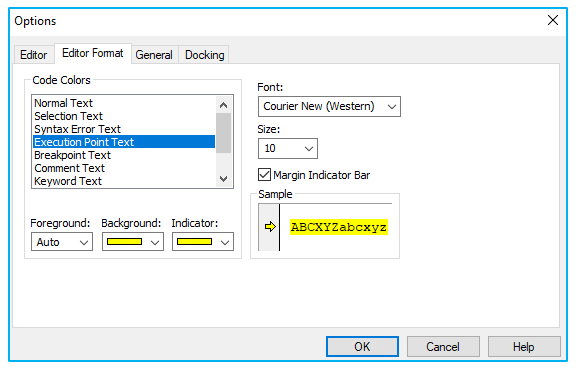
Note: When activated, the Margin Indicator Bar option displays a small margin bar to the left of the code. It is beneficial because it provides helpful signs when the code is executed. When you set a breakpoint in the aforementioned example, a red dot will immediately appear to the left of the line in the margin bar. Alternatively, you can simply click on the margin bar to the left of the code line you want to serve as the breakpoint in order to create a breakpoint.
Margin Indicator Bar is activated by default, and I advise leaving it that way.
Since she was color blind, one of my VBA course participants found the customization choices helpful. She was able to select the color and formats that made working with VBA simple for her using these options.
-
General Tab:
You can leave the General tab options as they are.
The Error Handling option is important to know.
It is set to ‘Break on Unhandled Errors’ by default and you should keep it that way.
This means your code will stop if it runs into an error that you have not dealt with in your code. But if you have used On Error Resume Next or On Error Goto options to handle the errors, then your code will not stop (as the errors are handled).
-
Docking Tab:
You can select which windows should be docked in this tab.
By docking, you can keep a window in place so that it doesn’t move around and you can see all the open windows at once. Examples of such windows include the Properties window and the project viewer.
If you don’t dock, you can only watch one window in full-screen mode at once; you will need to switch between them.
I advise maintaining the default values.
6. Things to Remember:
- We cannot save the code in any manner using it. We must save the code-containing file in Macro-Enabled files in order to save or keep the code in MS Office applications.
- Play around with the various options and buttons in the Excel VB Editor Window to become acquainted with their uses.
- Module, Sheet, and User Form coding can be used to create a script.
We can use the options provided in the Developer ribbon from Control to create any button and then apply the written code from Module or Sheet to it.
Application of Open and Use Visual Basic Editor in Excel
- Automate Repetitive Tasks: Use Visual Basic Editor to create macros that automate repetitive tasks, saving time and reducing manual effort.
- Custom Functions: Develop custom functions tailored to specific needs, extending Excel’s built-in functionality and enhancing data analysis capabilities.
- User Forms: Design interactive user forms for data entry and manipulation, improving user experience and data accuracy.
- Complex Calculations: Implement complex calculations and algorithms that are difficult to achieve with standard Excel formulas, enabling advanced data processing.
- Data Integration: Integrate Excel with other applications and databases using VBA, allowing seamless data exchange and enhanced workflow automation.
- Enhanced Reporting: Create dynamic and automated reports that update with a single click, providing timely and accurate insights for decision-making.
For ready-to-use Dashboard Templates:
