Insert Data and Timestamps in Excel to revolutionize how you monitor and document various activities and events. This functionality enhances accuracy, accountability, and productivity by providing clear historical records for project management, inventory control, employee tracking, and more. By mastering the insertion of data and timestamps, you can ensure precise timing, improve data analysis, and uphold data integrity across all your Excel tasks. Embrace this essential skill to make your spreadsheets not only a tool for calculation but also a reliable record of events and changes.
This Tutorial Covers:
- Inserting a date and time stamp in Excel using a keyboard shortcut
- Inserting Date and Timestamps Using Excel’s TODAY and NOW Functions
- Using the TODAY function, insert the current date
- Using the NOW function, add a Date and Timestamp
- Circular References Trick to Automatically Insert Date and Timestamp in Excel
- Using VBA to Automatically Insert Timestamp in Excel
- Making a Custom Function to Insert a Timestamp
1. Inserting a date and time stamp in Excel using a keyboard shortcut
It could be quicker and more effective to enter the date and timestamp manually if you need to do it for a few cells in Excel.
The keyboard shortcut for entering the current date in Excel fast is as follows:
Command +: (hold the control key and press the colon key).
How to insert time in excel is shown below
Step 1: Choose the cell where the timestamp should be inserted.
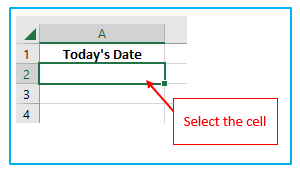
Step 2: Make use of the keyboard shortcut Control +: The current date would be added to the cell immediately.
You should be aware of the following:
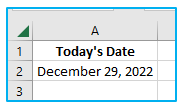
- Only the current date and not the time would be entered using this shortcut.
- When you wish to selectively enter the current date, it is useful.
- It chooses the current date from the clock on your computer.
- You can use any date format on the date once it is in the cell. Simply choose the desired date format from the ‘Number Format’ drop-down menu in the ribbon.
Keep in mind that this is not dynamic, so it won’t update or alter when you open the worksheet again. Once entered, it stays in the cell as a static value.
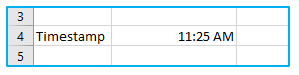
The following shortcut can be used to enter the timestamp/ inserting time in excel even though this one does not:
Control + Shift +:
The current time would be added to the cell immediately in this way.
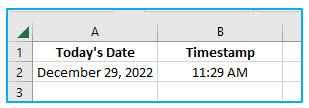
Therefore, you can use two different cells, one for the date and one for the time stamp excel if you wish to have both the date and the timestamp.
2. Inserting Date and Timestamps Using Excel’s TODAY and NOW Functions
The date and timestamp that are entered using the shortcuts in the procedure above are static values that are not updated when the date and time change.
Use Excel functions if you want the current excel date time stamp/date and time to be updated each time a workbook modification is made.
This can occur if you have a report and want the printed copy to show the time of the most recent update.
- Using the TODAY function, insert the current date:
Simply write =TODAY() in the cell you wish to insert the current date in.
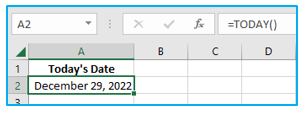
Make sure the cell is set to display the TODAY function result in the date format since Excel only stores dates and times as numbers.
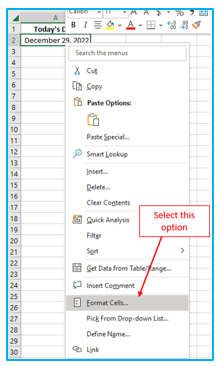
How to insert excel timestamp is shown below
Step 1: “Format cells…” by doing a right-click on the cell.
Step 2: In the “Number” tab of the “Format Cells” dialog box, choose the “Date” category. Choose the necessary date format (or you can simply go with the default one). Select OK.
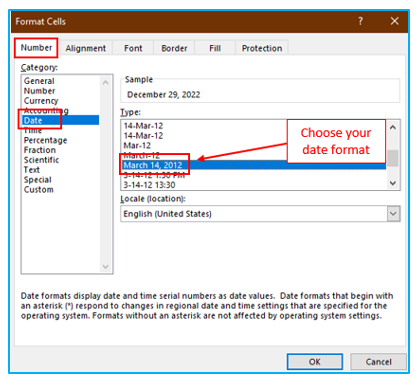
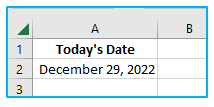
After selecting OK, immediately changes into your date format.
Keep in mind that this formula is unstable and would recalculate each time the workbook was changed.
- Using the NOW function, add a Date and Timestamp:
Use the NOW function if you want to insert date and time in excel to appear combined in a cell.
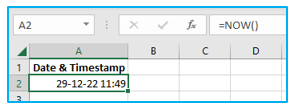
Again, because Excel stores all dates and times as numbers, it is crucial to style the cell such that the NOW function result is shown in a way that includes both the date and time.
How to insert date and time in excel is shown below
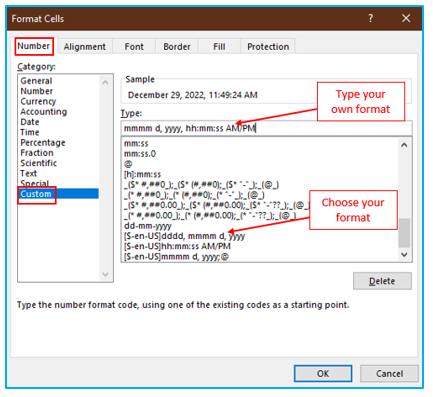
Step 1: “Format cells…” by doing a right-click on the cell.
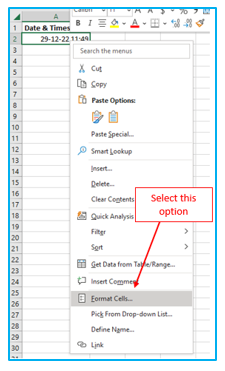
Step 2: Choose “Custom” from the “Number” tab’s category list in the “Format Cells” dialog box. Now choose your format in the “Type” area. Here I write my own format “mmmm d, yyyy, hh:mm:ss AM/PM”. After that, select OK.
This would guarantee that the return includes both the date and the time.

Keep in mind that this formula is unstable and would recalculate each time the workbook was changed.
3. Circular References Trick to Automatically Insert Date and Timestamp in Excel
Circular references are a clever trick that can be used to automatically insert the timestamp.
Let’s first define what an Excel circular reference is.
Let’s say cell A1 has the value 1 and cell A2 has the value 2.
Now, if you enter the formula =A1+A2+A3 in cell A3, a circular reference error will result. A prompt similar to the one below may also appear:

This occurs because you are utilizing the cell reference A3 in the A3 computation.
The Excel program would have halted as a result of the non-ending loop that begins when a circular reference error occurs. But the clever programmers behind Excel made sure that when a circular reference was discovered, it was not calculated and the non-ending loop catastrophe was avoided.
There is a technique, though, by which we can compel Excel to at least attempt a certain number of times before giving up.
Let’s see how this may be used to Excel to obtain a date and time stamp automatically (as shown below).
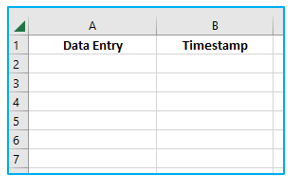
Keep in mind that whenever I enter data in the cells in column A, a timestamp appears in the cell’s neighbor in column B. If I alter a value anywhere else, though, nothing changes.
The steps to complete this are as follows to insert timestamp in excel
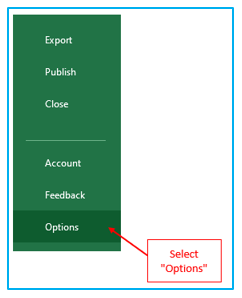
Step 1: Select “File”. Then select “Options”.
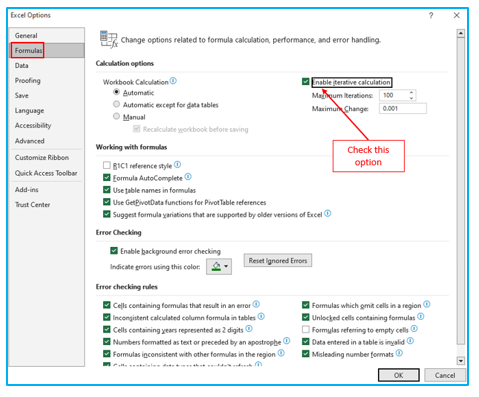
Step 2: Select “Formulas” from the “Excel Options” dialog box. Check the “Enable iterative calculation” in the “Calculated options”.
Step 3: Enter the following formula in cell B2:
=IF(A2<>””,IF(B2<>””,B2,NOW()),””)
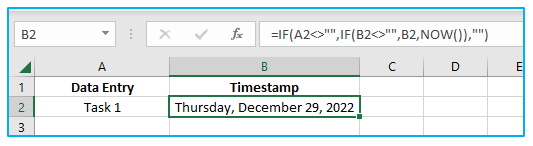
There you go! Now, a timestamp would automatically show in column B in the cell next to column A whenever you entered anything in column A.
Once the timestamp is entered using the formula above, it is not updated when the value of the neighboring cell is changed.
Use the following formula (using Control + Shift + Enter instead of the Enter key) if you want the timestamp to update each time the neighboring cell in Column A is updated:
=IF(A2<>””,IF(AND(B2<>””,CELL(“address”)=ADDRESS(ROW(A2),COLUMN(A2))),NOW(),IF(CELL(“address”)<>ADDRESS(ROW(A2),COLUMN(A2)),B2,NOW())),””)
This formula checks the reference of the most recent edited cell using the CELL function, and if it matches the reference of the cell to its left, it changes the timestamp.

Please take note that once you switch on iterative calculations in a spreadsheet, it will remain turned on until you turn it off. You must go to Excel Options and uncheck the “Enable iterative computation” box to turn it off.
4. Using VBA to Automatically Insert Timestamp in Excel
You’ll find it to be a useful technique to insert a timestamp in Excel if VBA is your tool of choice.
When defining the conditions under which you want the timestamp to show, VBA offers a great deal of freedom.
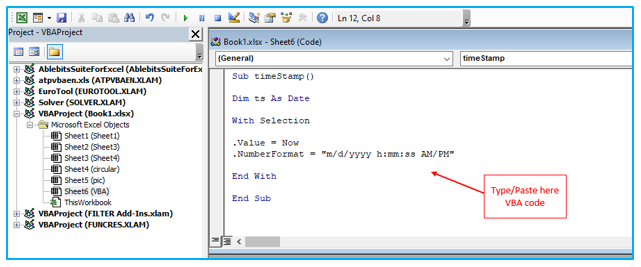
The code that will insert a timestamp into column B whenever any input or change occurs in a cell in column A is provided below.
Sub timeStamp()
Dim ts As Date
With Selection
.Value = Now
.NumberFormat = “m/d/yyyy h:mm:ss AM/PM”
End With
End Sub
This code checks whether the cell being edited is in column A using the IF Then statement. If so, the timestamp is inserted into the subsequent cell in column B.
Keep in mind that the contents of any existing cells in column B would be overwritten by this code. If you’d want. The code can be changed to include a message box that displays a prompt if any existing content exists.
Where Shall We Place This Code?
In order for this code to be activated every time there is a change, it must be entered as the worksheet change event.
How to do it:
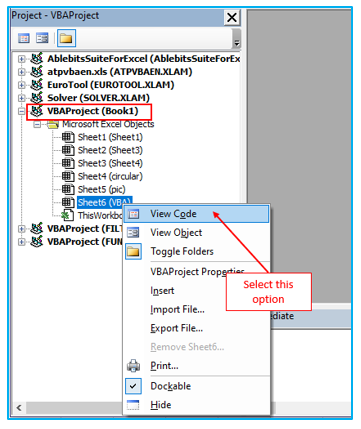
Step 1: Choose View Code from the context menu by right-clicking the worksheet tab (you can also double-click the sheet name in the project explorer by pressing Alt + F11 on your computer).
Step 2: Copy and paste this code into the sheet’s code window.
To execute this code, use the F5 key. This will show the result as below:

Because it contains a macro, make sure to save the file with the.XLS or.XLSM extension.
5. Making a Custom Function to Insert a Timestamp
A particularly clever technique to insert a timestamp in Excel is by creating a custom function.
You can use it just like any other worksheet function and it combines the strength of VBA and functions.
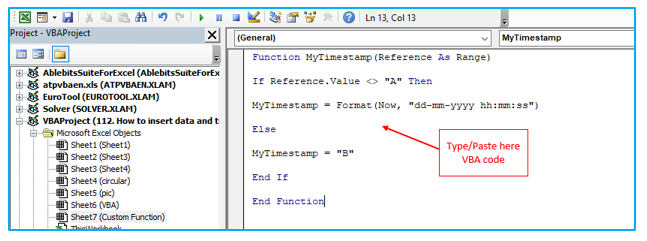
The following code will enable an Excel “MyTimestamp” function that is unique:
Function MyTimestamp(Reference As Range)
If Reference.Value <> “” Then
MyTimestamp = Format(Now, “dd-mm-yyyy hh:mm:ss”)
Else
MyTimestamp = “”
End If
End Function
Where Shall We Place This Code?
In order for this code to be activated every time there is a change, it must be entered as the worksheet change event.
How to do it:
Step 1: Choose View Code from the context menu by right-clicking the worksheet tab (you can also double-click the sheet name in the project explorer by pressing Alt + F11 on your computer).

Step 2: Paste the aforementioned code into the module code window. To return to the worksheet, either close the VB Editor or press ALT + F11 once more.
You can now use the worksheet’s function. It will assess the cell to the left and insert the timestamp in line with the results.
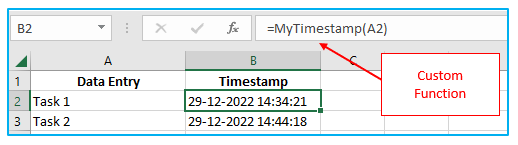
Every time an entry is updated, the timestamp is likewise updated.
Because it contains VB code, make sure to save the file with the.XLS or.XLSM extension.
Application of Insert Data and Timestamps in Excel
- Project Tracking: Use data and timestamps to record the exact time and date when project tasks are completed, aiding in accurate project management and progress tracking.
- Inventory Updates: Insert data and timestamps to log when inventory items are added, sold, or updated, ensuring precise inventory control and stock history.
- Employee Time Sheets: Utilize data and timestamps for recording employee clock-in and clock-out times, facilitating accurate payroll processing and time management.
- Customer Interaction Records: Embed data and timestamps in customer service logs to track when interactions occur, improving customer relationship management and service responsiveness.
- Audit Trails: Apply data and timestamps to create audit trails in financial documents or data entry logs, enhancing data integrity and compliance with regulatory standards.
- Event Logging: Use data and timestamps to record occurrences of specific events or errors within a system, aiding in troubleshooting and system maintenance.
You may be interested:
