When you want to add details about a cell or data point without changing the text of the cell, comments can be very helpful.
When using formulas and I need to explain what a formula does or what a cell value signifies, I frequently use these. You can also make comments for other people’s reference if you’re working with others.
You will learn everything you need to know about comments in this tutorial, including how to enter comments in Excel, edit/delete comments, and delete comments from a sheet or workbook as a whole.
Note: There is a crucial point you need to understand, though, before I show you how to enter comments in Excel (or delete/edit comments).
Microsoft has changed the Comment feature’s moniker to Notes in Office 365. Notes have thus replaced the conventional Excel comments that you are familiar with (one that displays a yellow box and tiny red triangle in the cell at the top-right). Additionally, comments now refer to a new function that lets you start threaded discussions. This essay discusses the distinction between notes and comments.
In conclusion, if you are NOT using Office 365, there is no need for concern and the remark is unaffected. For users of Office 365, remarks are now known as Notes.
This Tutorial Covers:
- How to Insert Comments in Excel (Shortcut)
- Show All Comments/Notes
- Navigate Through Comments (Previous/Next)
- Copy Comments
- Delete Comments
- Remove Comments from the Entire Worksheet or a Selected Range
- Erase All Comments From Worksheets at Once
- Copy All Comments In a Separate Worksheet
- Convert Notes to Comments (Office 365 Only)
Using the keyboard shortcut listed below, you can add a remark to a cell in Excel:
- SHIFT + F2 in Windows
- Command + F2 in Mac
Here’s how to use shortcut to insert a comment:
Step 1: Choose the cell into which you want to add a comment.
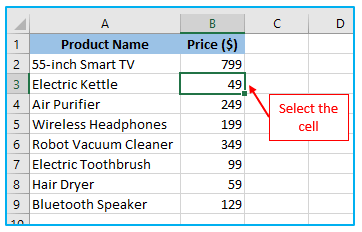
Step 2: Hold down the Shift key or the Command key on your Computer. F2 is pressed.
This would immediately insert a comment into the chosen cell.
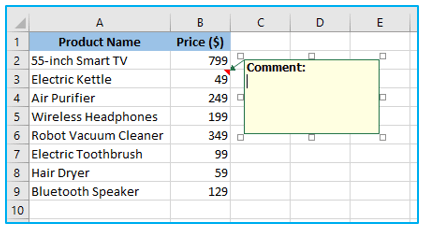
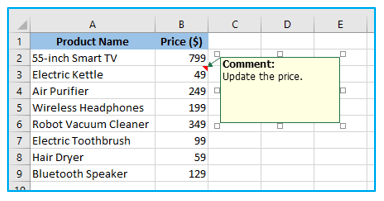
Step 3: You can now write any text you like in the remark field and save it in the cell by pressing the Escape key or clicking anywhere on the worksheet.
If you use the aforementioned shortcut while selecting a group of cells, a comment will only be added to the active cell.
If the shortcut technique is not your preference, there is another way to add a comment below:
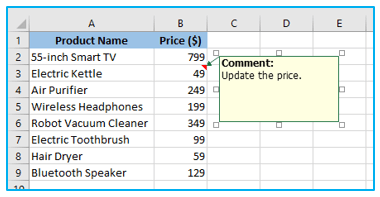
Step 1: Select the cell with the right click if you want to make a comment. Select New Comment (or New Note if you’re using Office 365) to start a new comment.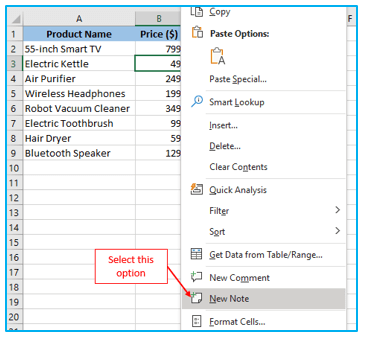
This would immediately insert a comment into the chosen cell.

Step 3: You can now write any text you like in the remark field and save it in the cell by pressing the Escape key or clicking anywhere on the worksheet.
With just one click, you can quickly make all the comments in Excel expand and display their text:
Step 1: Select the “Review” tab. Select “Show All Comments” under the Comments category. If you’re using Office 365, you must select “Notes” from the menu, then “Show All Notes.”
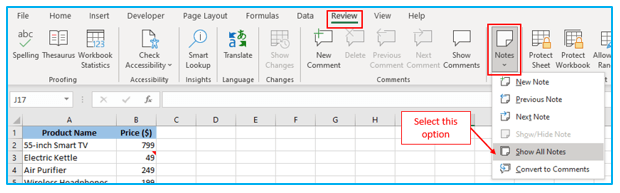
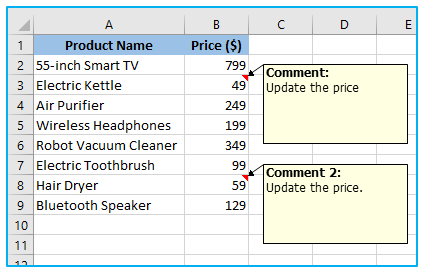
This will display all of the worksheet’s comments right away.
Like a toggle switch, this performs. Therefore, all of the worksheet’s remarks will be hidden if you click on it once more.
You can also read through each comment one at a time if you prefer. When there are many comments and you want to make sure you don’t overlook any while reading them, this can be helpful.
The stages to reading through comments one at a time are as follows:
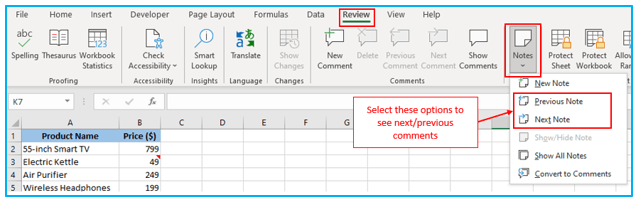
Step 1: On the “Review” tab, click. To move to the following comment, select “Next” in the “Comments” group (and “Previous” to go to the previous comment).
If you’re using Office 365, where notes have replaced comments, you must first click on the “Review” tab, then select “Notes,” and finally select “Next Note” or “Previous Note.”
If you need to use this choice frequently, office 365 has made it a little more challenging (as it now takes more clicks).
The Next/Previous Notes option, which appears when you right-click on the Next/Previous Note choices, could be added to the QAT as a possible solution to this problem.
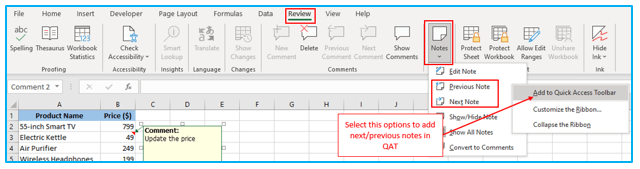
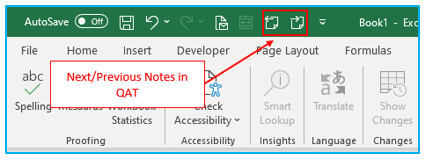
As shown below, these options can be found now in QAT.
Simple copy-and-paste operations will replicate all data, including values, formulas, formatting, and comments. Therefore, all you need to copy-paste everything is the standard Control-C and Control-V keys.
What happens, however, if you only need to transcribe the comments? (and nothing else).
You can do this in Excel by using the Paste Special features.
The methods to copy and paste only comments in Excel are as follows:
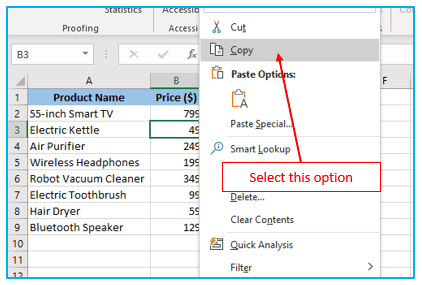
Step 1: Choose every cell that contains the comments you want to copy. Simply use the Control + C keyboard shortcut or the right-click menu to pick Copy after selecting any column in the selection.
Step 2: To paste the comments, go to the cell that you want to. Choose “Paste Special” with a right-click button on your mouse.
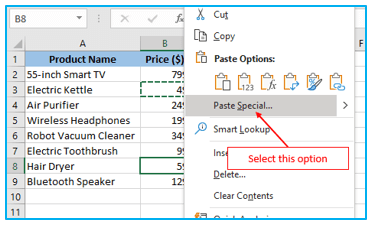
Step 3: Click Comments in the Paste Special dialog window (it will be ‘Comments and Notes’ if you’re using Office 365). Then, click OK.
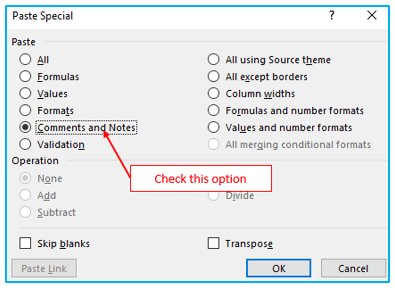
The aforementioned procedures would only copy the comments—not the numbers, formatting, or formulas.
When you have two copies of the same file with distinct comments, this can be helpful. To make sure you have everything in one place, you can copy and paste every comment from the most recent version.
You can delete comments in Excel using a variety of techniques. What remarks you want to delete will determine the technique you use.
For instance, you can use a shortcut or option in the ribbon to quickly delete all comments from a worksheet or a selection.
However, you must use VBA if you want to remove comments all at once from the worksheets.
Let’s examine these two possibilities.
- Remove Comments from the Entire Worksheet or a Selected Range:
The methods listed below can be used to remove all comments from a selection:
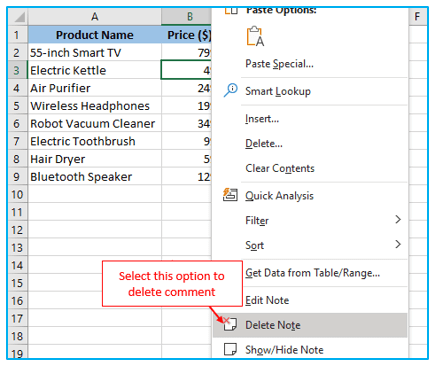
Step 1: Simply right-click anywhere within the choices. Select on “Delete Comment” (or ‘Delete Note’ if you’re using Office 365).
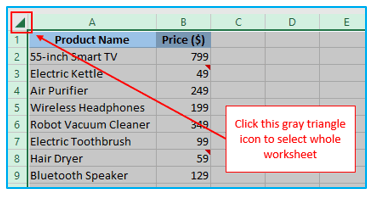
Step 1: In the top-left corner of the Excel spreadsheet, click the gray triangle. You can also use Control + A + A to select the full worksheet.
Step 2: On the “Home” page, click. Go to the “Editing” category and select “Clear”. Select “Clear Comments” (or, if you’re using Office 365, “Clear Comments and Notes”).
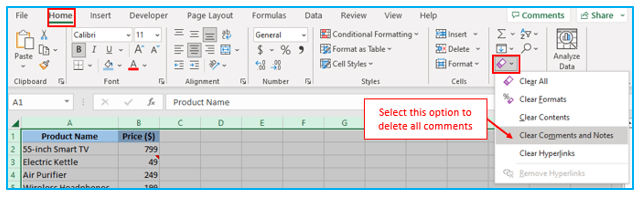
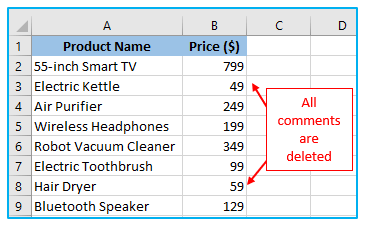
All of the worksheet comments would be deleted using the aforementioned methods.
Keep in mind that you won’t have the option to remove all the comments when you select the full worksheet and then right-click any cell (or notes)
- Erase All Comments From Worksheets at Once:
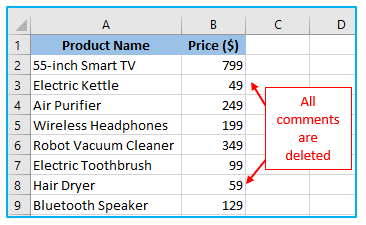
It can be challenging to remove comments from the complete workbook. If there are many sheets in the workbook, going to each sheet and deleting all the remarks on it can get tedious.
In this instance, all the work can be done with a single line of VBA code.
The code to delete all comments from every page in the workbook is provided below:
For each ws in Worksheets: ws.cells.ClearComments: Next ws
The For Each Next loop is used in the code above to cycle through each spreadsheet in the workbook. Additionally, it employs the ClearComments technique for each sheet to remove all comments at once.
Microsoft changed the name of comments in Office 365 to notes, so in the future, the code above could remove comments (a new feature in O365), and you might have to use the code below to delete notes (the comments in prior versions)
For each ws in Worksheets: ws.cells.ClearNotes: Next ws
Both of these codes currently function and remove remarks from the designated cells.
Let me now demonstrate how to use this code:
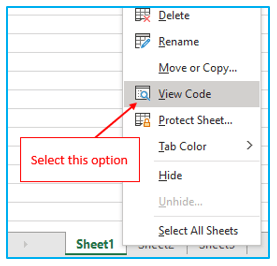
Step 1: Right-click any page tab to open it by selecting “View Code”. By pressing CTRL + F11, the VB Editor can also be accessed through this method.
Step 2: If the “Immediate Window” choice isn’t visible in the VB Editor, select “View” from the menu, and then select “Immediate Window.”

Step 3: The above VBA macro code should be copied and pasted into the immediate window.
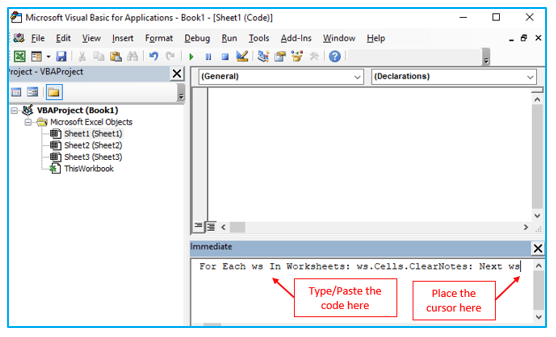
Step 4: Press the Enter key on your keyboard. The full workbook’s comments will be deleted as a result.
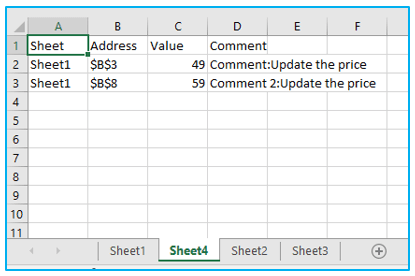
The worksheet should include a summary of all the comments and the text contained within each one. This will make reading through the remarks one at a time simple (instead of navigating and jumping across cells in the sheet).
While there is no built-in tool that can accomplish this, VBA can.
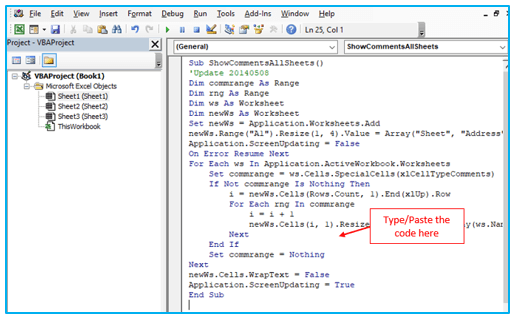
The heavy work is all handled by the following VBA code:
Sub ShowCommentsAllSheets()
‘Update 20140508
Dim commrange As Range
Dim rng As Range
Dim ws As Worksheet
Dim newWs As Worksheet
Set newWs = Application.Worksheets.Add
newWs.Range(“A1”).Resize(1, 4).Value = Array(“Sheet”, “Address”, “Value”, “Comment”)
Application.ScreenUpdating = False
On Error Resume Next
For Each ws In Application.ActiveWorkbook.Worksheets
Set commrange = ws.Cells.SpecialCells(xlCellTypeComments)
If Not commrange Is Nothing Then
i = newWs.Cells(Rows.Count, 1).End(xlUp).Row
For Each rng In commrange
i = i + 1
newWs.Cells(i, 1).Resize(1, 4).Value = Array(ws.Name, rng.Address, rng.Value, rng.Comment.Text)
Next
End If
Set commrange = Nothing
Next
newWs.Cells.WrapText = False
Application.ScreenUpdating = True
End Sub
How to Use this Code?
The worksheet from which you want to Copy All Comments In a Separate Worksheet should have the code copied and pasted.
How to accomplish it:
Step 1: Right-click on the active tab to open it by selecting “View Code”. By pressing CTRL + F11, the VB Editor can also be accessed through this method.

Step 2: In the Module code box, paste the code. VB Editor Window should be closed (or Alt + F11 should be pressed to return to the spreadsheet).
Step 3: You must now execute the macro code. For the code to execute, press the F5 key on your keyboard.
This will copy all comments in a separate worksheet.
Only Office 365 users have access to this function.
You can convert notes to comments because there are now two kinds of comments: comments and notes (not vice-versa).
Therefore, by following the steps listed below, you can simply change any traditional comments (now known as notes in Office 365) into comments.
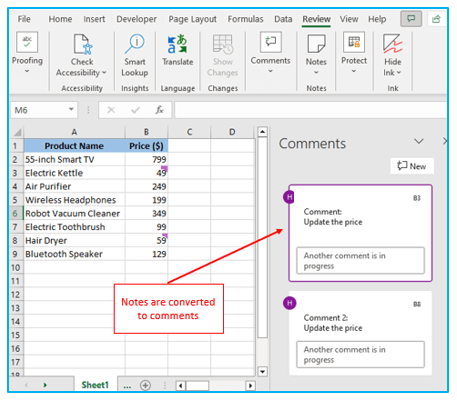
Step 1: Select the “Review” tab. Then select “Notes” from the menu. Then select “Convert to Comments.”
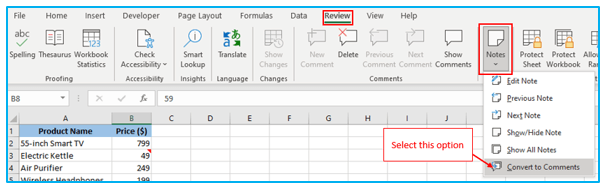
Step 2: Click “Convert All Notes” in the dialog window that appears.
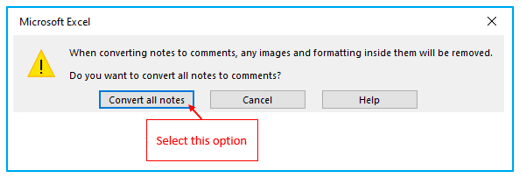
All of the comments would become Notes after the aforementioned stages.
Please be aware that any formatting or images you include in your remarks will be automatically removed.
Additionally, you cannot decide to change some notes to comments while leaving others alone. The worksheet’s notes would all become comments after performing the aforementioned actions.
This concludes the information on adding and removing remarks in Excel.
For ready-to-use Dashboard Templates:
- Financial Dashboards
- Sales Dashboards
- HR Dashboards
- Data Visualization Charts

How to Insert Comments and Delete Comments in Excel (including Shortcuts)?
When you want to add details about a cell or data point without changing the text of the cell, comments can be very helpful.
When using formulas and I need to explain what a formula does or what a cell value signifies, I frequently use these. You can also make comments for other people’s reference if you’re working with others.
You will learn everything you need to know about comments in this tutorial, including how to enter comments in Excel, edit/delete comments, and delete comments from a sheet or workbook as a whole.
Note: There is a crucial point you need to understand, though, before I show you how to enter comments in Excel (or delete/edit comments).
Microsoft has changed the Comment feature’s moniker to Notes in Office 365. Notes have thus replaced the conventional Excel comments that you are familiar with (one that displays a yellow box and tiny red triangle in the cell at the top-right). Additionally, comments now refer to a new function that lets you start threaded discussions. This essay discusses the distinction between notes and comments.
In conclusion, if you are NOT using Office 365, there is no need for concern and the remark is unaffected. For users of Office 365, remarks are now known as Notes.
This Tutorial Covers:
Using the keyboard shortcut listed below, you can add a remark to a cell in Excel:
Here’s how to use shortcut to insert a comment:
Step 1: Choose the cell into which you want to add a comment.
Step 2: Hold down the Shift key or the Command key on your Computer. F2 is pressed.
This would immediately insert a comment into the chosen cell.
Step 3: You can now write any text you like in the remark field and save it in the cell by pressing the Escape key or clicking anywhere on the worksheet.
If you use the aforementioned shortcut while selecting a group of cells, a comment will only be added to the active cell.
If the shortcut technique is not your preference, there is another way to add a comment below:
Step 1: Select the cell with the right click if you want to make a comment. Select New Comment (or New Note if you’re using Office 365) to start a new comment.
This would immediately insert a comment into the chosen cell.
Step 3: You can now write any text you like in the remark field and save it in the cell by pressing the Escape key or clicking anywhere on the worksheet.
2. Show All Comments/Notes
With just one click, you can quickly make all the comments in Excel expand and display their text:
Step 1: Select the “Review” tab. Select “Show All Comments” under the Comments category. If you’re using Office 365, you must select “Notes” from the menu, then “Show All Notes.”
This will display all of the worksheet’s comments right away.
Like a toggle switch, this performs. Therefore, all of the worksheet’s remarks will be hidden if you click on it once more.
3. Navigate Through Comments (Previous/Next)
You can also read through each comment one at a time if you prefer. When there are many comments and you want to make sure you don’t overlook any while reading them, this can be helpful.
The stages to reading through comments one at a time are as follows:
Step 1: On the “Review” tab, click. To move to the following comment, select “Next” in the “Comments” group (and “Previous” to go to the previous comment).
If you’re using Office 365, where notes have replaced comments, you must first click on the “Review” tab, then select “Notes,” and finally select “Next Note” or “Previous Note.”
If you need to use this choice frequently, office 365 has made it a little more challenging (as it now takes more clicks).
The Next/Previous Notes option, which appears when you right-click on the Next/Previous Note choices, could be added to the QAT as a possible solution to this problem.
As shown below, these options can be found now in QAT.
4. Copy Comments
Simple copy-and-paste operations will replicate all data, including values, formulas, formatting, and comments. Therefore, all you need to copy-paste everything is the standard Control-C and Control-V keys.
What happens, however, if you only need to transcribe the comments? (and nothing else).
You can do this in Excel by using the Paste Special features.
The methods to copy and paste only comments in Excel are as follows:
Step 1: Choose every cell that contains the comments you want to copy. Simply use the Control + C keyboard shortcut or the right-click menu to pick Copy after selecting any column in the selection.
Step 2: To paste the comments, go to the cell that you want to. Choose “Paste Special” with a right-click button on your mouse.
Step 3: Click Comments in the Paste Special dialog window (it will be ‘Comments and Notes’ if you’re using Office 365). Then, click OK.
The aforementioned procedures would only copy the comments—not the numbers, formatting, or formulas.
When you have two copies of the same file with distinct comments, this can be helpful. To make sure you have everything in one place, you can copy and paste every comment from the most recent version.
5. Delete Comments
You can delete comments in Excel using a variety of techniques. What remarks you want to delete will determine the technique you use.
For instance, you can use a shortcut or option in the ribbon to quickly delete all comments from a worksheet or a selection.
However, you must use VBA if you want to remove comments all at once from the worksheets.
Let’s examine these two possibilities.
The methods listed below can be used to remove all comments from a selection:
Step 1: Simply right-click anywhere within the choices. Select on “Delete Comment” (or ‘Delete Note’ if you’re using Office 365).
Step 1: In the top-left corner of the Excel spreadsheet, click the gray triangle. You can also use Control + A + A to select the full worksheet.
Step 2: On the “Home” page, click. Go to the “Editing” category and select “Clear”. Select “Clear Comments” (or, if you’re using Office 365, “Clear Comments and Notes”).
All of the worksheet comments would be deleted using the aforementioned methods.
Keep in mind that you won’t have the option to remove all the comments when you select the full worksheet and then right-click any cell (or notes)
It can be challenging to remove comments from the complete workbook. If there are many sheets in the workbook, going to each sheet and deleting all the remarks on it can get tedious.
In this instance, all the work can be done with a single line of VBA code.
The code to delete all comments from every page in the workbook is provided below:
For each ws in Worksheets: ws.cells.ClearComments: Next ws
The For Each Next loop is used in the code above to cycle through each spreadsheet in the workbook. Additionally, it employs the ClearComments technique for each sheet to remove all comments at once.
Microsoft changed the name of comments in Office 365 to notes, so in the future, the code above could remove comments (a new feature in O365), and you might have to use the code below to delete notes (the comments in prior versions)
For each ws in Worksheets: ws.cells.ClearNotes: Next ws
Both of these codes currently function and remove remarks from the designated cells.
Let me now demonstrate how to use this code:
Step 1: Right-click any page tab to open it by selecting “View Code”. By pressing CTRL + F11, the VB Editor can also be accessed through this method.
Step 2: If the “Immediate Window” choice isn’t visible in the VB Editor, select “View” from the menu, and then select “Immediate Window.”
Step 3: The above VBA macro code should be copied and pasted into the immediate window.
Step 4: Press the Enter key on your keyboard. The full workbook’s comments will be deleted as a result.
6. Copy All Comments In a Separate Worksheet
The worksheet should include a summary of all the comments and the text contained within each one. This will make reading through the remarks one at a time simple (instead of navigating and jumping across cells in the sheet).
While there is no built-in tool that can accomplish this, VBA can.
The heavy work is all handled by the following VBA code:
Sub ShowCommentsAllSheets()
‘Update 20140508
Dim commrange As Range
Dim rng As Range
Dim ws As Worksheet
Dim newWs As Worksheet
Set newWs = Application.Worksheets.Add
newWs.Range(“A1”).Resize(1, 4).Value = Array(“Sheet”, “Address”, “Value”, “Comment”)
Application.ScreenUpdating = False
On Error Resume Next
For Each ws In Application.ActiveWorkbook.Worksheets
Set commrange = ws.Cells.SpecialCells(xlCellTypeComments)
If Not commrange Is Nothing Then
i = newWs.Cells(Rows.Count, 1).End(xlUp).Row
For Each rng In commrange
i = i + 1
newWs.Cells(i, 1).Resize(1, 4).Value = Array(ws.Name, rng.Address, rng.Value, rng.Comment.Text)
Next
End If
Set commrange = Nothing
Next
newWs.Cells.WrapText = False
Application.ScreenUpdating = True
End Sub
How to Use this Code?
The worksheet from which you want to Copy All Comments In a Separate Worksheet should have the code copied and pasted.
How to accomplish it:
Step 1: Right-click on the active tab to open it by selecting “View Code”. By pressing CTRL + F11, the VB Editor can also be accessed through this method.
Step 2: In the Module code box, paste the code. VB Editor Window should be closed (or Alt + F11 should be pressed to return to the spreadsheet).
Step 3: You must now execute the macro code. For the code to execute, press the F5 key on your keyboard.
This will copy all comments in a separate worksheet.
7. Convert Notes to Comments (Office 365 Only):
Only Office 365 users have access to this function.
You can convert notes to comments because there are now two kinds of comments: comments and notes (not vice-versa).
Therefore, by following the steps listed below, you can simply change any traditional comments (now known as notes in Office 365) into comments.
Step 1: Select the “Review” tab. Then select “Notes” from the menu. Then select “Convert to Comments.”
Step 2: Click “Convert All Notes” in the dialog window that appears.
All of the comments would become Notes after the aforementioned stages.
Please be aware that any formatting or images you include in your remarks will be automatically removed.
Additionally, you cannot decide to change some notes to comments while leaving others alone. The worksheet’s notes would all become comments after performing the aforementioned actions.
This concludes the information on adding and removing remarks in Excel.
For ready-to-use Dashboard Templates:
Categories