Hide Formulas in Excel provides a practical solution for safeguarding sensitive information and improving the presentation of your spreadsheets. Whether you’re sharing financial models, reports, or budget templates, Hide Formulas in Excel allows you to conceal complex formulas while preserving the integrity of your data. Say goodbye to concerns about accidental formula edits or unauthorized access to proprietary calculations and hello to enhanced confidentiality. From protecting intellectual property to creating professional-looking reports, Hide Formulas in Excel empowers users to customize their spreadsheets with confidence. Take control of your data privacy and presentation needs by leveraging the flexibility and convenience of Hide Formulas in Excel. With just a few clicks, you can hide formulas without affecting their functionality, ensuring that your Excel files are both secure and visually appealing. Embrace the power of Hide Formulas in Excel and elevate your spreadsheet management to new heights of efficiency and professionalism.
This Tutorial Covers:
- How to hide every formula in Excel
- How to hide formulas in Excel only (And keep the rest of the cells editable)
- Step 1: Remove the lock Property from all the cells
- Step 2: Only enable the Locked and Hidden feature for cells with formulas
- Step 3: Protecting the worksheet
- How to hide formulas without encrypting the worksheet
- How to unhide formulas and erase protection in Excel
1. How to hide every formula in Excel?
When you have a formula in a cell, a person can see the formula in two ways:
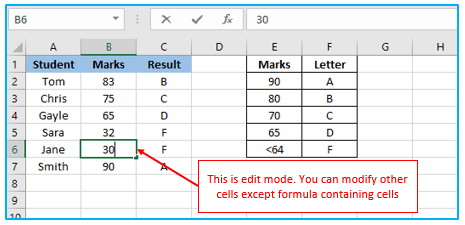
- By selecting the columns with a double-click and switching to edit mode
- By choosing the cell and viewing the formula in the formula column
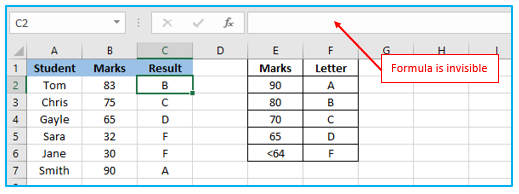
Users won’t be able to modify the cell or see the formula in the formula bar when you hide the formulas (as we’ll see how to do in a moment).
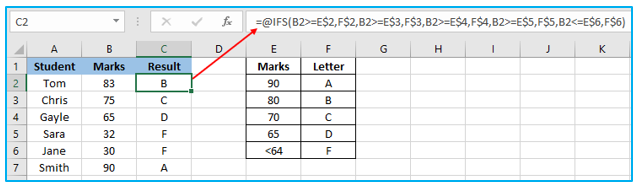
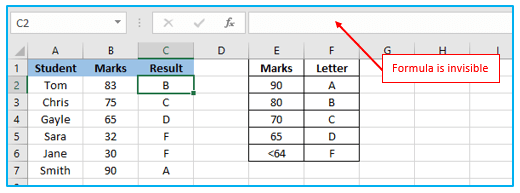
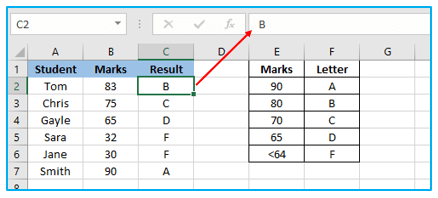
Assume you have the data collection depicted below, with the formula in column C.
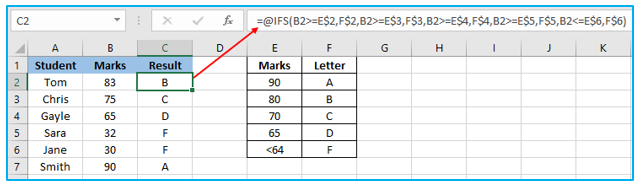
How to hide excel formula is shown below:
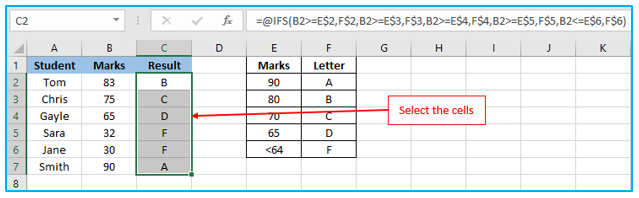
Step 1: Choose the cells in column C that contain the formula that you want to hide.
Step 2: Go to the “Home” option. Click on the dialog box launcher in the “Number” group (it’s the tiny, tilted arrow icon in the bottom right of the group).

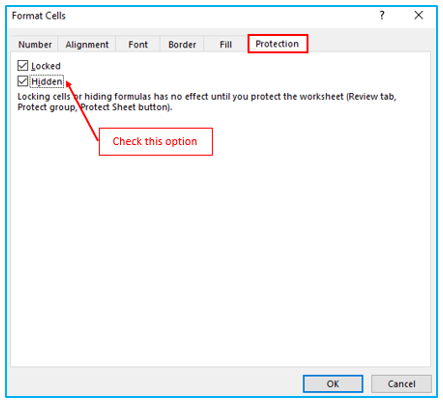
Step 3: Click the “Protection” tab in the “Format Cells” dialog window that appears. Check the “Hidden” option. Select OK.
Step 4: On the ribbon, select the “Review” tab. Select “Protect Sheet” from the “Protect” category by clicking it.
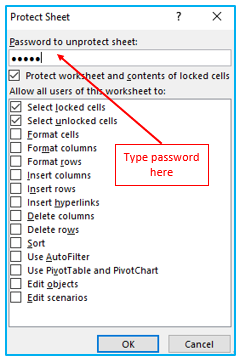
Step 5: Enter the password that would be required to unlock the worksheet in the “Protection” dialog window (if you don’t want to use a password, leave this field empty). Select OK.
The aforementioned actions would protect the entire worksheet so that if you clicked on a cell with a value, the value would appear in the formula bar; however, if you clicked on a cell with a formula, no formula would appear in the formula bar.
Additionally, since the worksheet is secured, you would be unable to double-click a column to enter edit mode (so the formula is hidden that way as well).
While this technique is effective, you should be aware that protected Excel sheets and cells are simple for the user to unlock.
Your protected workbooks can be readily broken into by any tech-savvy user (a simple Google search will give them multiple ways to break the protected worksheet). It’s not easy, but it’s not too difficult either.
However, if you’re dealing with non-technical users, adding a password ought to suffice.
2. How to hide formulas in Excel only (And keep the rest of the cells editable)?
I explained how to protect the entire worksheet in the method above, including the cells without a formula.
What happens, though, if you don’t want to secure the full worksheet? What if you only want to safeguard the columns that contain formulas while keeping the user from seeing those formulas?
This might be the case if you want users to enter data but prevent them from seeing or editing the formula (like in a data entry form).
This is also a simple process.
In this method, we would only choose the cells that contain the formulas and protect those cells, as opposed to the prior method where we protected all the worksheet’s cells.
The user could continue to modify the remaining portions of the worksheet.
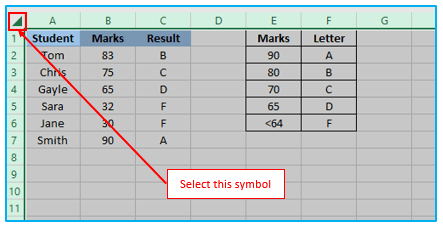
Consider the following data set, where you only want to hide and protect the formulas in column C. (which has formulas).
A cell cannot be protected unless both the protection from the ribbon and the “Locked” property are set. A cell can only genuinely become locked (i.e., uneditable) when both apply.
Additionally, this means that even after you secure the worksheet, some cells whose lock property has been disabled may still be edited.
The locked property will be turned off for all cells other than those with formulas using this concept.
Let’s look at the procedure.
-
Step 1: Remove the lock Property from all the cells:
Therefore, in order to prevent these cells from being secured, we must first turn off the Locked property for each cell.
The steps to disable the lock property from all the cells are described below:
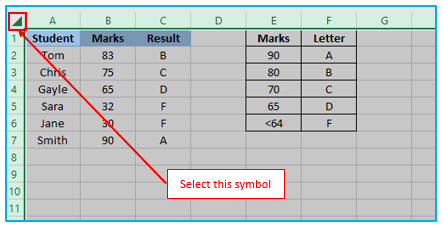
Step 1: Pick every column on the worksheet (you can do this by clicking on the gray triangle at the top left part of the sheet).
Step 2: Go to the “Home” option. Click on the dialog box launcher in the “Number” group (it’s the tiny, tilted arrow icon in the bottom right of the group).

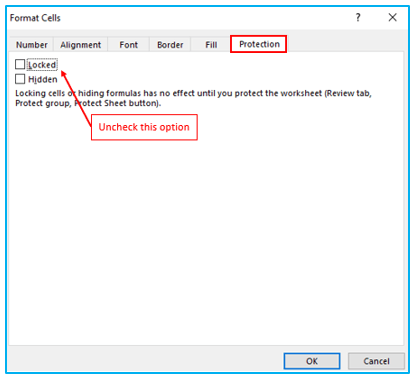
Step 3: The “Protection” option can be found in the Format cells dialog window. Select “Locked” and uncheck it. Select the “OK” button.
The locked property has been removed from every cell in the worksheet using the aforementioned methods.
Now, even if I go ahead and secure the sheet using the ribbon’s Review >> Protect Sheet option, the cells would still be partially editable.
-
Step 2: Only enable the Locked and Hidden feature for cells with formulas:
I now need to locate the cells that contain the formula and lock them in to hide the formula from all the worksheet’s cells.
I would also make careful to hide the formula from the formula bar while locking these cells.
The steps to hide formulas are as follows:
Step 1: Pick every column on the worksheet (you can do this by clicking on the gray triangle at the top left part of the sheet).
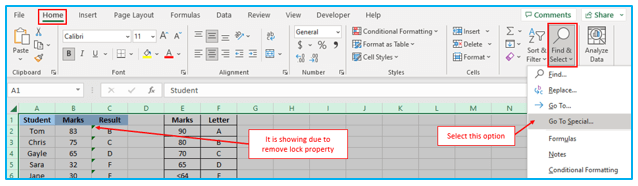
Step 2: On the “Home” option, click. Click the “Find & Select” link under the “Editing” category. Select “Go-To Special” from the menu.
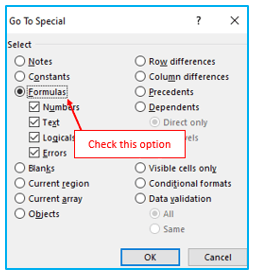
Step 3: Click the “Formulas” choice in the “Go To Special” dialog box. This will pick every cell that contains a formula.
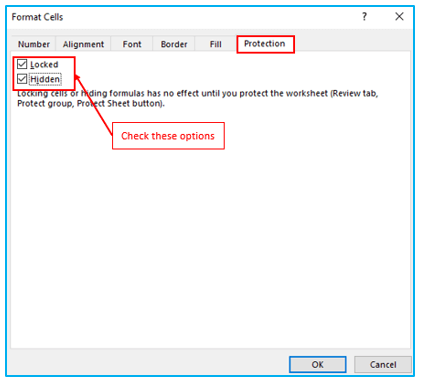
Step 4: Hold the Control key while pressing the 1 key while selecting the cells that contain formulas (or the Command key and the 1 key if using Mac). The “Format Cells” dialog window will then be displayed. Select “Protection” tab. Ensure that the “Locked” and “Hidden” checkboxes are selected. Select the “OK” button.
-
Protecting the worksheet:
The Locked property has been disabled throughout the procedure for all cells with the exception of those that contain formulas.
As a result, only the cells with formulas would be protected if I protected the complete worksheet (as you need the Locked property to be enabled to truly lock a cell).
How to Protect excel sheet is shown below:
Step 1: On the ribbon, select the “Review” tab. Select “Protect Sheet” from the “Protect” category by clicking it.

Step 2: Enter the password that would be required to unlock the worksheet in the “Protection” dialog window (if you don’t want to use a password, leave this field

The aforementioned procedures would secure only those cells that contained a formula while also hiding the formula from users.
The formula in the formula bar won’t be visible to users, and they won’t be able to double-click to enter modify mode. On the other hand, you can edit other cells.
3. How to hide formulas without encrypting the worksheet?
The most effective method for hiding formulas in Excel from users without protecting the document is to use VBA code.
The steps to hide formulas without encrypting the worksheet are described below:
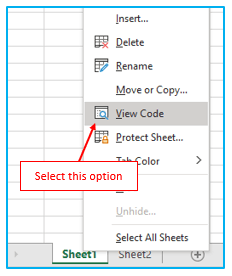
Step 1: Right-click on the worksheet name to start. Choose “View Code” from the menu.
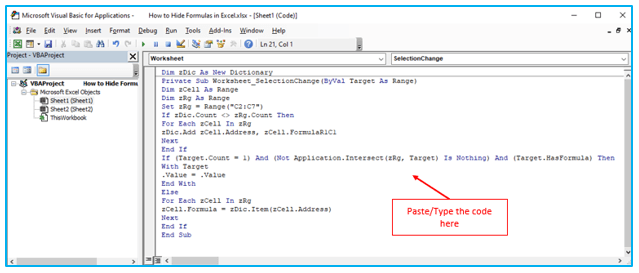
Step 2: The aforementioned instruction will launch a new VBA module. Add the following code to the empty VBA module as well:
Dim zDic As New Dictionary
Private Sub Worksheet_SelectionChange(ByVal Target As Range)
Dim zCell As Range
Dim zRg As Range
Set zRg = Range(“C2:C7”)
If zDic.Count <> zRg.Count Then
For Each zCell In zRg
zDic.Add zCell.Address, zCell.FormulaR1C1
Next
End If
If (Target.Count = 1) And (Not Application.Intersect(zRg, Target) Is Nothing) And (Target.HasFormula) Then
With Target
.Value = .Value
End With
Else
For Each zCell In zRg
zCell.Formula = zDic.Item(zCell.Address)
Next
End If
End Sub
Step 3: In addition, select “References” from the “Tools” menu.
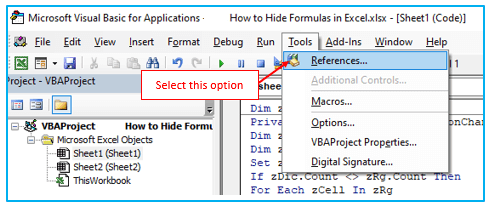
Step 4: The “References – VBAProject” dialogue box will now display. Next, select the “Available References” tab and select the “Microsoft Scripting Runtime” checkbox. Next, select OK.

Step 5: Press Alt + Q to exit the VBA module after that. Finally, select cell C2. As can be seen, the formula bar only displays the value and not the formula.
4. How to unhide formulas and erase protection in Excel?
The steps listed below can be used to make the previously hidden formulas appear in the formula bar once again:
Step 1: On the ribbon, select the “Review” tab. Select “Unprotect Sheet” from the “Protect” category by clicking it.

Note: After removing the worksheet’s protection, you might want to uncheck the “Hidden” checkbox if you chose to hide the formulas before protecting the worksheet. Since the formulas appear in the formula bar as soon as you remove the worksheet protection, this won’t have an instant impact. To prevent the hidden attribute from being selected for those cells in the future when you want to protect the same sheet but still allow users to see the formulas, select the formula-containing cells, press Ctrl + 1, open the Format Cells dialog, select the “Protection” tab, and uncheck the “Hidden” box.
This is how you can hide and lock formulas in Excel with protecting the worksheet and without protecting the worksheet. I hope you found this tutorial useful.
Application of Hide Formulas in Excel
- Confidentiality Protection: Conceal sensitive formulas in Excel to protect proprietary calculations and intellectual property from unauthorized access.
- Presentation Enhancement: Improve the visual appeal of spreadsheets by hiding formulas, creating cleaner and more professional-looking reports or dashboards.
- Data Privacy Compliance: Ensure compliance with data privacy regulations by hiding formulas containing personally identifiable information or sensitive data.
- Preventing Errors: Minimize the risk of accidental formula edits or deletions by hiding complex formulas, reducing the likelihood of spreadsheet errors.
- Focus on Outputs: Hide formulas to focus on the output data rather than the underlying calculations, simplifying data interpretation and analysis for end-users.
- Safeguarding Formulas: Conceal formulas to prevent users from tampering with critical calculations, preserving data integrity and accuracy in Excel files.
For ready-to-use Dashboard Templates:
