Track changes in your documents marks a significant stride toward maintaining transparency and collaboration in your workflow. This powerful feature not only provides a clear audit trail of modifications but also fosters an environment of teamwork and accountability. As you embrace the track changes functionality, you unlock the potential for seamless revisions, constructive feedback, and a harmonious editing process. Let the track changes feature be your ally in crafting documents that are not only refined and accurate but also a collective achievement of meticulous collaboration and shared expertise.
The tutorial demonstrates how to track changes in Excel by highlighting changes on the screen, cataloging changes in a different sheet, accepting and rejecting changes, and keeping track of the most recently modified cell.
This Tutorial Covers:
- Excel Track Changes – the Basics
- How to track changes in Excel
- Turn on Excel Track Changes feature
- Highlight changes on screen
- View tracked changes history in a separate sheet
- Accept or reject changes
- Decide how long to retain history changes
- How to disable the Excel track changes feature
- How to monitor the most recent cell change in Excel
- Difference Between Comments and Track Changes
1. Excel Track Changes – the Basics
You can quickly evaluate your edits in the edited worksheet or on a separate sheet using Excel’s built-in Track Changes feature, and you can approve or reject each change separately or all of them at once. There are a few things you should keep in mind in order to make the most of the tracking function in Excel.
A. Only shared files are compatible with Track Changes:
Track Changes in Excel only function in shared files. Therefore, whenever you enable tracking in Excel, the workbook becomes shared, allowing multiple users to modify it at once. Although sharing a file has its benefits, there are also some disadvantages. Not all Excel features, such as conditional formatting, data validation, sorting and filtering by format, and merging cells, to mention a few, are completely supported in shared workbooks. Please refer to our Excel shared workbook guide for more details.
B. Track Changes is not working in spreadsheets that contain tables:
If your Excel workbook has one or more tables or XML maps, which are not allowed in shared workbooks. The Track Changes button in Excel is likely not accessible (grayed out). If so, change your tables to ranges and get rid of the XML files.
C. In Excel, it is impossible to undo modifications:
When adjusting a worksheet in Microsoft Excel, you cannot go back in time by undoing them like you can in Microsoft Word. Excel’s Track Changes feature actually keeps track of modifications made to a workbook in a log file. This Track changes history in Excel
can be manually reviewed, and you can decide which ones to retain and which ones to override.
D. Excel does not track every modification:
Excel does not keep a note of every change. Any adjustments you make to cell values are recorded, but formatting, hiding and unhiding rows and columns, and recalculating formulas are not.
E. By default, change data is retained for 30 days:
Excel retains the change history for 30 days by default. The change history for all 40 days will be visible if you open an edited workbook, but only until you exit the document. Any modifications older than 30 days will be lost after the workbook has been closed. The number of days for keeping change history can, however, be altered.
2. Enabling the track changes features in Microsoft Excel
In Excel, this function is deactivated by default. Let’s discuss how to activate and utilize Excel Track Changes in your spreadsheets now that you are familiar with its fundamentals.
Turn on the Excel Track Changes in Microsoft Excel
Follow these steps to see the modifications you or other users have made to a particular workbook:
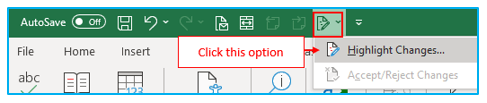
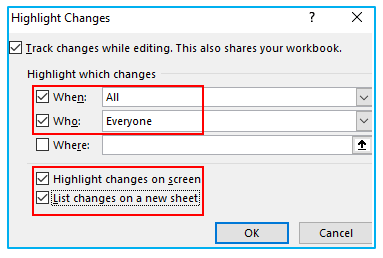
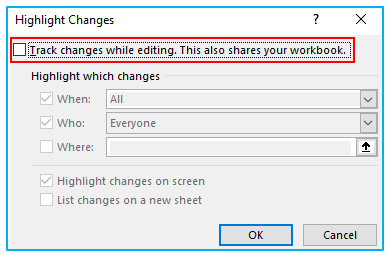
Step 1: Click the “Track Changes” icon on the “Review” tab, then choose “Highlight Changes” from the “Changes” group. If you are using Office 365, then you have to add it in QAT manually. Here I add it to the QAT.
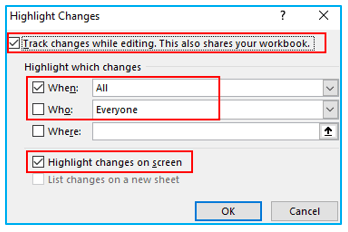
Step 2: Do the following in the “Highlight Changes” dialog box:
- Check the “Track changes while editing. This also shares your workbook.” Box
- Choose the appropriate time period in the When box next to Highlight which changes, and then choose the people whose changes you want to see in the Who box (the screenshot below shows the default settings).
- Check the “Highlight changes on screen option”.
- Select OK.
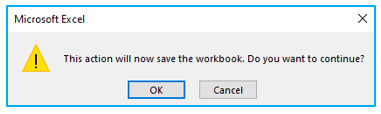
Step 3: Allow Excel to save your workbook if asked, and you’re done!
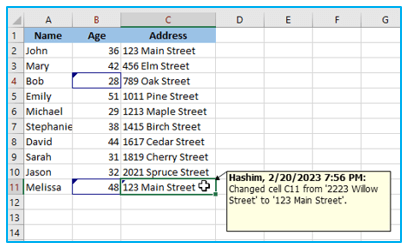
As shown in the following part, Excel will highlight edits made by various users in different colors. As you type, any fresh alterations will be highlighted.
The List changes on a new sheet option will also be accessible if you are enabling Excel Track Changes in a shared workbook (which is denoted by the term [Shared] appended to the workbook name). To examine comprehensive information about each change on a separate sheet, check this box as well.
- Highlight changes on screen:
Microsoft Excel highlights the column letters and row numbers where changes were made in a dark red tone when “Highlight changes on screen” is checked. Different users’ edits are distinguished at the cell level by a colored cell border and a tiny triangle in the upper-left area. Simply hover your cursor over a modification to see more details:
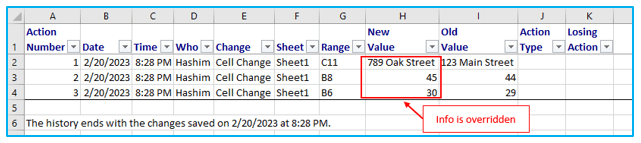
- View tracked changes history in a separate sheet:
You can examine a list of changes on a separate sheet in addition to the screen-highlighted changes.
Follow these instructions to view tracked changes history in a separate sheet:
Step 1: Turn on the Excel “Track Changes” function (Review > Track Changes > Highlight Changes). Configure the “Highlight which changes” boxes in the “Highlight Changes” dialog window (the image below shows the suggested options), choose the “List changes on a new sheet” box, and then click OK.
The History sheet, a new worksheet created as a result, will enumerate all tracked changes and provide extensive information about each change, including who made it, what data was changed, when it was made, and whether it was kept or not.
Tips and notes:
- The History sheet only shows saved changes, so be careful to Ctrl + S to save any recent work before using this feature.
- Clear the Who and Where check boxes after selecting All in the When box if the History sheet does not show every modification that has been made to the workbook.
- Either save the workbook again or uncheck the List changes on a new sheet box in the Highlight Changes dialog box, to delete the History worksheet from your workbook.
- Use a macro that is shared on the “Microsoft Excel Support Team” blog to format deleted values with a strikethrough so that Excel’s track changes resemble Word’s track changes.
Accept or reject changes
The steps are described below:
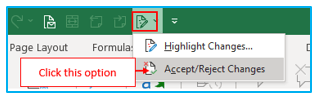
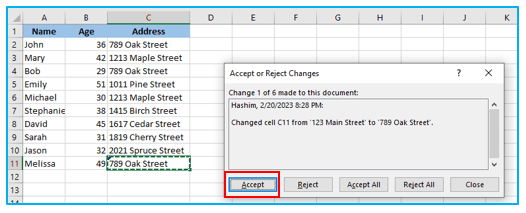
Step 1: Go to the “Review” tab and select “Track Changes” from the “Changes” group in order to approve or reject changes made by various users. Next, select “Accept/Reject Changes.”
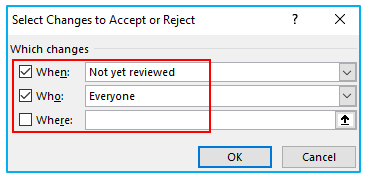
Step 2: Configure the following options in the “Select Changes to Accept or Reject” dialog window, and then click OK:
- Select either “Not yet reviewed” or Since date from the “When” selection.
- Choose the user whose changes you want to examine from the “Who” list (Everyone, Everyone but me or a specific user).
- Make the “Where” field empty.
Step 3: When you select Accept or Reject, Excel will display each change one at a time, allowing you to decide whether to keep or reject it.
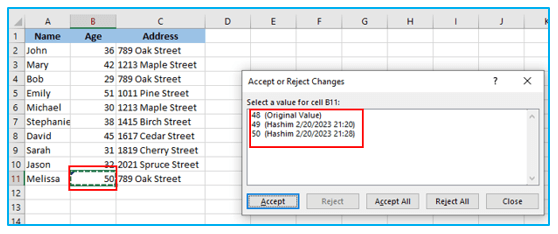
You will be prompted to decide which changes you want to retain if multiple edits were made to a particular cell:
You can also choose to accept or reject all modifications at once by clicking Accept All or Reject All.
Note: Keep in mind that the tracked changes will remain highlighted in your workbook whether you approve or reject them. Turn off Track Changes in Excel to get rid of them entirely.
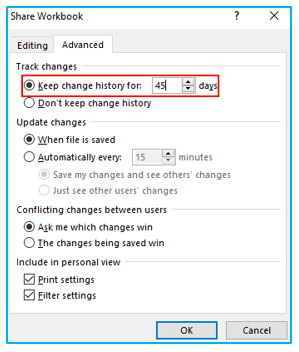
- Decide how long to retain history changes:
By default, Excel only saves modifications made within the previous 30 days before permanently erasing them.
Follow these instructions to preserve changes in history for an extended time:
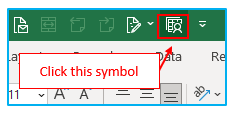
Step 1: Click the “Share Workbook” option under the “Changes” group on the “Review” tab. In Office 365, this option needs to be explicitly added to QAT. I included QAT because I use Office 365.
Step 2: Change to the “Advanced” option in the “Share Workbook” dialog window, select “Keep Change History For” from the drop-down menu, and then click OK.
3. Disabling track changes in Excel?
Turn off the Excel Track Changes feature to stop changes in your workbook from being highlighted.
The steps to disable the Excel track changes feature are described below:
Step 1: Select “Highlight Changes” from the “Track Changes” drop-down menu under the “Changes” category on the “Review” tab (as shown earlier part).
Uncheck the “Track changes while editing. This also shares your workbook” box in the “Highlight Changes” window box
Note: Excel’s change history is forever erased when change tracking is turned off. You can list the changes on a new sheet, copy the History sheet to another workbook, and then save that workbook to retain the information for future use.
4. How to monitor the most recent cell change in Excel?
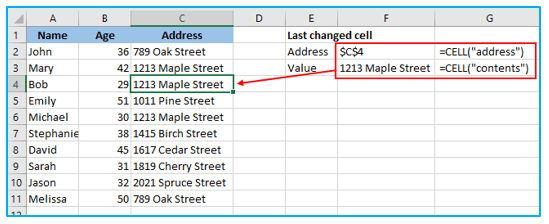
In some cases, you might only want to keep track of the most recent update to a workbook rather than viewing all of the revisions. This can be accomplished by combining the Monitor Window feature with the CELL function.
As you likely already know, Excel’s CELL function is made to obtain data about a cell:
CELL(info_type, [reference])
What kind of information, such as a cell value, address, formatting, etc., you want to deliver is specified by the info type argument. There are 12 different types of information overall, but for this assignment, we will only use two of them:
Contents – to obtain the value of the cell.
Address – to discover the cell’s location.
As an alternative, you can use different input categories to get more data, like:
Col – to determine the cell’s column number.
Row – to determine the cell’s row number.
Filename – to show the filename’s route for the cell’s location in the file.
When the reference argument is omitted, Excel is told to deliver details about the most recently modified cell.
Once you have the necessary background knowledge, follow these instructions to keep note of the last changed cell in your workbooks:
Step 1 : Fill in any blank spaces with the following formulas:
=CELL(“address”)
=CELL(“contents”)
The formulas will display the address and current value of the last cell modified, as shown in the screenshot below:
5. Difference Between Comments and Track Changes:
When evaluating other people’s Excel work, many people find that adding notes is preferable.
The following are the main variations between the features of “Comments” and “Track Changes”:
- To make a comment, you don’t have to modify a cell’s content. On the other hand, track changes would add a notation whenever the cell under consideration changed.
- The procedure of adding a comment must be done manually, but when track changes is enabled, the worksheet will automatically keep track of all changes.
- A worksheet does not have the ability to provide a list of each comment individually, but the tracking feature does.
- Some Excel features are disabled when track changes are enabled. The same cannot be said of remarks.
For ready-to-use Dashboard Templates:
