Alphabetize by last name in Excel to streamline your data organization and enhance the clarity of your lists. Whether you’re managing contact lists, employee records, or any dataset that includes names, sorting by last name ensures a more intuitive and professional presentation. Say goodbye to manually sorting names and hello to efficient, accurate organization with Excel’s powerful sorting capabilities. By alphabetizing by last name in Excel, you make your data more accessible and easier to navigate, facilitating quicker lookups and better data management. Take control of your datasets and improve your workflow by leveraging Excel’s sorting features. With just a few clicks, you can create neatly organized lists that enhance productivity and ensure data accuracy. Embrace the efficiency and precision of alphabetizing by last name in Excel and elevate your data handling to new heights.
This Tutorial Covers:
- Using Find and Replace, extract and sort by last name
- Utilizing a formula, extract and alphabetize last names
- How to Use Text to Columns
- Utilizing Flash Fill
- Using Power Query, dynamically sort by last name and extract
- Additional Advice
1. Using Find and Replace, extract and sort by last name
Getting the last name in a distinct column is the first step in sorting by the last name.
To achieve this, simply leave the space before the last name vacant, leaving only the last name remaining.
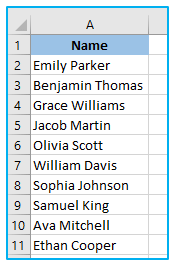
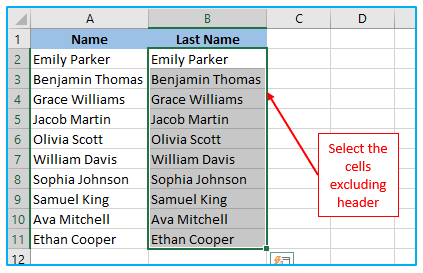
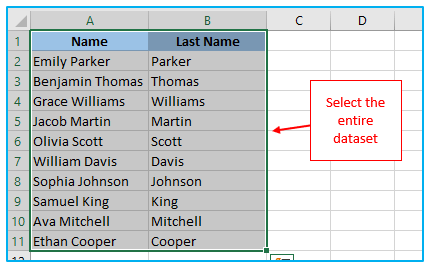
Assume you want to arrange the data in the dataset as shown below alphabetically by last name.
How to sort by the last name in excel:
Step 1: Choose the file with the header included.
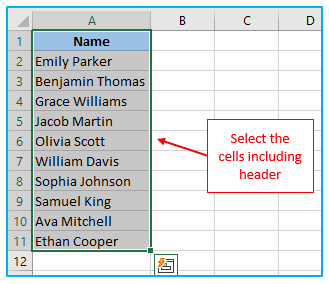
Step 2: In the neighboring column, duplicate it (if the adjacent column is not empty, insert a new column and then copy these names)
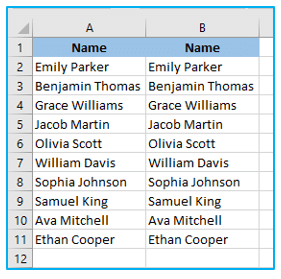
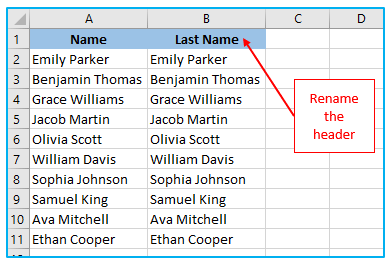
Step 3: Give the copied column heading a new name. I’ll use “Last Name” as an illustration.
Step 4: Don’t pick the header; instead, select each of the copied names.
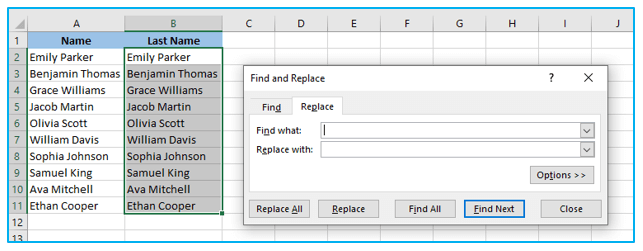
Step 5: Press the H key while keeping the Control key depressed. The Find and Replace dialog window will then be displayed.
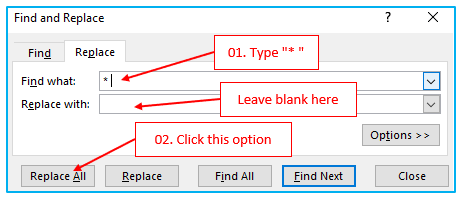
Step 6: Enter * in the Find What box (asterisk symbol followed by a space character).
Fill in nothing in the Replace with box. Simply select Substitute All. All of the first names would be immediately replaced by this, leaving you with only last names.
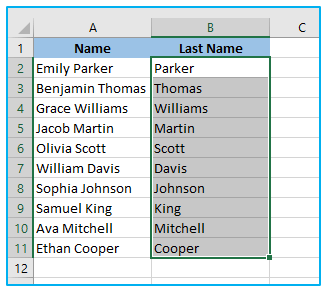
The procedures mentioned above would retain the last name and eliminate everything else. Even if you have given names or prefixes, this still works (such as Mr. or Ms).
You can quickly sort the dataset (including the complete names) alphabetically based on the last name once you have the last names in the adjacent column.
The methods to get last name and sort by last name are as follows:
Step 1: The complete dataset with headers should be chosen (including the full names and the extracted last names). Along with the names, you can also include other columns you want to arrange by.
Step 2: On the “Data” tab, click. Select “Sort”.

Step 3: Make sure “My data has headers” is selected in the Sort dialog window. Choose the name of the column that only contains the “Last Name” as the “Sort by” choice. Choose “Cell Values” for the “Sort On” option. Choose “A to Z” under the Order option. Select OK.

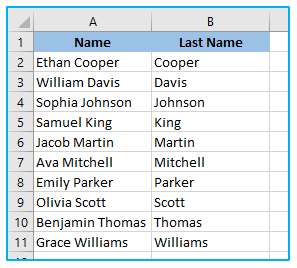
The aforementioned procedures would use last names to order the complete selected dataset.
Once finished, you can remove the last name section.
Pro tip: You should have a method to un-sort this dataset if you ever believe you might need the original data back. To accomplish this, place serial numbers in a column to the left or right of the sorting, close to it. Now, if you need the original info back, sorting by numbers will give it to you.
2. Utilizing a formula, extract and alphabetize last names
Even though I prefer the above approach (using Find and Replace to get all the last names and sort them), it has the drawback of producing static data.
The procedure will have to be repeated in order to obtain the last names if I add more names to my list.
Use the formula technique to sort the data by last names if you don’t want this to happen.
Assume you possess the information depicted below.
The following formula will extract last name in excel:
=RIGHT(A2,LEN(A2)-FIND(” “,A2))
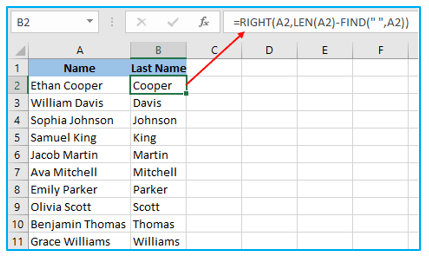
The formula above depends on a pattern with a complete name (that contains only the first and last name in this example). Between the first and last word, there will typically be a space character.
To determine the location of the space character, use the FIND feature. The overall number of characters in the last name is then calculated by subtracting this value from the length of the name as a whole.
The RIGHT function uses this number to obtain the last name after that.
You can order this information once you have the last name section (this is covered in the first method in detail).
If you only have first and last names, the method above would still be valid.
What if you also go by your middle name?
In this situation, you must apply the following formula:
=RIGHT(A2,LEN(A2)-FIND(“@”,SUBSTITUTE(A2,” “,”@”,LEN(A2)-LEN(SUBSTITUTE(A2,” “,””)))))
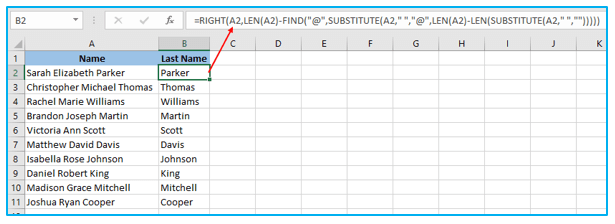
The last space character is located using the algorithm above, which is then used to extract the last name.
The second formula is the one I advise using in all circumstances because it is more reliable and can manage any situation (as long as the last name is at the end of the name).
Note: It should be noted that these two formulas assume there is only one space character between each name part. This formula will produce false findings if there are leading or trailing spaces, or if there are double spaces. In this situation, it is best to first remove any leading, trailing, and double spaces using the TRIM function before applying the aforementioned algorithm.
Using a formula has the advantage of making the results dynamic, despite the fact that it may seem like a complex technique. If you want to get the last name for additional people on your list, just copy the formula.
3. How to Use Text to Columns?
Once more, using Text to Columns in Excel to divide cells is quick and straightforward.
To divide the content of the cell, you can indicate the delimiter (such as a comma or space). Once the split elements are in distinct columns, you can alphabetize the data using the column containing the last name.
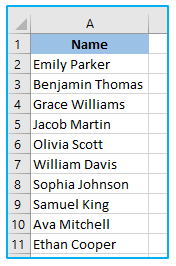
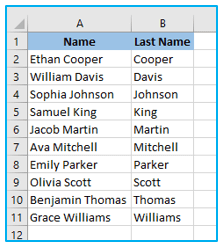
Assume you have the information as follows:
The procedures for using Text to Column to arrange by last name are as follows:
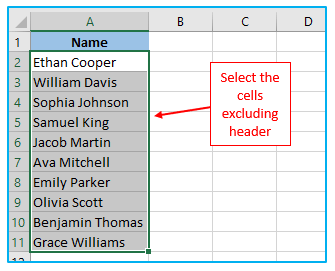
Step 1: Select the name-containing cells (excluding the header)
Step 2: On the “Data” tab, click. Select the “Text to Columns” option under the “Data Tools” group. The “Text to Columns tool” will then launch.

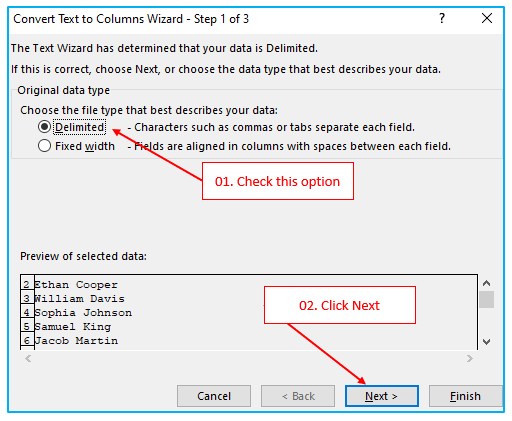
Step 3: Select “Delimited” in Step 1 of the “Convert Text to Columns Wizard” and then hit “Next.”
Step 4: Click the Next option after choosing “Space” as the Delimiter in Step 2 (and unchecking anything else if it is checked).
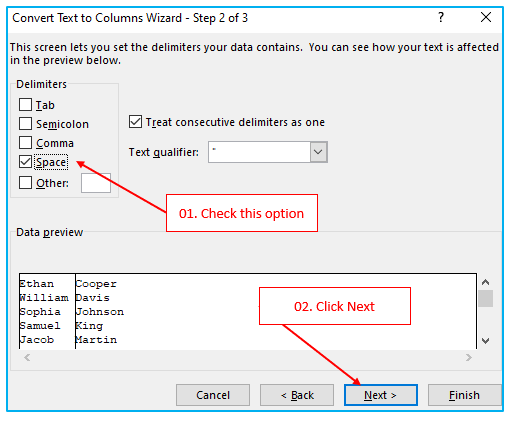
Step 5: In Step 3, choose the ‘Do not import columns (skip)’ choice after selecting the first name column in the Data preview. This makes sure that only the last name is returned and that the first name is excluded. The cell that is next to the initial data should be used as the destination cell. By doing this, you can be certain that the initial names data and last name are received separately. Select “Finish”.
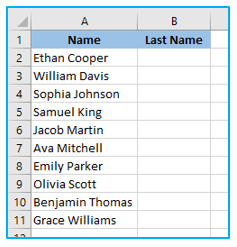
When you have the outcome, you can arrange it by last name.
4. Utilizing Flash Fill
Using the Flash Fill feature is another quick and easy method to get the last names.
In Excel 2013, Flash Fill was launched, and it aids in data manipulation by spotting patterns. You must repeatedly display to Flash Fill the outcome you desire for this to function.
It will finish the remainder of the work for you quickly after determining the pattern.
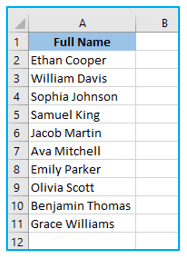
Let’s say you have the names information listed below.
The procedures for using Flash Fill to obtain the last name and then arrange using it are listed below:
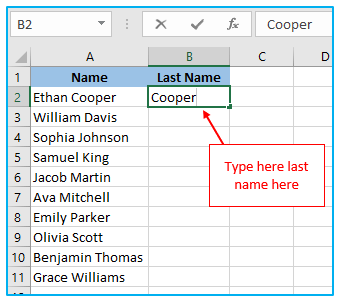
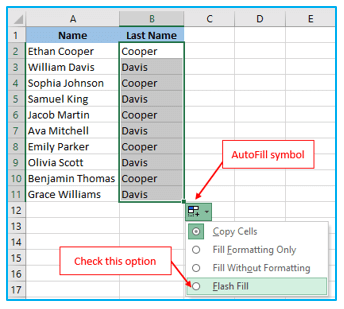
Step 1: In column B2, type “Cooper” in the text field. You anticipate this outcome in the cage.
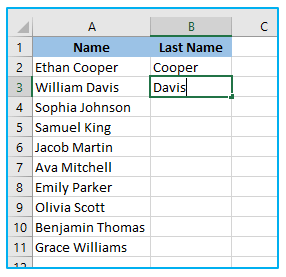
Step 2: Enter the last name for the name in the adjacent column in the following cell(In this example, Davis).
Step 3: Choose both of the spaces. Place the mouse over the selection’s bottom-right corner. The pointer will now be a plus sign, as you can see.
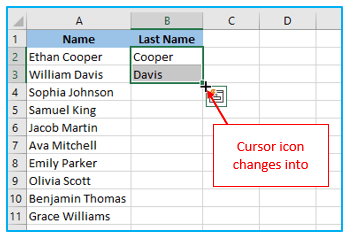
Step 4: Simply hit it twice (or click and drag it down). You will see some results in the cells as a consequence (not likely to be the result you want).
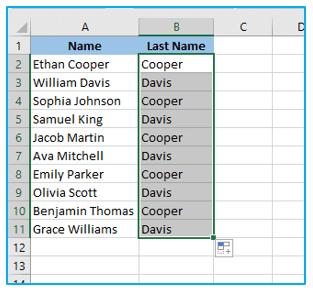
Step 5: Select the symbol for AutoFill Options. Toggle “Flash Fill” on.
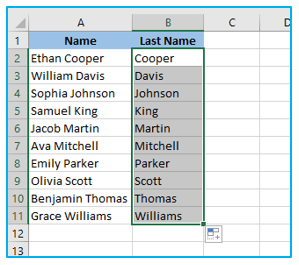
The outcome you get from this will probably be the last names in each column.
Though Flash Fill might not always function, I say “likely.” It might not always be able to do that because it relies on being able to recognize a pattern. Or occasionally, the pattern it discerns might not be the correct one.
You can arrange the data based on last names once you have a column with all the last names in it.
5. Using Power Query, dynamically sort by last name and extract
The Power Query tool in Excel will be used in the final technique to automatically order the last names. Let’s examine its operation.
Let’s say you have the names information listed below.
The steps to sort by last name using Power Query are described below:
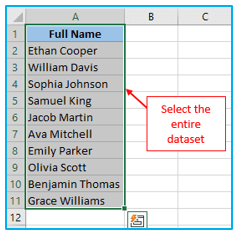
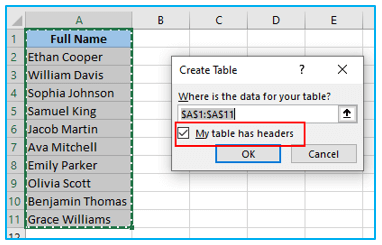
Step 1: Choose the whole dataset first.
Step 2: The keyboard’s Control + T keys together. After that, select the box next to “My table has headers” in the “Create Table” window and click OK.
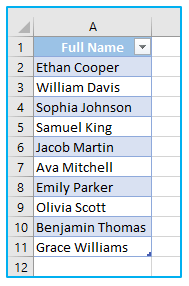
You will therefore receive the information as a table that looks like this.
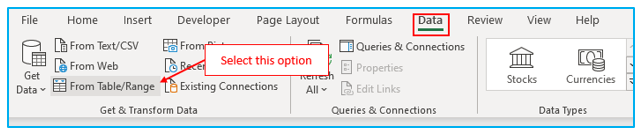
Step 3: Next, pick “From Table/Range” from the “Get & Transform Data” section on the “Data” tab.
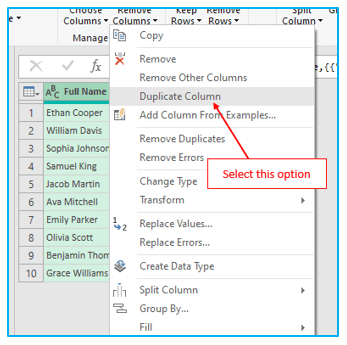
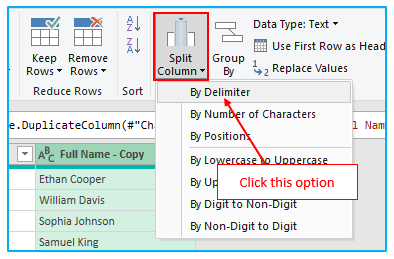
Step 4: You will consequently see the “Power Query Editor” interface. Right-click the first column in this box and choose “Duplicate Column”.
Step 5: Then select “Split Column” under “Transform” from the list. Select “By Delimiter” from the drop-down option.
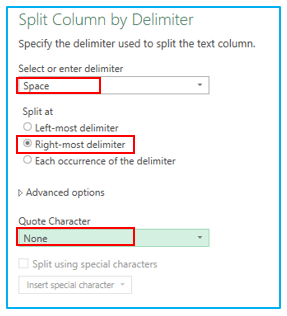
Step 6: The “Split Column by Delimiter” box will then appear. Keep these choices as they are in the picture below and click OK.
The last names will then be displayed in a new section similar to this.
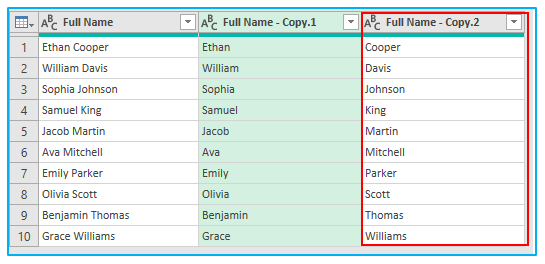
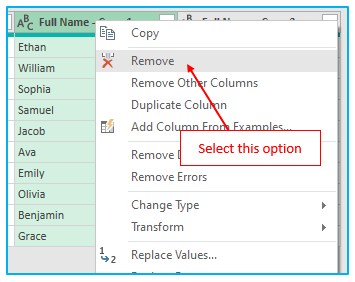
Step 7: To remove the second column heading, right-click on it and select “Remove.”
Step 8: After that, choose “Sort Ascending” by clicking on the heading arrow of the “Full Name- Copy.2” column.

Step 9: At last, click “Close & Load To” underneath the “Home” option.
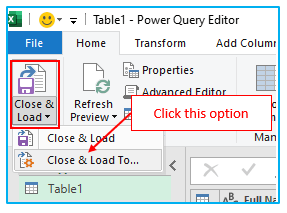
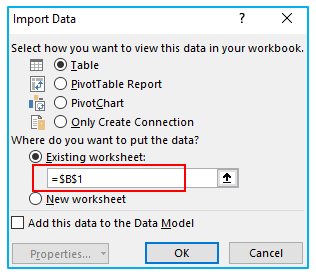
Step 10: Therefore, in the “Import Data” dialogue box, choose the place to store the data and then click OK.
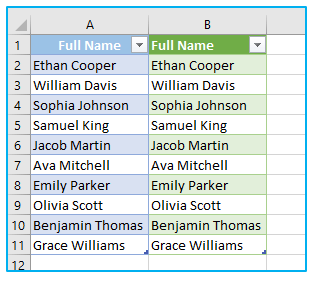
The names will then appear alongside the initial dataset, sorted by last names. Here, all last name are sorted by alphabetically.
6. Additional Advice
- The Flash Fill technique may not always be successful because it relies on pattern recognition. If this issue occurs, replicate the desired outcome in one or two additional cells.
- Make sure there are no extra spaces in your initial dataset. If not, it will go back to a vacant cell.
Application of Alphabetize by last name in Excel
- Contact Lists: Alphabetize contact lists by last name in Excel to ensure that entries are easy to find and access, making communication more efficient.
- Employee Directories: Sort employee directories alphabetically by last name to streamline HR processes and facilitate quick lookups of personnel information.
- Student Rosters: Organize student rosters by last name to improve classroom management and simplify administrative tasks like attendance tracking and grade recording.
- Client Databases: Arrange client databases alphabetically by last name to enhance customer service, allowing for faster retrieval of client information during interactions.
- Event Registrations: Manage event registration lists by sorting attendees by last name, ensuring orderly check-ins and facilitating smooth event operations.
- Membership Lists: Alphabetize membership lists by last name to improve the organization of club or association records, making member management more efficient.
For ready-to-use Dashboard Templates:
