Excel Camera Tool revolutionizes the way you present data in Excel, offering dynamic and customizable snapshots of your spreadsheets. With Excel Camera Tool, you can capture specific ranges or charts and place them anywhere in your workbook, creating visually appealing and interactive reports. Say goodbye to static screenshots and hello to flexibility with this versatile feature. Whether you’re creating dashboards, presentations, or financial reports, Excel Camera Tool empowers you to showcase your data with precision and creativity. Take control of your data visualization and reporting tasks by leveraging the intuitive capabilities of Excel Camera Tool. With just a few clicks, you can effortlessly create dynamic snapshots that update in real-time with changes to your underlying data. Embrace the power of Excel Camera Tool and elevate your spreadsheet presentations to new heights of professionalism and impact.
This Tutorial Covers:
- What is Excel’s Camera Tool
- Getting Access to Excel Camera Tool
- Using Excel Camera Tool
- Samples of When to Use the Excel Camera Tool
- Example 1- Adding In-Cell Charts to Your Dashboard
- Example 2- Adding Data Tables In a Dashboard
- Example 3- Monitoring Important Cells
1. What is Excel’s Camera Tool?
One of Excel’s less well-known features is the camera tool. You can use this tool to snap a photo of the data set (range, table, chart, etc.). Any changes made to the source data set are then mirrored in the picture that the camera took. It can be used to all of the worksheet’s several sheets. The tools included with the camera can be used to format the copied image as well as change its proportions. Also, they can be copied and pasted into Word and PowerPoint documents, respectively.
2. Getting Access to Excel Camera Tool:
By default, the Excel Toolbar does not contain the camera tool.
How to add camera tool in excel is shown below:
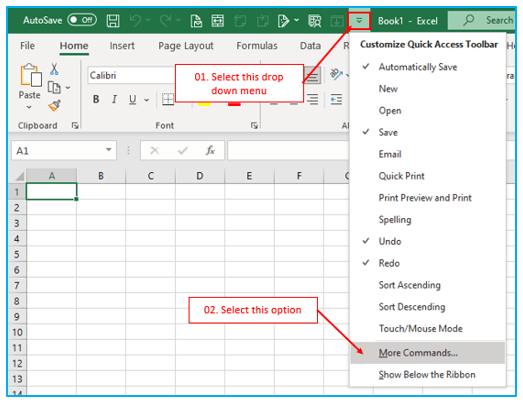
Step 1: In the ribbon, click the “QAT” drop down menu and select “More Commands”.
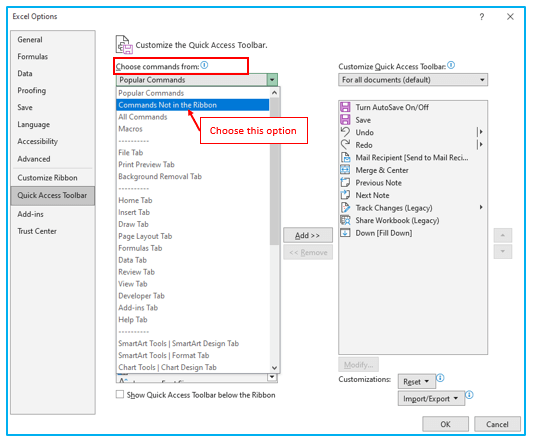
Step 2: Select “Commands not in the Ribbon” from the “Choose commands from” drop-down menu in the “Excel Options” window box.
Step 3: Choose “Camera” from the dropdown list of commands not available on the ribbon. Following that, select “OK” after selecting “Add” to add the “Camera” command to the right command list.
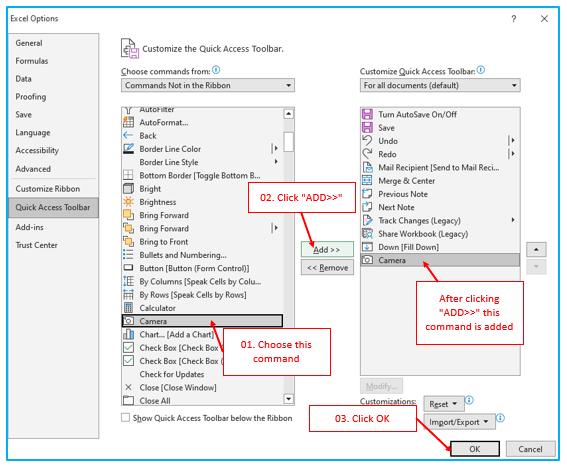
The Camera feature is now accessible from the Excel Quick Access Toolbar.

3. Using Excel Camera Tool:
The camera can be used to produce an image of the data set. After that, the image will be updated in sync with any data updates.
The steps to use Excel Camera tool are described below:
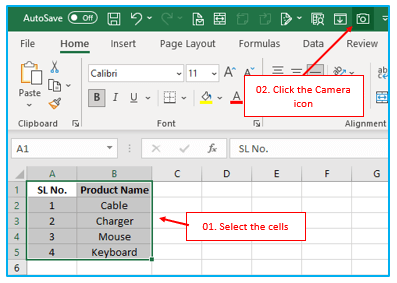
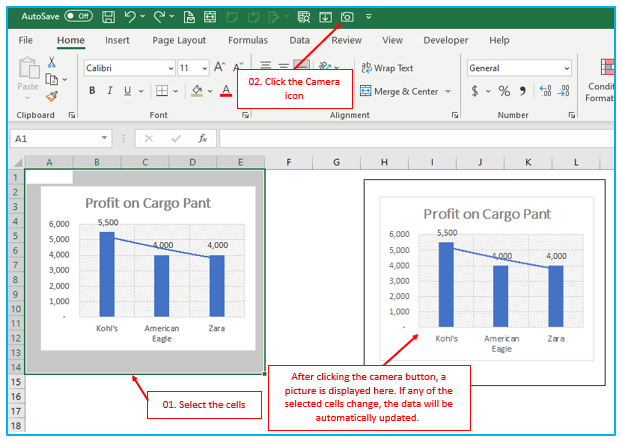
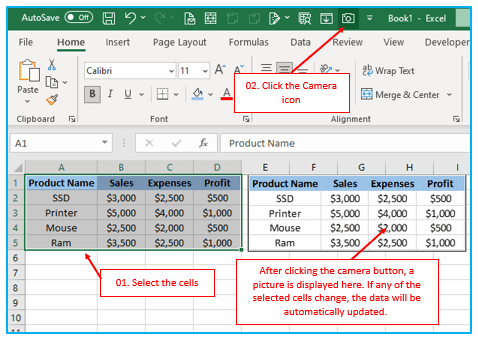
Step 1: Select the datasheet section you want to take a picture of, then select the “Camera” button.
Step 2: The image will now appear wherever you click on the sheet where you wish to insert it, as demonstrated in the screenshot below.
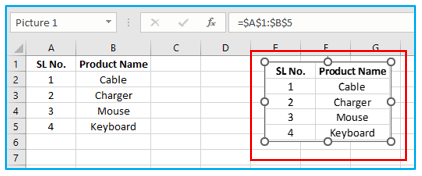
Step 3: As you can see, the image of the data that was recorded has been added (similar to a screenshot). if you alter any information from the initial data set. When the source data changes, the data in the image will also immediately change, as seen in the screenshot below.
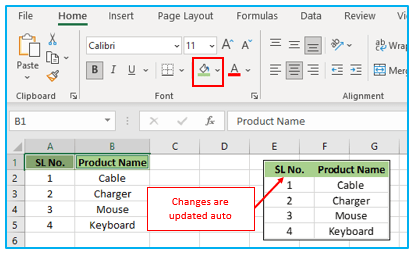
Similar to a live stream, almost. A change you make to the data set is immediately visible in the image.
Additionally, the data and picture do not have to be in the same worksheet. It doesn’t matter where you put it in the worksheet; it will still function.
4. Samples of When to Use the Excel Camera Tool:
The Excel Camera Function is useful in a variety of circumstances.
Here, I’ve provided some encouraging instances of how to use a camera tool to insert live pictures into your spreadsheet.
-
Example 1- Adding In-Cell Charts to Your Dashboard:
Although I love in-cell charts, adding them to the interface is their most challenging aspect. I therefore make a live image of them using a camera tool and add it to the dashboards.
I find that this technique is very helpful because I can adjust the chart’s size.
-
Example 2- Adding Data Tables In a Dashboard:
Additionally, it can be used to incorporate real-time images of data tables. On our interface, data tables can occasionally take up a great deal of space. Our dashboards can include a real-time snapshot of the info.
Depending on the available area in the dashboard, you can adjust the size of the data table.
-
Example 3- Monitoring Important Cells:
Let’s say you have some significant dashboard-related cells. You want to keep an eye on all the cells, which are spread across various spreadsheets. The simplest method to accomplish this is to simply make live images of all crucial cells and place them in a single worksheet or your primary dashboard sheet.
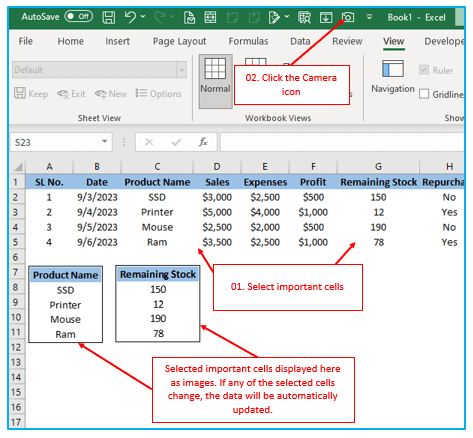
The greatest part of this is that a user cannot alter these live images.
This camera tool is really good. Simply choose a range, then click the location where you want to paste the picture. That’s it, indeed. If you don’t use shortcut keys, it will be much quicker even when compared to the paste special option for pasting images.
Application of Excel Camera Tool
- Dynamic Reports: Use the Excel Camera Tool to create dynamic reports by capturing specific ranges or charts and placing them elsewhere in the workbook, ensuring that your reports update automatically with changes to the underlying data.
- Dashboard Creation: Build interactive dashboards by capturing key data visualizations with the Excel Camera Tool and arranging them on a single sheet for easy monitoring and analysis.
- Presentation Enhancement: Improve the visual appeal of presentations or slideshows by inserting live snapshots of Excel data using the Camera Tool, ensuring that your audience sees the latest information.
- Comparative Analysis: Compare multiple sets of data by capturing snapshots with the Excel Camera Tool and arranging them side by side for easy comparison and analysis.
- Data Sharing: Share specific sections of your Excel workbook with colleagues or stakeholders by capturing snapshots with the Excel Camera Tool and pasting them into emails, documents, or presentations.
- Data Validation: Validate data entries by capturing snapshots of input ranges with the Excel Camera Tool and comparing them to reference data, allowing for quick visual verification.
For ready-to-use Dashboard Templates:
