Create and Install Excel Add In to revolutionize your Excel experience, elevating the functionality and efficiency of your spreadsheets. These custom add-ins unlock new potentials, from automating repetitive tasks to integrating with external data sources and offering advanced data visualization tools. By mastering the creation and installation of Excel add-ins, you can tailor Excel to meet specific business needs, ensuring your workflows are more streamlined and your data analysis more powerful. Embrace the transformative power of Excel add-ins to take your productivity and data management to new heights.
This Content Covers:
1.1 Set the code for Excel Add-in using VBA
1.2 Save and Install the Add-in
1.3 Bring the Add-in to Excel Quick Access Toolbar
1. How to Create and Install Excel Add-in in Excel?
To construct an add-in and make it accessible through the QAT, there are three stages.
1.1 Set the code for Excel Add-in using VBA
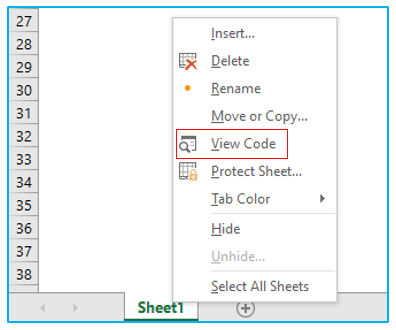
Step 1: Right-click on the worksheet name and select View Code.
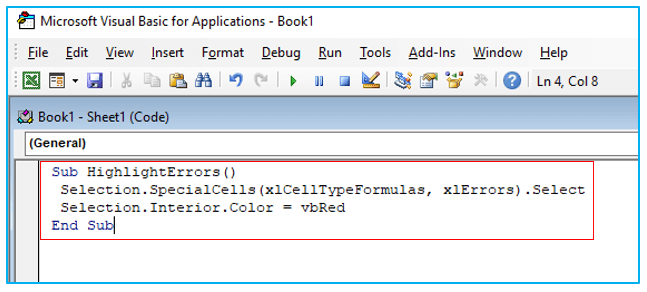
Step 2: Insert this code inside the VBA Script box and close the box.
Sub HighlightErrors()
Selection.SpecialCells(xlCellTypeFormulas, xlErrors).Select
Selection.Interior.Color = vbRed
End Sub
1.2 Save and Install the Add-in
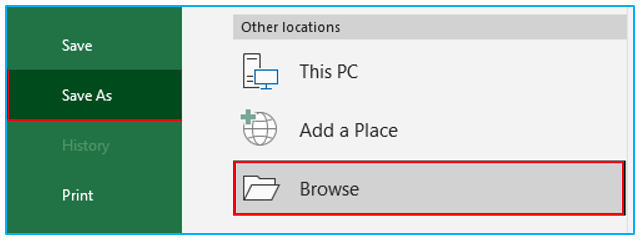
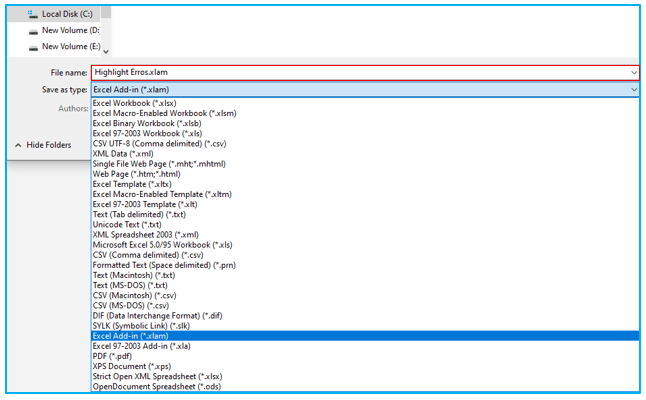
Step 1: Go to File>>Save As>>Browse.
Step 2: Select a location where you want to save the add-in. Give the add-in file a name and save the file as an .xlam file.
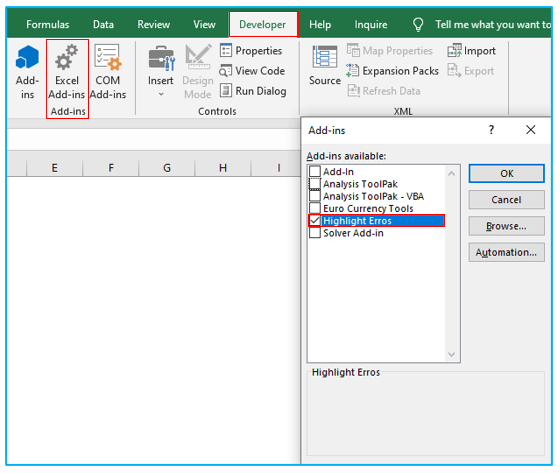
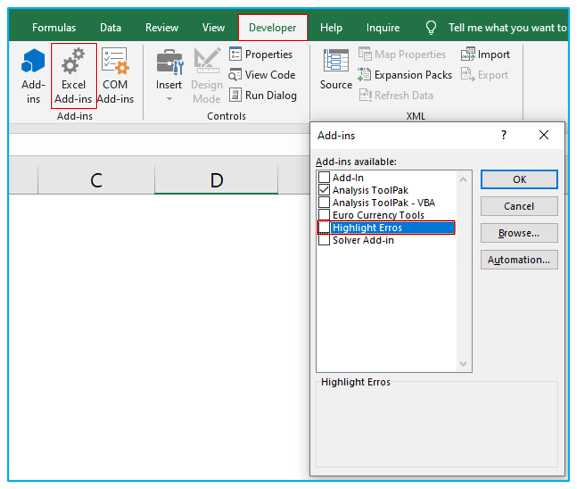
Step 3: Now open a new workbook and go to Developer>>Excel Add-ins to open Add-ins dialogue box. Select the add-in you just created and click OK. If you don’t see your add-in in the list then click on Browse and select the file manually from where you saved it.
1.3 Bring the Add-in to Excel Quick Access Toolbar
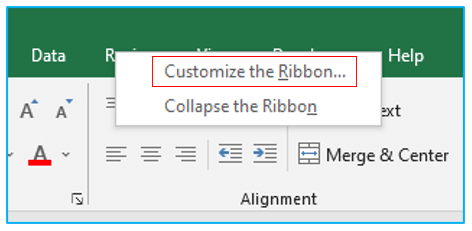
Step 1: Right-click on any of the ribbon tabs and select Customize the Ribbon option.
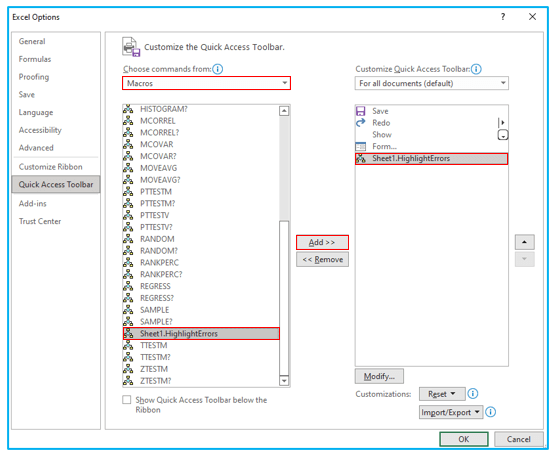
Step 2: Choose Macros from Choose Commands From box. Scroll down and select your add-in and click on Add to add this to the list on the right. Click OK.
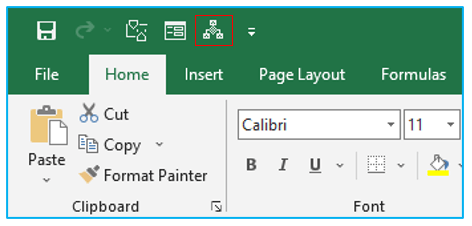
Step 3: Now you can see the add-in showing in Excel’s quick access toolbar.
2. How to Use the Add-in?
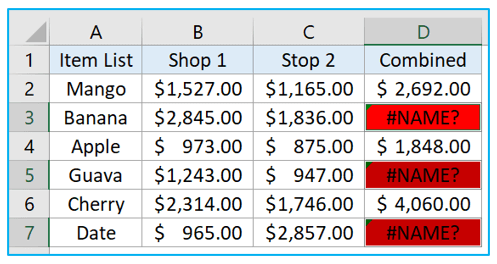
Step 1: Select the dataset and click on the macro icon from quick access toolbar.
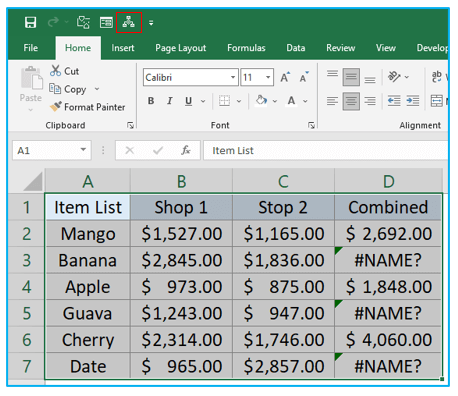
Step 2: This will highlight all of the incorrect cells in red. Since you have the add-in enabled, you can use this macro in any worksheet.
3. How to Remove the Add-in?
Step 1: Go to Developer>>Excel Add-ins. From the Add-ins dialogue box uncheck the add-in and click OK. Now close your Excel file and go to the folder in your device where you saved your add-in. Delete the add-in from there. Now when you restart Excel the add-in will be gone.
Application of Create and Install Excel Add In
- Automation of Repetitive Tasks: Develop add-ins that automate repetitive tasks and complex calculations, saving time and reducing errors for users across multiple spreadsheets.
- Custom Functions and Formulas: Create add-ins that introduce custom functions and formulas not available in standard Excel, catering to specific business or research needs.
- Integration with External Data Sources: Design add-ins that facilitate seamless integration with external data sources, allowing for real-time data updates and analysis within Excel.
- Enhanced Data Visualization Tools: Develop add-ins that offer advanced data visualization tools beyond Excel’s default charts and graphs, providing more insights through custom dashboards and reports.
- Workflow and Process Enhancements: Create add-ins that streamline workflow and processes, such as data validation, entry forms, or financial modeling, enhancing productivity and data integrity.
- Collaboration and Sharing: Install shared add-ins across teams or departments to ensure consistency in data analysis methods, reporting styles, and computational formulas, promoting collaboration and standardization.
For ready-to-use Dashboard Templates:
