AutoFit Column Width in Excel is an essential feature for anyone looking to improve the readability and presentation of their spreadsheets. By enabling this function, you ensure that each column adjusts to the optimal width, accommodating all your data without the need for manual resizing. This not only saves time but also enhances the overall appearance of your documents, making them more professional and easier to navigate. Implement AutoFit Column Width today to transform cluttered sheets into organized, accessible, and visually appealing reports, setting a new standard for your data management practices.
Potential uses for the AutoFit Column Width feature in Excel
- Making sure all columns in a table are uniform in width for a more polished look
- Adjusting column widths to fit the length of text or numbers to prevent data from being cut off
- Formatting spreadsheets for printing, ensuring that all data is easily visible on the printed page
This Tutorial Covers:
- How to AutoFit Column Width in Excel?
- Basics of Excel Column Width
- Change the Column Width using Mouse
- Set the Column Width to a Certain Number
- Set the Column Width to Inches
- Excel AutoFit Column Width with Shortcut1.
1. How to AutoFit Column Width in Excel?
Adjusting the width of a column in Excel is a common task. It is one of the regular tasks that you perform on a daily basis when creating reports, summary tables, or dashboards. You could indeed manually change their width by dragging the column header’s border. However, doing so on a regular basis can become time-consuming. Let’s take a look at how to automatically adjust column width/autofit in Excel.
2. Basics of Excel Column Width
While you type something into an Excel cell, it will overflow if the text/data size exceeds the column size. AutoFit is an Excel feature that makes it possible to quickly adjust the row height or column width to completely fit the text.
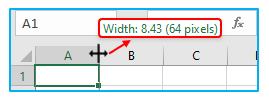
In an Excel spreadsheet, you can specify a column width ranging from 0 to 255, with one unit equal to the width of one character displayed in a cell formatted with the standard font. The default width of all columns on a new worksheet is 8.43 characters, which corresponds to 64 pixels. Once a column width is set to zero (0), the column is hidden.
To see the current width of a column, click the right boundary of the column header, and Excel will show you the width:
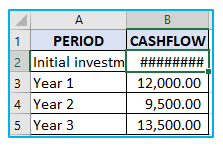
Columns in Excel do not automatically resize as you enter data into them. If a cell’s value is too large to fit in the column, it extends over the column’s border and overlaps the next cell. A text string is cut off at the cell border, and a numerical value is overtaken with a sequence of hash symbols (######).
3. How to Change the Column Width using Mouse?
Let’s assume you have a data set like the one below, where the text pours into the other column as the column width decreases.

The following is how to use the mouse to autofit the column width:
Step 1: Move the mouse cursor to the right edge of the spine header. The cursor changes to an arrow icon on both sides.

Step 2: Drag the right border of the column header until the column is set to the desired width.

Result outlined below:

4. How to Set the Column Width to a Certain Number?
The Excel column width value represents the number of characters you can insert into a cell formatted with the standard font. To digitally resize the columns, perform the following steps:
Option 1:
Step 1: Select one or multiple columns for resizing. Ctrl + A or click the Select All button to select all columns. Here I have selected Column A.

Step 2: Go to the Home tab, within the Cells group, click Format > Column Width.

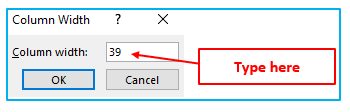
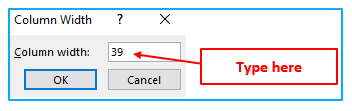
Step 3: In the Column Width box, enter the required number and click OK.
Result outlined below:

Option 2:
Step 1: Select one or multiple columns for resizing. Ctrl + A or click the Select All button to select all columns. Here I have selected Column A.

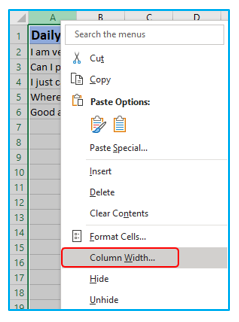
Step 2: Right-click on the selected column(s) and select Column Width from the contextual menu.
Step 3: In the Column Width box, enter the required number and click OK.
Result outlined below:

5. How to Set the Column Width with Inches?
You can specify the column width in inches, centimeters, or millimeters when preparing a worksheet for printing.
The following is the steps to autofit columns excel:
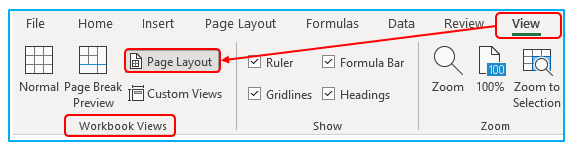
Step 1: Go to the View tab > Workbook Views group and click the Page Layout button to switch to the Page Layout view:
Step 2: Select one or multiple columns for resizing. Then drag the right border of the column header until the column is set to the desired width.
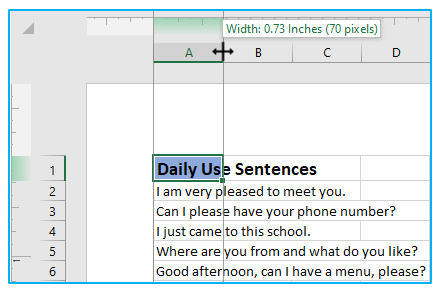
Excel will display the column width in inches as you drag the boundary.
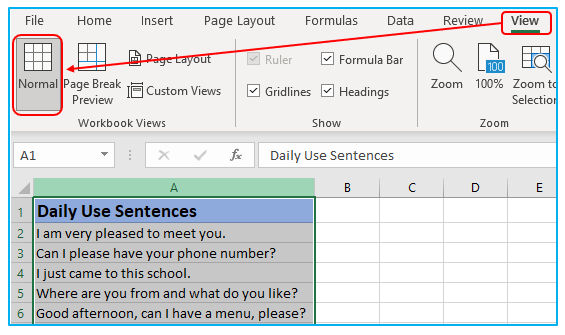
Step 2: When the width is fixed, you may exit the Layout view by clicking the Normal button on the View tab in the Views group in the workbook.
Result are outlined below:

6. Excel AutoFit Column Width with Shortcut
There is a shortcut that you can use to automatically adjust the column widths in Excel so that everything adapts perfectly.
Below is the Excel autofit column width shortcut:
- To Autofit column width shortcut: Press ALT + H + O + I
- The alternative to ALT + H + O + I key is ALT + O + C + A.
- To Autofit row height shortcut: Press ALT + H + O + A
To use the column width shortcut for autofit in Excel, follow the below steps:
Step 1: Select the row or column that you want to autofit

Step 2: Then press Alt + H + O + I
Results are outlined below:

For AutoFit column width to the entire column, we should select the entire column and perform AutoFit task. If not, only selected cells will be set up automatically.
Application of AutoFit Column Width in Excel
- Enhanced Readability: Use AutoFit Column Width in Excel to automatically adjust column sizes, ensuring all data is visible and readable without manual adjustments, enhancing the overall clarity of your spreadsheets.
- Improved Presentation: Apply AutoFit to make your Excel sheets look more professional and organized by eliminating inconsistent column widths, thus improving the aesthetic appeal for presentations and reports.
- Efficient Data Management: Utilize AutoFit to quickly adjust columns to fit the longest entry, saving time and effort in manually resizing columns when adding or updating data.
- Dynamic Data Adjustment: As you update or add new data, AutoFit Column Width can adapt your columns automatically, ensuring that all entries are fully visible and neatly organized.
- Streamlining Bulk Data Import: When importing large sets of data into Excel, use AutoFit to instantly adjust the width of multiple columns, ensuring all imported data is immediately legible without additional formatting.
- Preventing Text Overflow: Prevent text overflow from obscuring adjacent column data by employing AutoFit, which ensures that each column width accommodates its longest piece of data, maintaining the integrity and accessibility of your information.
You may be interested:
