Not Equal To in Excel provides a powerful tool for comparing values and identifying discrepancies within your data. Whether you’re filtering datasets, creating conditional formulas, or conducting data analysis, Not Equal To in Excel offers flexibility and precision in your comparisons. Say goodbye to manual sorting and filtering and hello to efficiency with this versatile operator. From identifying outliers to flagging inconsistencies, Not Equal To in Excel streamlines your workflow, saving you time and effort. Take control of your data analysis tasks and enhance your Excel experience with the robust capabilities of Not Equal To. With just a simple formula or filter, you can easily identify and address disparities in your data, ensuring accuracy and reliability in your analyses. Embrace the convenience and reliability of Not Equal To in Excel and elevate your spreadsheet skills to new heights of productivity and accuracy.
This Tutorial Covers:
- Not Equal to in Excel
- How to Put “Not Equal To” in Excel
- Example 1 – Implementing the “Not Equal To” Operator in Excel
- Example 2 – Using String
- Example 3 – Using IF Statement
- Example 4 – Using the COUNTIF Function
- What You Should Know About Not Equal To in Excel
1. Not Equal To in Excel:
A logical operator in Excel called “not equal to” is used to compare two numerical or textual values. It is written using a pair of angle brackets that point away from one another (much like >). The “not equal to” Excel symbol will result in either of the two possible Boolean values (true or false).
- True signifies that the two values being compared are neither equal nor different.
- False signifies that the two values being compared are identical or equal.
For instance, “=10>5” yields “true” since the integers 10 and 5 are not equal to one another (ignore the double quotation marks).
In the arguments of various Excel functions, the phrase “not equal to” is used. The “not equal to” operator is used to determine whether or not two values are different. However, this operator does not express the size of the difference.
2. How to Put “Not Equal To” in Excel?
Excel Not Equal To operator is quite intuitive and straightforward to use. Let’s look at some instances to better grasp how Excel’s “Not Equal To” Operator functions.
-
Example 1 – Implementing the “Not Equal To ” Operator in Excel:
We’ll demonstrate how to use the Excel Not Equal To the logical operation in this example.
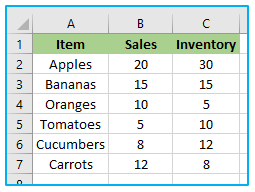
Suppose you run a small business that sells fruits and vegetables. You want to keep track of your daily sales and inventory using an Excel sheet. Below is a table that shows the sales and inventory of fruits and vegetables for a day:
To check if the sales and inventory of each item match, you can use the Not Equal To in Excel. In this case, you want to check if the sales of an item are not equal to its inventory.
The steps to check if the sales of an item are not equal to its inventory using “Not Equal To” operator in Excel are described below:
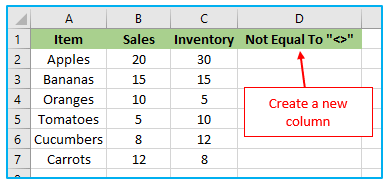
Step 1: Create a new column named, Not Equal To “<>”.
Step 2: Type the following formula in cell D2.
=B2<>C2
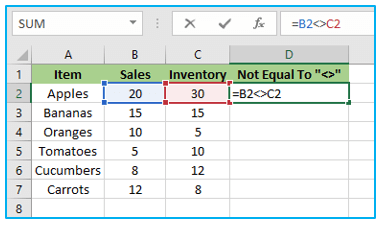
So, as we can see in the above screenshot, we applied the formula as =B2<>C2 here, we can see that in the B2 cell Sales is 20, and in C2 cell Inventory is 30, so the values are not match.
Excel will check if B3 values are not equal to C3, then it returns TRUE or else it will return FALSE.
Step 3: Press Enter key on your keyboard to apply the formula.
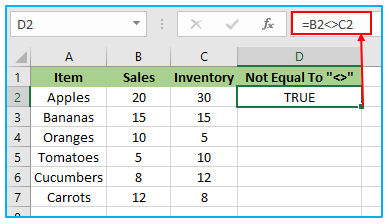
Here in the above screenshot, we can see that Sales is not equal to Inventory, so we will get the output as TRUE, which is shown in the below screenshot.
Step 4: Drag down the formula for the next cell. So, the output will be as below:
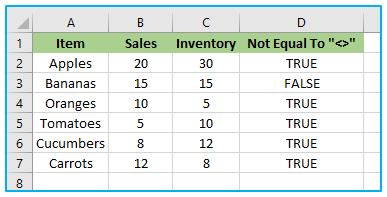
We can see that the formula =B3<>C3; in this case, Sales is equal to Inventory. So, excel will return the output as FALSE, as shown above.
Example 2 – Using String:
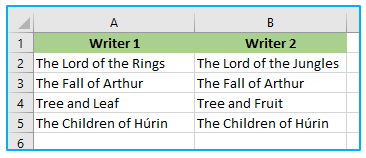
We’ll explore how the Excel not equal to operator behaves with strings in this example. Take a look at the example below, which features the book titles of two different writers.
By doing the procedures listed below, we can verify that the book names of Writers 1 and 2 are identical:
Step 1: First, create a new column called “Does book name different?”.

Step 2: Type the following formula in cell D2.
=A2<>B2

So, the above formula will check for A2 book name is not equal to B2 book name if it is not equal, it will return FALSE or else it will return TRUE.
Step 3: Press Enter key on your keyboard to apply the formula.
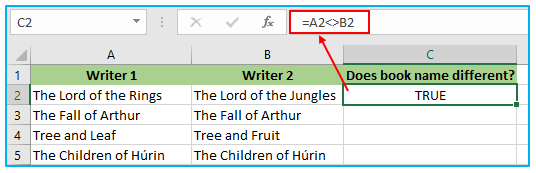
We can see that both the book names are the different and it will return the outcome as TRUE which is shown in the above screenshot.
Step 4: Drag down the formula for the next cell. So, the output will be as below:
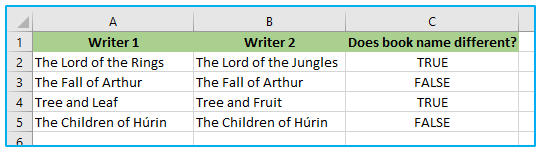
As =A3<>B3, where we can see the A3 book name is equal to the B3 book name, so we will get the output as FALSE which is shown as the output in the above screenshot.
-
Example 3 – Using IF Statement:
We’ll examine how to use the if statement in the Not Equal To operator in this Excel example.
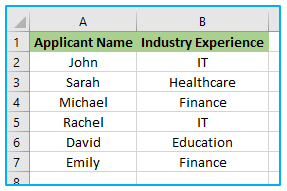
Suppose you have a list of job applicants and you want to filter out all applicants who do not have experience working in a specific industry.
The following example table is shown below:
The steps to filter out all applicants who do not have experience in the IT industry using “Not Equal To” operator with IF statement in Excel are described below:
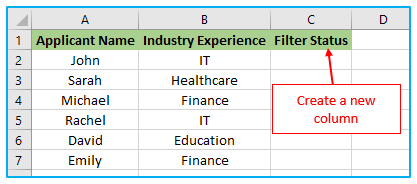
Step 1: Create a new column as Filter Status.
Step 2: Apply the following formula in cell C2.
=IF(B2<>”IT”,”Remove”,”Keep”)
This formula checks if the value in column B (Industry Experience) is not equal to “IT” for each row. If the applicant does not have IT experience, it returns the text “Remove”. Otherwise, it returns “Keep”. The resulting table would look like this:
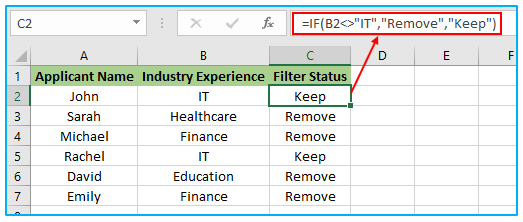
As you can see, using the “Not Equal To” operator in Excel has allowed us to quickly and easily filter out all applicants who do not have IT experience. By using this operator in your own data analysis tasks, you can similarly compare strings and spot patterns in your data that can help inform your decision-making.
-
Example 4 – Using the COUNTIF Function:
We’ll explore how the COUNTIF Function operates in the Not Equal To operator in this Excel example.
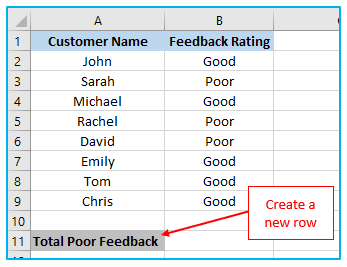
Take a look at the example below, which displays customer feedback.

The procedures listed below will help us determine how many consumers have sent poor feedback:
Step 1: Add a new row with the title “Total Poor Feedback.”
Step 2: Apply the COUNTIF formula as below:
=COUNTIF(B2:B9,”<>Good”)
This formula uses the “Not Equal To” operator (“<>”) to check each value in the “Feedback” column (column B) and counts the number of values that are not equal to “Good”.
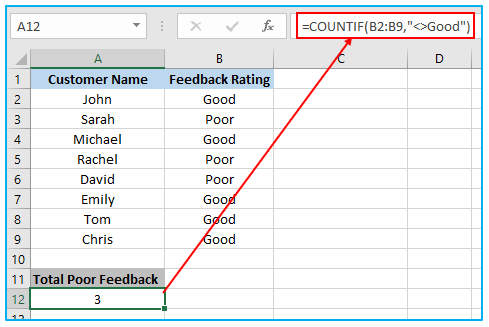
As you can see, by using the “Not Equal To” operator with the COUNTIF function, we were able to count the total number of poor feedbacks.
3. What You Should Know About Not Equal To in Excel?
- Logical operators are frequently employed in conditional formatting in Microsoft Excel, which will produce the best results.
- The Not Equal To operator always needs two values to determine if a value is “TRUE” or “FALSE.”
When employing the Not Equal To on Excel, be sure to provide the correct condition statement; otherwise, we will receive an incorrect result.
Application of Not Equal To in Excel
- Data Filtering: Exclude specific values from datasets by using the “Not Equal To” operator in Excel filters, facilitating targeted data analysis.
- Conditional Formatting: Apply conditional formatting rules to cells based on criteria where values are not equal to a specified reference, highlighting discrepancies or outliers.
- Formula Criteria: Use the “Not Equal To” operator in Excel formulas to create conditions for calculations or logical tests, enabling dynamic data processing.
- Data Validation: Set up data validation rules to restrict entries in cells where values are not equal to certain criteria, ensuring data integrity and consistency.
- Comparative Analysis: Compare datasets or columns by filtering or highlighting rows where values are not equal, facilitating comparative analysis and identification of differences.
- Error Identification: Identify errors or inconsistencies in datasets by applying filters or formulas to highlight cells where values are not equal to expected or reference values, aiding in data quality assessment.
For ready-to-use Dashboard Templates:
