Introduction to Sending Emails from Excel
Why Use Excel for Email Automation
Microsoft Excel is more than just a spreadsheet tool—it’s a powerful way to manage and organize large lists of recipients for email campaigns. Whether you’re sending internal communications, customer notifications, or newsletters, automating email distribution directly from an Excel file can save hours of manual effort. When you send a mass email from Excel, you not only reduce time but also maintain accuracy by eliminating repetitive copy-paste errors. Excel’s structured rows and columns allow you to manage names, email addresses, and custom message content efficiently, preparing the foundation for bulk or personalized emailing with tools like Microsoft Outlook or other email clients.
Common Use Cases for Bulk Emailing from Spreadsheets
Bulk emailing directly from a spreadsheet is widely used across industries for HR notifications, event invitations, client communications, and marketing promotions. For example, companies use a mass email from Excel to send pay slips, policy updates, or customer satisfaction surveys. Educators send class updates to parents or students. In all these scenarios, sending multiple emails in a personalized format from a centralized Excel sheet streamlines communication. When combined with mail merge in Outlook or automated scripts, these processes are not only scalable but also more professional, reducing the risk of errors and enabling greater engagement through tailored messaging.
Preparing the Excel Spreadsheet for Emailing
Structuring Your Excel Sheet for Email Delivery
To effectively send an email from Excel, your spreadsheet should be carefully structured. Start by including columns for each email component—recipient email address, name, subject line, and personalized message content. This format enables you to send a personalized email to each recipient based on the row’s data. Include clear column headers such as “Email”, “FirstName”, “Subject”, and “MessageBody”. This structured format is essential when using the mail merge feature in Outlook or when coding automated email message scripts in VBA. By setting up the Excel file properly from the start, you ensure a smooth, error-free process during mail merge or automation.
Organizing the Recipient Email List and Template Fields
A well-organized recipient list is key to sending personalized emails efficiently. Your Excel sheet should include a clean list of recipient names, email addresses, and any other fields you want to include in your message template. This data acts as the source for using the mail merge in Outlook, where each field is dynamically replaced in the email template. For example, “Dear <<FirstName>>” will automatically pull the correct name for each email. To ensure delivery success, avoid spaces or special characters in column headers, and validate the email addresses. This structure is vital when sending a mass email from Excel to multiple recipients with custom messages.
Setting Up Mail Merge in Outlook Using Excel
Steps to Perform Mail Merge in Outlook with Excel
Mail merge in Outlook allows users to send multiple personalized emails using data from an Excel spreadsheet. To start, create your Excel sheet with recipient data, and open Microsoft Word to draft your message. Use the “Mailings” tab to link your Excel data and insert fields such as FirstName or Email. Then select “Finish & Merge” and choose “Send Email Messages.” This method enables you to send a personalized message to each recipient without copying and pasting. Using the mail merge ensures consistent formatting, maintains data integrity, and helps automate bulk communication efficiently. It’s ideal for sending newsletters, appointment reminders, or internal updates.
Using the Mail Merge Template to Personalize Each Email
The key to effective communication is personalization. Using the mail merge template, you can customize each email’s greeting, message body, and even subject line. For instance, inserting fields like <<FirstName>>, <<EventDate>>, or <<InvoiceAmount>> into your template allows each email to be uniquely tailored to the recipient. This boosts engagement and professionalism. A mass email from Excel doesn’t have to be generic—mail merge in Outlook empowers you to speak directly to each contact. Once set up, the template and data source can be reused for future campaigns, making it a powerful tool for HR teams, educators, marketers, and more.
Automating Email Sending from Excel
Using Excel and Outlook VBA to Send Bulk Emails
If you need more control or customization than what mail merge offers, using Excel VBA to send bulk emails is an excellent solution. With a simple macro, you can loop through rows of data in your spreadsheet and send a personalized message to each recipient via Outlook. This approach is ideal for sending a mass email from Excel with advanced logic, attachments, or formatting. The VBA script accesses Outlook directly, allowing full automation. This method is best for users familiar with basic coding and provides great flexibility in managing different email scenarios—all while eliminating the need to manually send each email.
How to Send a Personalized Email to Each Recipient
Personalization is crucial in today’s communication landscape. To send a personalized email from Excel, start with a structured worksheet containing each recipient’s details. Then use either the mail merge feature or a custom VBA script to insert these details into the email dynamically. For example, you might start your message with “Hello John,” by inserting the first name from Excel into the body. This tailored approach shows attention to detail and significantly improves response rates. Whether you’re using the mail merge in Outlook or writing a VBA macro, the goal is the same: send relevant, meaningful messages that connect with your audience.
Best Practices for Bulk Emailing
Personalization Tips to Improve Email Engagement
Sending a personalized email to each recipient from Excel not only enhances engagement but also builds trust. Use the recipient’s name, mention relevant events, or highlight specific data points. Even simple customization like “Hi Sarah, here’s your account update” is more impactful than generic messages. Tools like mail merge in Outlook make this easy by pulling data from Excel and inserting it into a message template. Ensure your content is professional, concise, and tailored. Keep subject lines clear and specific. The more relevant your message, the better the open and response rates—especially when managing a mass email from Excel.
Avoiding Spam Filters and Ensuring Deliverability
While sending bulk emails, it’s important to follow email or Gmail deliverability best practices. Avoid spam trigger words (like “Free”, “Buy Now”), don’t include too many links, and personalize your messages to pass filters. Ensure all recipients have opted-in to receive emails. When using the mail merge in Outlook or VBA, stagger sending if dealing with large volumes to avoid throttling. Also, double-check the “From” address and subject line for clarity and consistency. Sending a mass email from Excel can be highly effective, but only if your emails reach the inbox. Test a few messages before sending to your full list.
Troubleshooting and Optimization
Common Issues When Sending Emails from Excel
While sending emails from Excel is powerful, users often encounter issues such as incorrect email formatting, missing fields, or Outlook security prompts. If you’re using mail merge in Outlook, ensure your Excel file is saved and closed before starting. If using VBA, make sure Outlook is referenced properly in the code. Email addresses must be valid to avoid delivery failures. Also, check for typos in column headers or broken macros. A mass email from Excel relies heavily on correct formatting and setup. Regular testing and a clean Excel file help prevent most errors and ensure smooth operation every time.
Automate Your Email Workflow for Efficiency
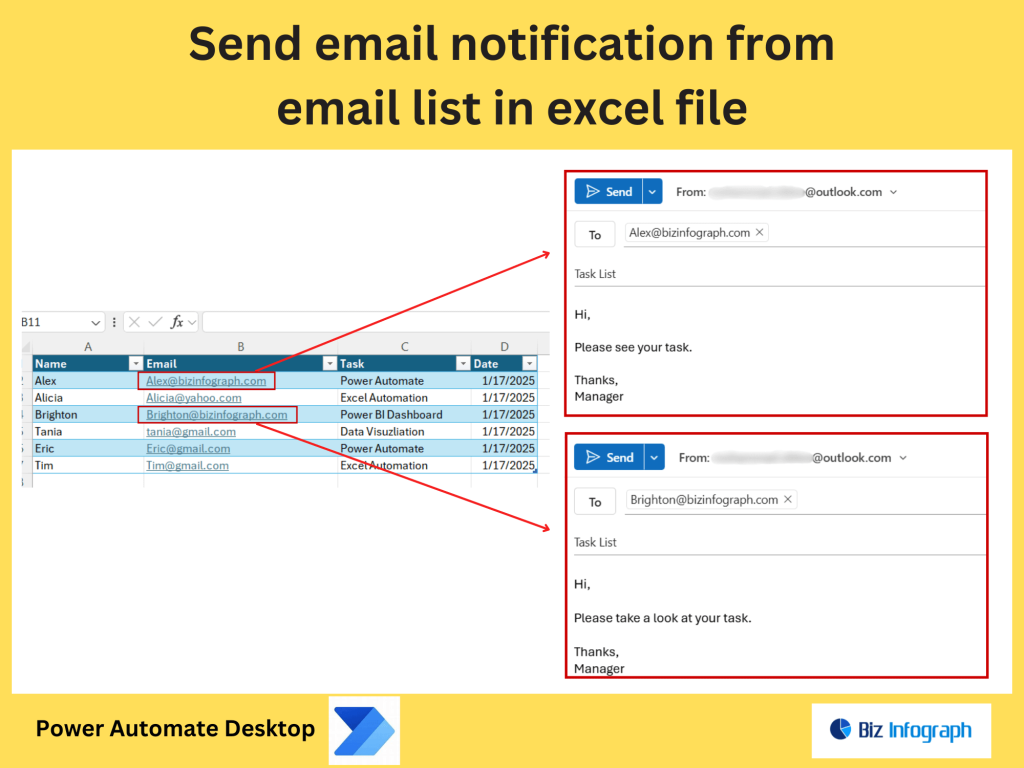
To truly streamline your workflow, consider fully automating the process of email generation from Excel. Whether you use mail merge in Outlook or a VBA macro, integrating these steps into your regular reporting or notification tasks saves time and boosts efficiency. You can even schedule Excel tasks using Windows Task Scheduler or combine with Power Automate for more advanced scenarios. With automation, you eliminate manual processes like copying email addresses or composing each message. The result: faster communication, better consistency, and more time for higher-level tasks. Sending a personalized, professional email becomes a seamless part of your Excel-driven workflow.
To send a newsletter, you can manually paste an existing list with columns like first name and contact information, configure a reminder, and ensure the process is not repetitive by using a seamless platform for better productivity.
For ready-to-use Dashboard Templates: